You may be preparing for a long time to start a WordPress blog to share something or some good ideas, that’s indeed a very popular thing and a good idea in itself! However, you don’t know how or where to start your blog as a beginner or not good at web knowledge.
Who was not a beginner or a newbie ever? yes, I was a newbie, and I am a newbie to any new knowledge, but I learned how to start a WordPress blog, and even build a website by myself, There is a lot of information displayed on the web, you may search to learn too and get what you want, the problem is so much info, which one is good, which one is suited for a beginner?
I combined that info and my own knowledge and wrote this post to show you the easiest way to create your own blog. Follow me, and start your own blog today.
I need to introduce something about the Blog or other info to the visitor of this article, the purpose to make you a better starting. someone may hunger for more knowledge, but someone may not like that, if you don’t like reading this info, you can skip these and go to step 1 directly.
What is a Blog
You can hear and see people always say blog, blog, blog, but do you know why it is called ‘Blog‘? Most people don’t know the reason, the ‘blog’ is short for ‘weblog’ -> weblog, Weblog was coined by Jorn Barger in 1997, you must know the web and log, and have some thinking in your brain now.
Yes, the weblog is also for recording something on the web like logs. the difference is weblog is for people to write or share something online, such as recording their life, work, knowledge, and more, it is more like an online diary or journal.
However, ‘weblog’ was jokingly broken as the phrase ‘we blog’ by Peter Merholz. Many people have started to use blogs in their posts and articles, and the word ‘blog’ gained unexpected popularity and has become an Industry term today.
What Purposes Can Be Used For a Blog?
To start a WordPress blog, you should have your purpose, the simple one as I mentioned above is building a blog for a diary to write something about life or work. Nowadays, the blog can be used for more purposes as below:
- of course, still as a personal diary to record people’s life;
- for sharing something interesting, pieces of knowledge, tutorials, and more;
- journal of so companies or big websites;
- for promoting business, brands, and products;
- for writing posts and articles to get some revenue, like affiliate marketing…
- …… anything you like with your great ideas.
Although there are many mediums on the web, most of them are agencies or companies, In fact, the blog also plays the role of medium, but it is more personally used to share and spread a lot of personal knowledge and information.
Why WordPress
First, you need to know the WordPress we are saying is wordpress.org, not wordpress.com. The blog is very popular, everyone knows that, but there are also many methods for people to start their blog:
- creating a space or blog based on some blogging websites/platforms, like Blogger;
- starting a personal blog website, you can use WordPress or other content management systems(CMS).
With the development of the Internet and technology, it has become easier to build a website, and more and more people choose this way to start their blogs, this not only does not need to be restricted by the rules of platforms, but it is more dedicated, moreover, a personal blog website may get more traffic on Google and other search engines.
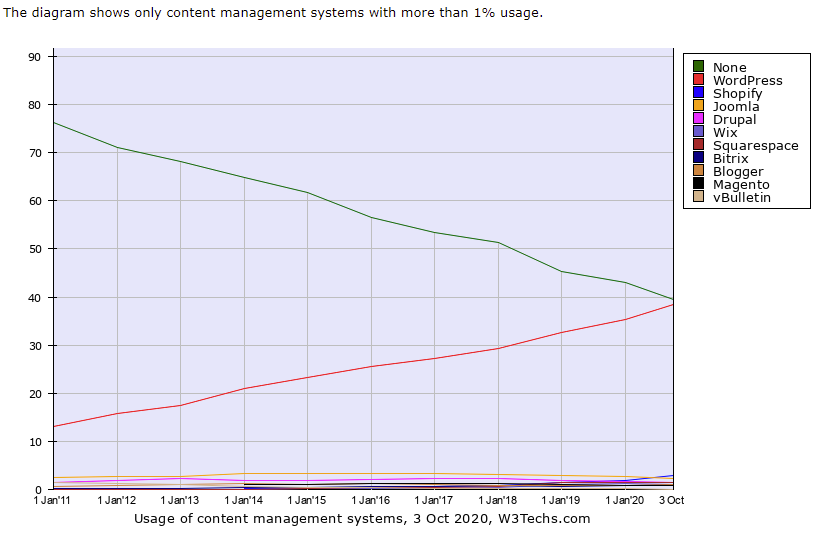
Today, what I want to say about starting a blog is also build your own WordPress website. There are so many methods, tools, or platforms to create a new website too, however, I only recommend you choose WordPress to start a blog, Why? WordPress is a professional BLOG system, I can say it was born for blogging, but not yet, it has more advantages besides:
- It is Free, WordPress is completely open-source software(content management system), and you can download, install, even modify, and use it anywhere and anytime without paying one penny, What you need are web hosting and a domain.
- Very friendly and easy to install and use, You don’t need any skill in coding and web development, what you need to do is click.
- Simple and Flexible, the software size of WordPress is very lightweight, You can run the blog website with good performance even on a small server, and it offers plenty of plugins and themes, You can add many features and functionality with beautiful design as you want.
- You own your all data, The website is hosted on a web server, which means you can back up and migrate or save the whole data of your blog, you own your blog really.
- You can find solutions easily when you encounter issues, There are lots of resources, articles, videos and forums, tutorials, since there are so many people who use WordPress, Once you encounter some issues, you will get a solution very fast by searching on the web, you never worry about that, cause you are really not alone, more than 1/3 of the websites are created with WordPress in the world.
The advantages of WordPress are far more than I listed, but I think some people(maybe including you) may want to try and start a WordPress blog now.
Step 1. Choose a domain name – Start a WordPress Blog
You will need a domain name to start a WordPress blog, A domain name is not only a name, it is an internet address of a website, like something xxx.com, xxx.net, xxx.org, and so on, the visitors will find you through your domain name. You can use any name/phrase/words for your domain and search the domain name with registrars to check if that is available.
Buy Domain name from Registrars
There are so many registrars where you can buy your domain name, it may be hard for you to find a good provider, please check our article 5 Top Best Domain Name Registrars Comparison to learn more info about domain name and find where is the best place to buy a domain name. if you don’t want to read that article, to save your time, I recommend you to choose NameSilo to register your domain name, It is cheap and safe, with no hidden fees.
Buy Domain name from hosting providers
There’s not much distinction between domain name registrars and hosting providers, you can register a domain name from providers too. most of the hosting providers offer one-year free domain name if you buy their hosting, like Chemicloud. Please see the table to see the providers who offer free domain names.
NameSilo
I have more than 2 domain names, for easy management, I register all domain names on NameSilo, there’s nothing I need to worry about. Let’s see how to register a domain name through NameSilo,
1. Go to NameSilo:
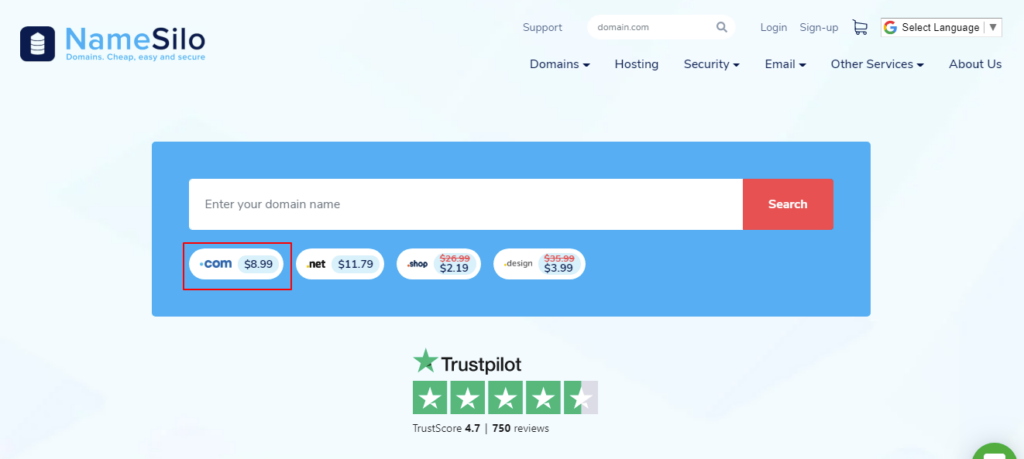
2. Enter your domain name in the search form, if the name is not registered, congratulations! you can buy it directly, the price is always USD8.99/year, it will be lower when in some shopping season.
3. Add the name to the cart and click go to checkout, you can still get 1 dollar off by applying the below coupon code if you buy a domain name from NameSilo for the first time.
Apply NameSilo coupon: NS01OFF to get USD$1 off Today!
4. In the “current cart contents”, you will see the price including all other fees, The price you see will be how much you need to pay, once you put the coupon code, you will see the discount available.
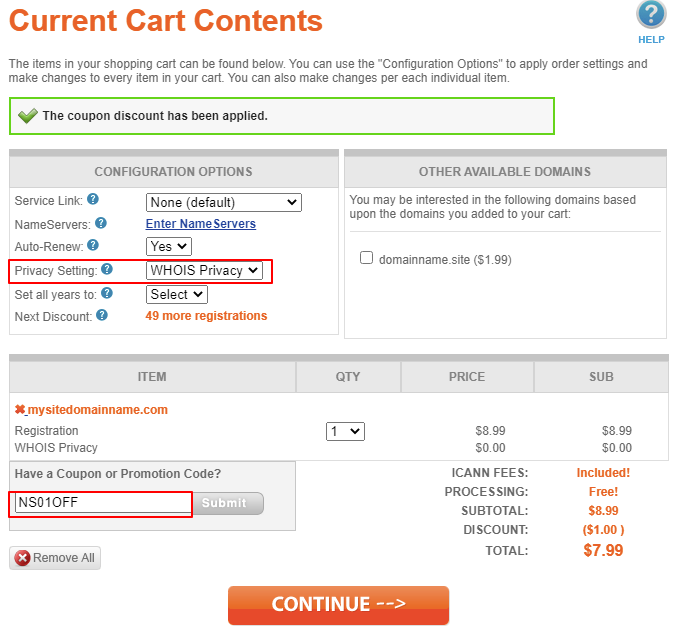
5. Click Continue, and you can choose your favorite method to make payment, Namesilo offers a lot of payment methods, including credit cards, PayPal, even Bitcoin, and more. after you pay for the order, you get the domain name.
Step 2. Buy a Web Hosting or WordPress Hosting – Start a WordPress Blog
What is hosting?
To build a blog website, there must be some files and data, such as images, and web pages, Where should you place these files? Hosting is playing this role, so you also need Web Hosting for building a blog website with WordPress, The domain name is like address of the website, and then the web hosting is like a space or a house to store the files and data of the website.
You can read this post: What Is Hosting And Domain? Best Recommended to learn more info about domain names and hosting.
Where to Buy a Best Hosting
When you search hosting through Google, you will find many web hosting providers on the web, Most of them are excellent, they are similar but different, and that’s hard to choose one for beginners. I used many web hosting services, so I chose some famous, high-performance, affordable hosting share here, for example, GreenGeeks.
Actually, there are other excellent providers like Chemicloud, Hostgator, Dreamhost, etc. I can’t show you all of them, you can check here to find more excellent hosting companies.
GreenGeeks
The main reason I choose Greengeeks is that they are committed to the environmental protection of the earth, Moreover, they provide excellent hosting services, high-performance web hosting, and affordable prices, You can also use their hosting to start a WordPress blog with their own customized Onboarding Wizard easily.
1 . Go to GreenGeeks website:
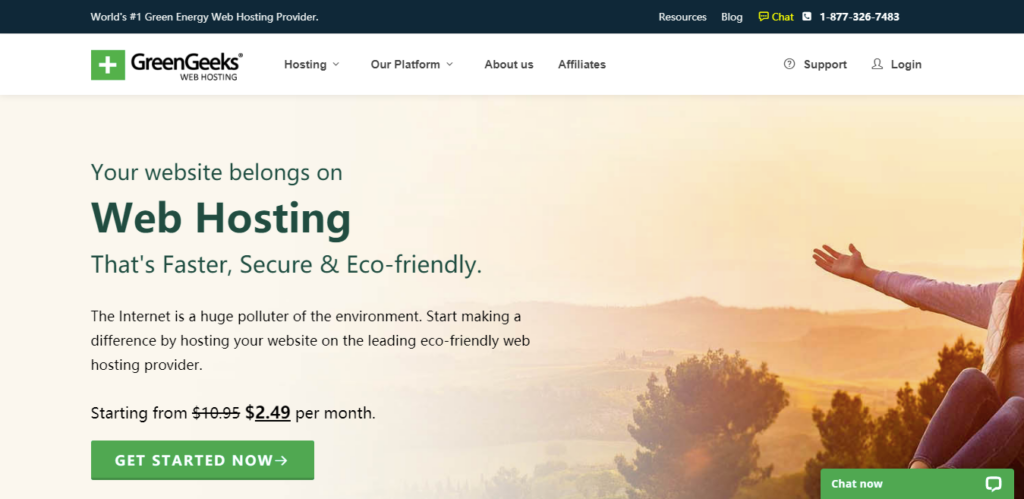
2. Click on GET STARTED NOW, You will see a page with different packages for your choice, the Lite one is enough for any beginners to start a WordPress blog. Choose It and Get Started.
3. GreenGeeks will ask you to set up your domain name if you skipped Step 1. Choose a domain name, you can register your domain name here, otherwise, please enter the domain name you already registered in Step 1.
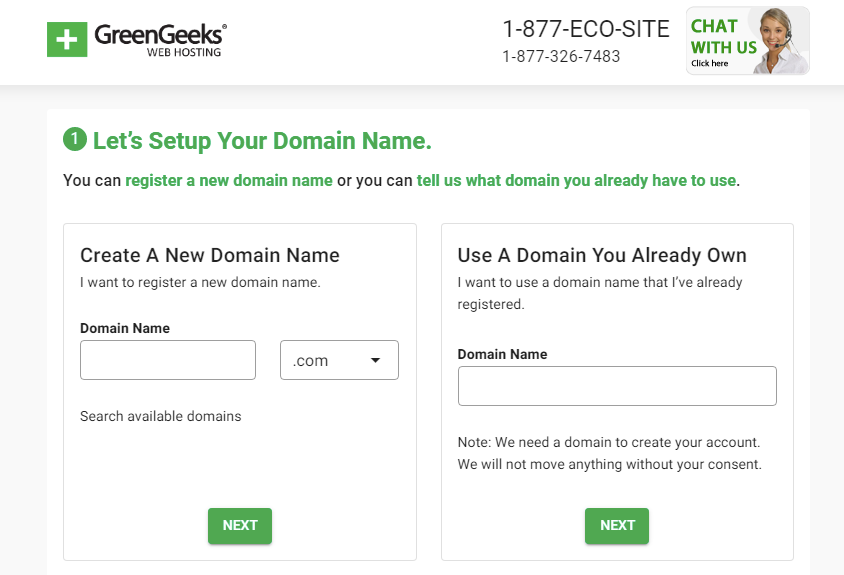
4. Click on Next, in this page, you need to fill out your account information, and choose package information and payment information.
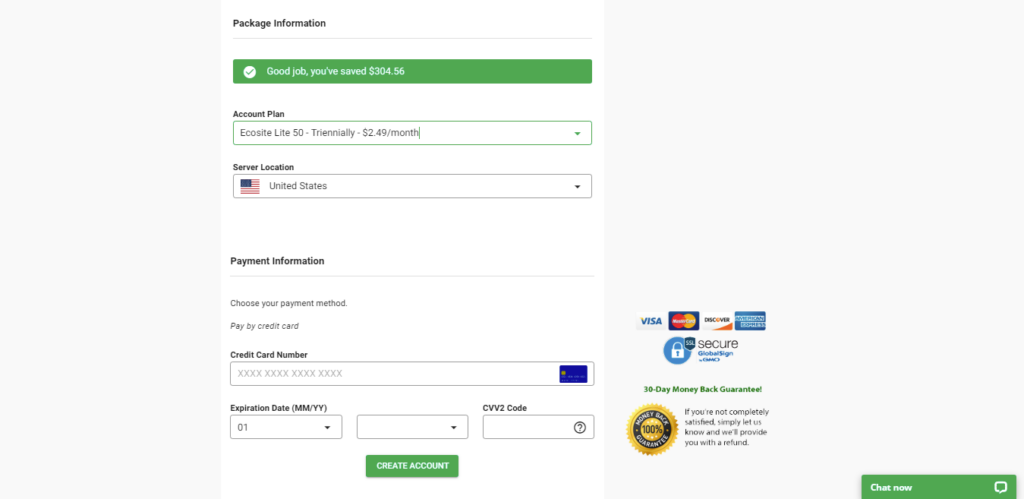
In the Package Information, you can choose different package plans, 1 month, 1 year, 2 years, and 3 years, the prices are different, the price is $2.49/mo. you see is 3 year plan, if you don’t need a long-term plan, you can choose 1 year. I recommend you choose 3 years(Triennially), the total amount is about 89 dollars, and you can use it for 3 years, very Cost-effective.
you can select a server location too, GreenGeeks offers 3 locations: Chicago in the USA, Montreal in Canada, and Amsterdam in the Netherlands.
5. Once you confirmed all information, you can click on Create Account, meanwhile, the order is confirmed, and you will receive 4 emails about the orders and your account login information.
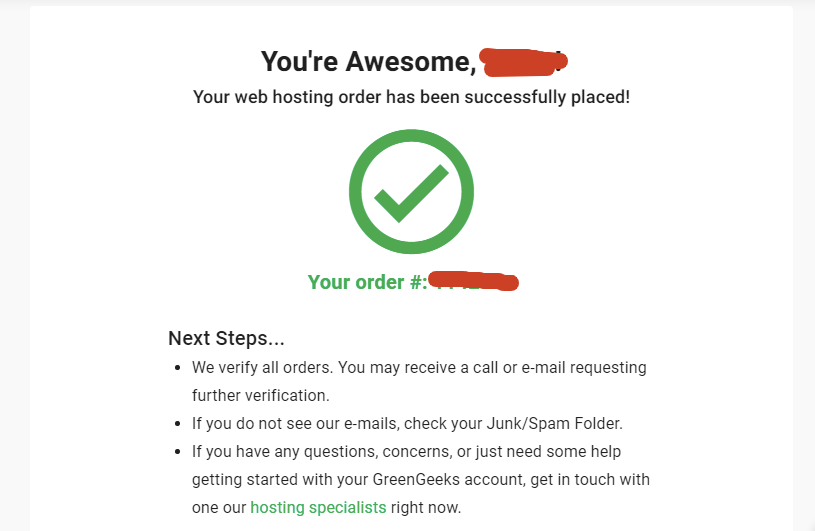
Now you can log in to your account to check your order details, the system will send some code to your email or your phone to verify the login at first. Please see the dashboard in the below screeshot.
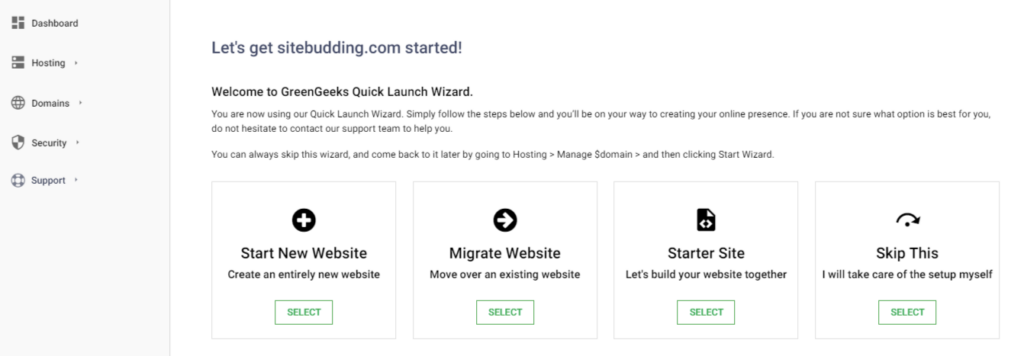
Connecting Domain name and Hosting
✻ You just skip this step if you registered the domain on GreenGeeks, it should be connected with the hosting when you place the order.
My domain name was bought from NameSilo, not from GreenGeeks, so I need to connect my domain to GreenGeeks hosting. Let me show you some simple steps on how to connect domain name and hosting from different providers.
NameSilo will be an example to show you how, if your domain is not bought from Namesilo, you need to log in to the account of the provider too. No matter which registrar or provider, the processing of connecting is very similar:
1. Login to the NameSilo Domain name manages dashboard, to point the Domain to GreenGeeks hosting, you need to change the domain name server to GreenGeeks’name server, from the Namesilo dashboard->domain manager->the domain name->NameServers, click on change, change name servers to Greengeeks’s name server, each line in one row:
chi-ns1.greengeeks.com
chi-ns2.greengeeks.com
ams-ns1.greengeeks.com2. Submit, That’s it, generally, you need to wait for a few hours so that the DNS gets propagated worldwide properly.
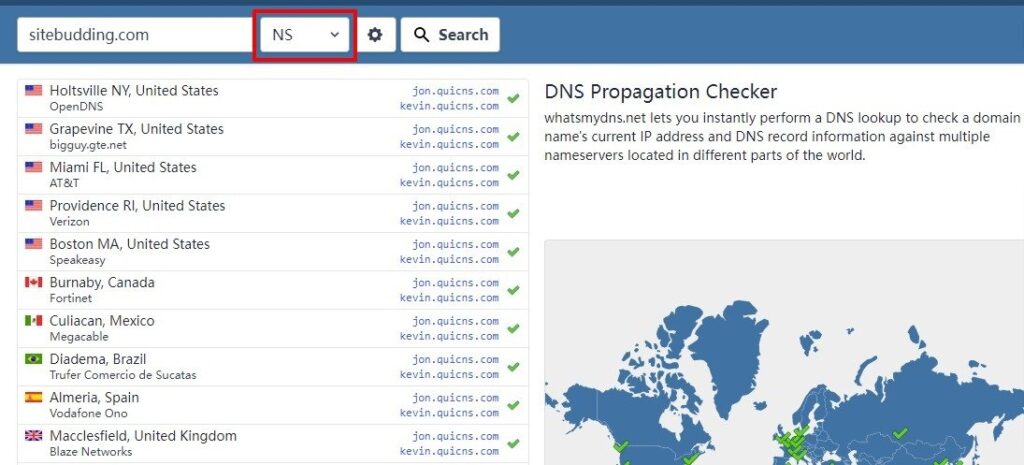
To know if the domain name is connected with web hosting successfully, you can simply go to https://www.whatsmydns.net/ and enter your domain, choose record type: NS, and check if all locations are propagated.
Install SSL certification
SSL is short for “Secure Sockets Layer”, which are cryptographic protocols designed to provide communications security over a computer network, which helps to protect sensitive information that’s sent between computers and servers. a website with SSL protection or not will affect SEO directly.
You have to make sure the Domain name is connected with hosting successfully before installing SSL certification for a website, although the website is not created, you can install it in advance. It is very easy to install SSL certification in the GreenGeeks dashboard, and the certification is free.
1. Locate the Security on the left side in the GreenGeeks account dashboard, and click on the green button on the right top: ADD SSL CERTIFICATION.

2. Select a Service and Domain, no need to say much, just select the domain and the hosting that you want to add SSL certificate
3. Select a Provider, GreenGeeks offers 2 types of SSL certificates, one is free -> Let’s encrypt SSL. the other is Premium AlphaSSL, you need to pay for this one. Let’s Encrypt SSL is good for a new beginning Blog. so just select Let’s Encrypt SSL.
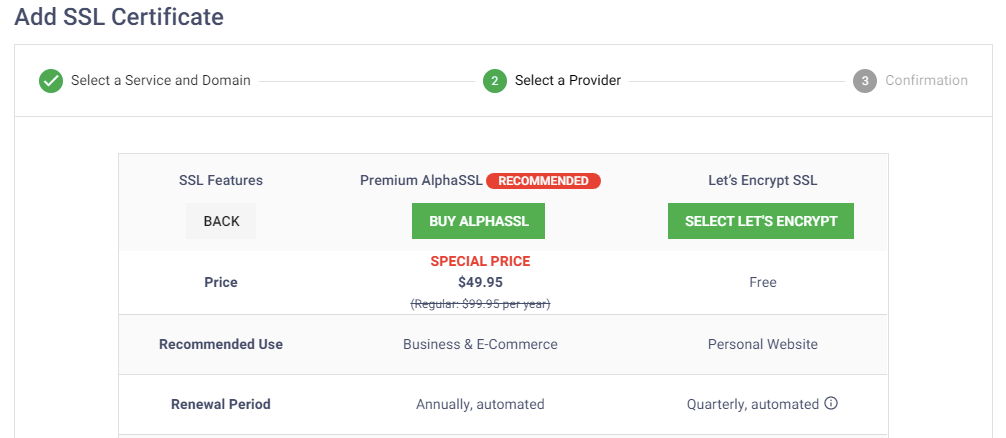
4. This processing step will ask you to confirm the domain name and hosting again, you need to make sure the domain name has connected to the hosting, once everything is done, you can click on CONFIRM AND CREATE. If everything is set up properly, it will show you the successful page.
It seems everything is ready, the next you need to do is install WordPress and start your blog.
Step 3. Install WordPress and Start a WordPress Blog
There is nothing easier than building a website with WordPress on GreenGeeks, this is another reason why I choose GreenGeeks. You can one click to create your WordPress blog website by using GreenGeeks Quick Launch Wizard.
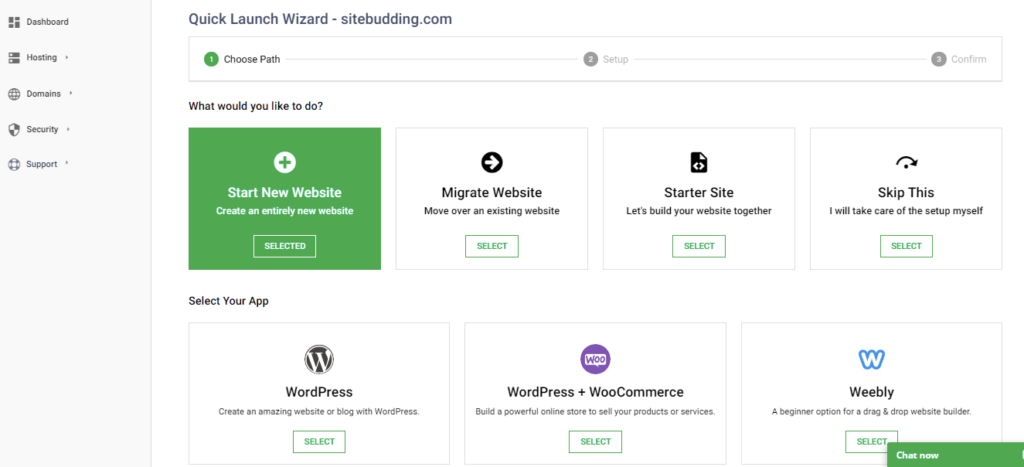
1. Go to the GreenGeeks dashboard, the landing page should be the Quick Launch Wizard, if it is not the wizard page, you can follow this: Hosting(left side) -> Select the hosting -> Manage -> Account Information -> Quick Launch Wizard. As you can see 4 options to create a website:
- Start New Website – Create a website or start a WordPress blog or other CMS platforms, this is what we will use.
- Migrate Website – If you need to transfer a website from another hosting, then you choose this one, but I don’t think you don’t have other websites as a beginner.
- Starter Site – From the introduction, this type should be a customization option, then GreenGeeks will help customers create a website according to their requirements.
- Skip this – you will take care of all the setup yourself.
Select the first one Start a new Website and WordPress, click on continue, and go to the next step Setup.
2. In this step, you can configure some info for the blog website:
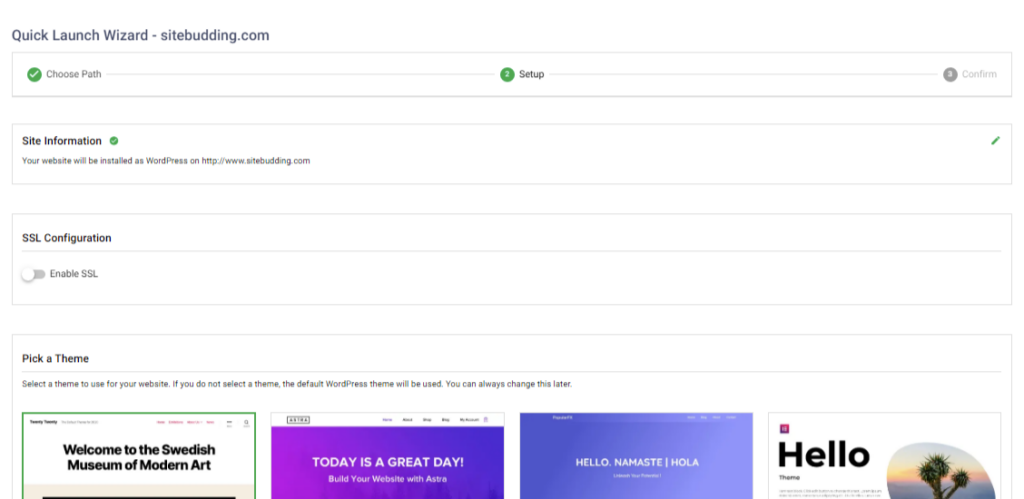
- Site information – Site title, site description, and the domain, Make sure the domain is correct, the rest information can be left as default, because you can change all of that information in WordPress
- enable SSL – enable
- Pick a theme – choose default, you can change themes in WordPress too.
- Select Plugins – don’t need to select any plugins, you can install the plugins in WordPress as required in the future.
Then Click on CREATE MY WEBSITE.
3. The Wizard will deploy your website in less than 1 minute, what? less than 1 minute? yes! you are right, after finish, the page will show you the successful page and the WordPress account details.
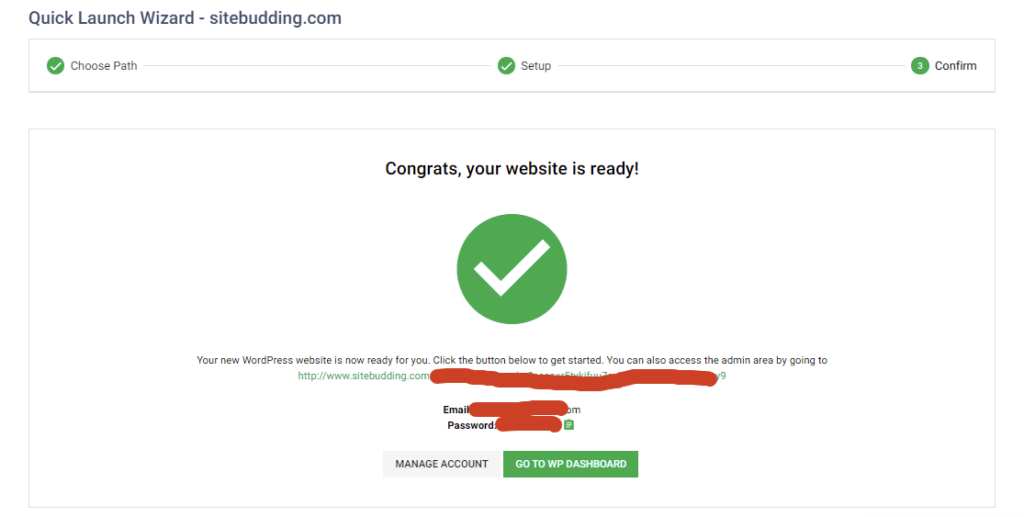
4. Login to the WordPress Dashboard to check the admin or enter your domain in your browser to check your website. The below screenshot is the latest landing page/homepage of the WordPress website blog.
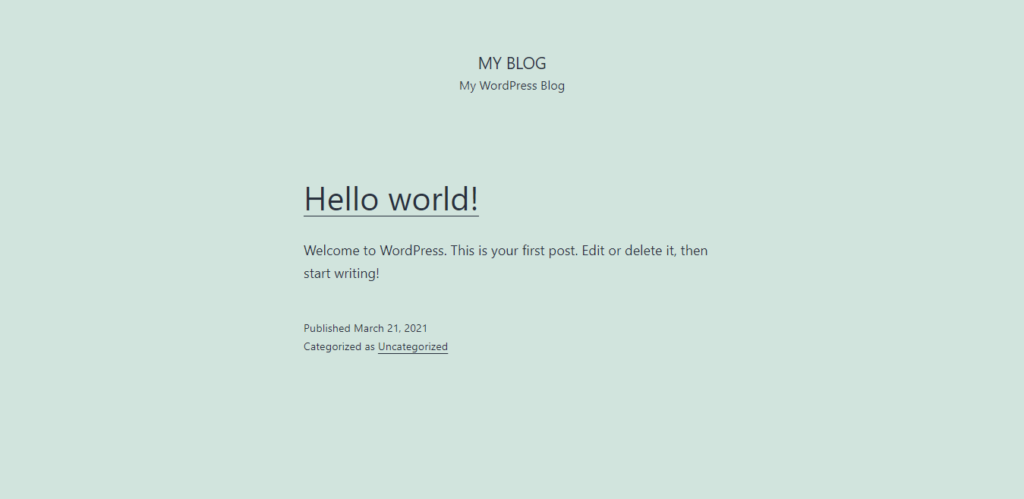
Basically, the website was successfully created, and you will see your blog is ready. it is running on the internet, amazing, just one click with GreenGeeks, anyone can open it by entering your website address in the browser worldwide.
Is that all finished, of course not, you need to put your own information and set up the websites to make it remarkable and friendly to visitors.
Step 4. Install Theme, Plugins, and Customize Your Blog – Start a WordPress Blog
Although your blog can be browsed by other people in the world, it is only a default template of WordPress, it is very simple and not friendly to SEO and visitors, you need to install a theme and some plugins to improve this situation, then customize your website, which will make it more unique.
Theme
A theme is actually a template for the appearance of the website, it can display your website with different layouts and add some functions, You can easily use it to design your website and make it more beautiful and friendly to visitors and search engines.
Where You Can Get a Theme
When you set up GreenGeeks Winzard, the site has installed the default themes of WordPress, which should be installed 3 themes during the installation, As I said, most of the time, those themes are not very good for a blog, it is too simple and lack of some features, anyway, if you like the style, you can use one of them.
But I still suggest you install a new theme for the 3rd party, because there are thousands of beautiful themes for WordPress from wordpress.org(the official WordPress website) and the whole internet, and many themes are free for use. If the free theme is not enough to support your website growth, you can buy a paid theme. Besides WordPress supply themes, You can buy themes from some other marketplaces:
Start to Install the Theme
1. The easiest way to install a new theme is to go to your WordPress admin, from the left navigation on the dashboard, click on Appearance -> Themes -> Add New, you will see thousands of themes, actually more than 8,000. most of these themes have free versions, and the free themes are very good for a new blog.
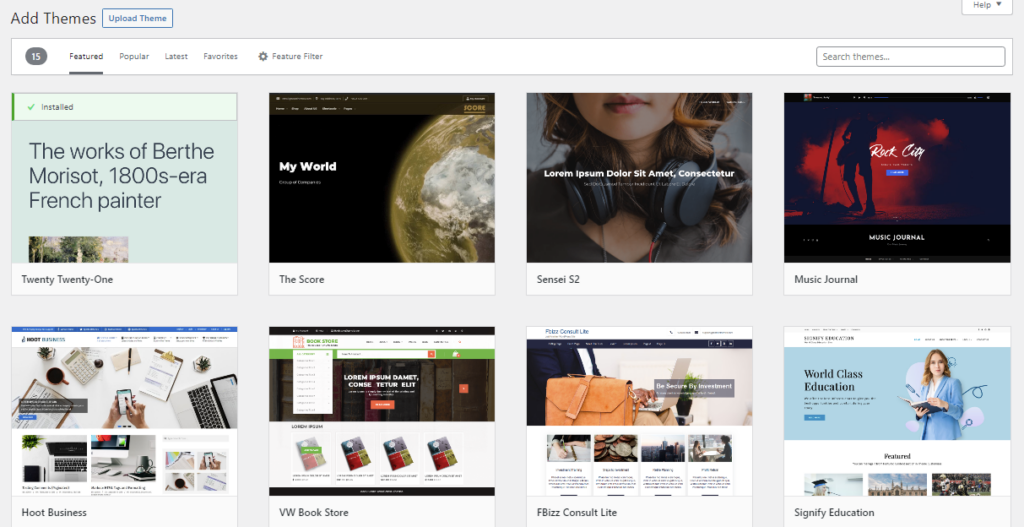
You may not know which one is suited for you, so please don’t worry, read our article: 15+ Best Free Responsive WordPress Themes & Templates, I‘ve selected 15+ excellent free themes for everyone, All these themes are suited for you to start a WordPress blog. I use Kadence for my website, and Astra, GeneratePress, Blocksy, Neve, etc. are also very famous, especially for Astra, there are many Templates for different industries and Niches.
2. On the page of Add Themes, enter the theme name in the search box, like ‘Kadence’, it will show you the relevant themes, hover over the theme and click on install, the theme will be installed after a few minutes, you need to manual to activate the theme, once you activated the theme, you can check how is your blog homepage.
3. Kadence will ask you to install a plugin Kadence Starter Templates, which contains some finished design templates for the website, you can import the templates to your blog and customize your website with your own information, which can save you much time. the theme includes 12 beautiful templates for Gutenberg Page Builder and 9 templates for Elementor Builder.
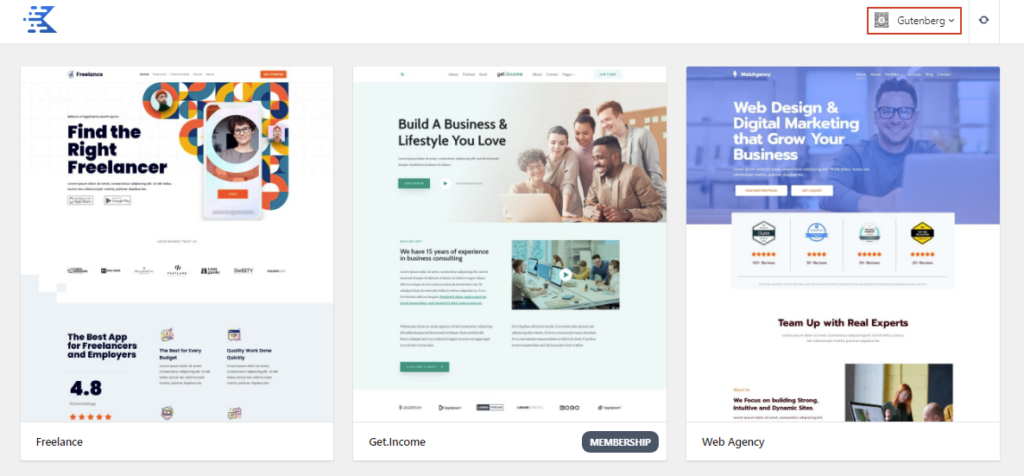
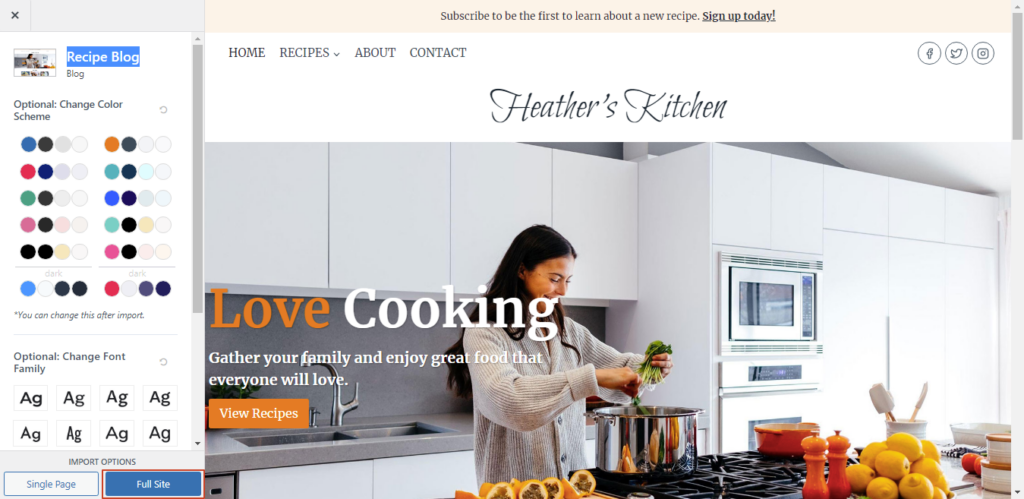
4. Importing a template, for example, I select ‘Recipe Blog’, you can see importing setups in the below image, you can choose different colors and fonts for the template, and you can also import any single page or import the full template. I suggest you import the Full Site and click on it, it will take a few minutes to finish it. Once it is finished, you can check your homepage of the blog, it should be the same layout as the template.
This is the method to install through the Admin, no need to download. if you get or buy themes from other places not from the WordPress admin, you can go to Appearance -> Themes -> Add New -> Upload themes, then activate the theme, The next is the same as above.
I want to say it is very similar to whatever theme you are going to install, not only for Kadence, you can try others too if you are interested.
Install Plugins
Actually, when you install a theme, it always asks you or install the required plugins at the same time, like Kadence, you need to install Kadence Starter Templates and other plugins, but that will install automatically. You can add more features by installing other plugins manually, like some plugins for performance, security, SEO, social plugins, etc.
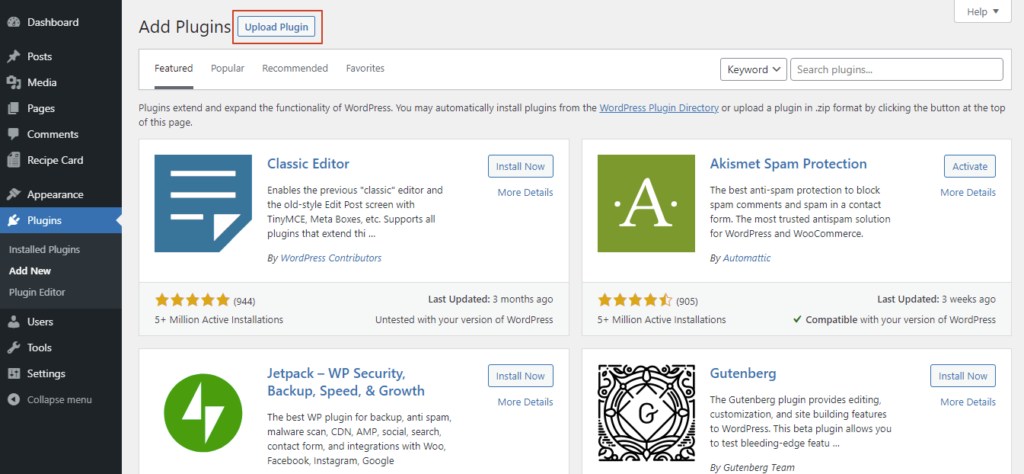
Installing Plugins is almost the same way as installing a Theme, Go to admin dashboard -> Plugins -> Add New, search the plugins you want click on the install button, then activate it, that’s it. As for the plugins you download or buy from other places, you can go to the admin dashboard -> Plugins -> Add New -> Upload Plugin, then activate it.
Setup and Customize Blog
After you install theme and all required plugins, you can start to customize and design your blog to make it more individual.
1. Setting of Admin
You don’t need to set all the settings on the left side navigation, Click Setting and follow me:
- General Setting – Here is some basic info about your website, The main options you need to set are Site Title and Tagline, Site Title is the name of your website, don’t change it frequently once you save the site Title, it will impact the SEO effectiveness. and the Tagline is the description of your website, I don’t recommend the description too long or too short.
As for other options, Keep URLs not changing, you can change the rest options as you like. - Writing – This is for the posts and pages setting, recommend keeping it as default.
- Reading – You can set the website homepage and the blog homepage, Because this tutorial is for the blog, you can set both are same pages or keep anyone blank. As for Search engine visibility, you can check it once your website is ready, but I don’t think that is very important now, since you can finish a website in a short time, just like these tutorials.
- Discussion – The setting of the Post for the Blog, doesn’t need to change。
- Media – Media files setting, keep it as default。
- Permalink – Select and check the Post name, then save it。
- Privacy – you can specify the privacy policy page in this setting, once you add a page of Privacy Policy, you can save it here。
- Kadence Blocks – this is a Kadenc Blockls setting, no need to change anything, if you are not use Kadence Theme, there is no setting here.

When you install some Plugins, It may add a related setting in the submenu of Settings. you can modify the settings for those Plugins here too.
2. Customizing Blog with Theme
Customizing Blog should be the last step of building the blog website, Once you finish this step, you can add pages and write posts to start a WordPress Blog. Because different themes will have different customizers, I will use Kadence as an example to introduce how to customize a blog website.
Open the customizer, and go to Appearance -> Customize, In the customizer page, the left part is the options of the customizer, and the right part is a live website preview, you can change the settings for different devices like desktop, tablet, and mobile in the customizer because the Kadene theme is responsive. And the customizer is very good for beginners, since when you change something on the left, it will show the effect in the right preview.
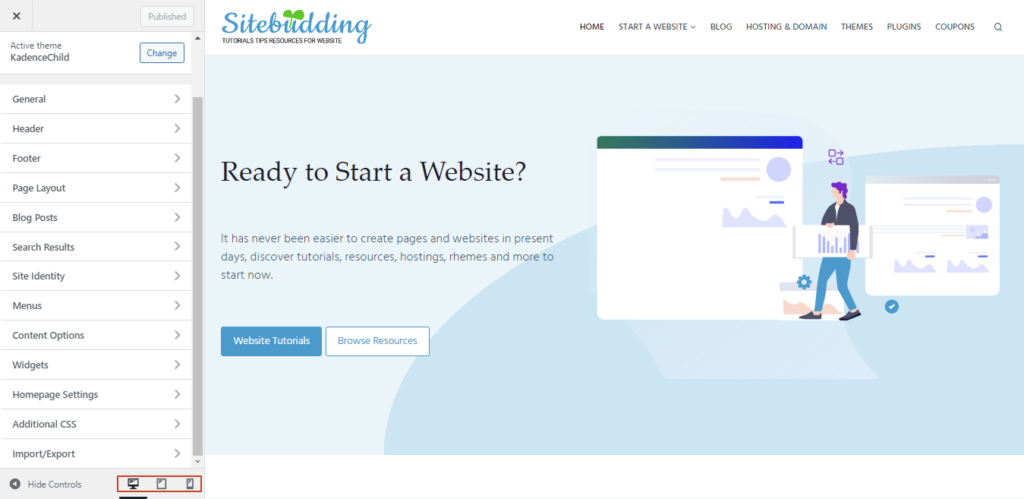
Let’s see what these options are used for and how to set them too:
- General – Every theme should have a similar setting in the customizer. This contains the settings of layout, color, font, sidebar, buttons, and more, all of these settings depend on people’s preferences, you can change each one and check the effect on the right preview, or you can keep all as default since the default template is very beautiful. As for Breadcrumbs and Performance, you can check all sub-options.
- Header and Footer – Kadence Use an advanced builder for the header and footer, you don’t need any templates for headers or footer anymore with the builder, The builder has 3 Rows for the header and footer, and you can add widgets to each row in different column, which is not only friendly to any beginners, but also can make the header and footer unique as it can be customized as different people’s requires.
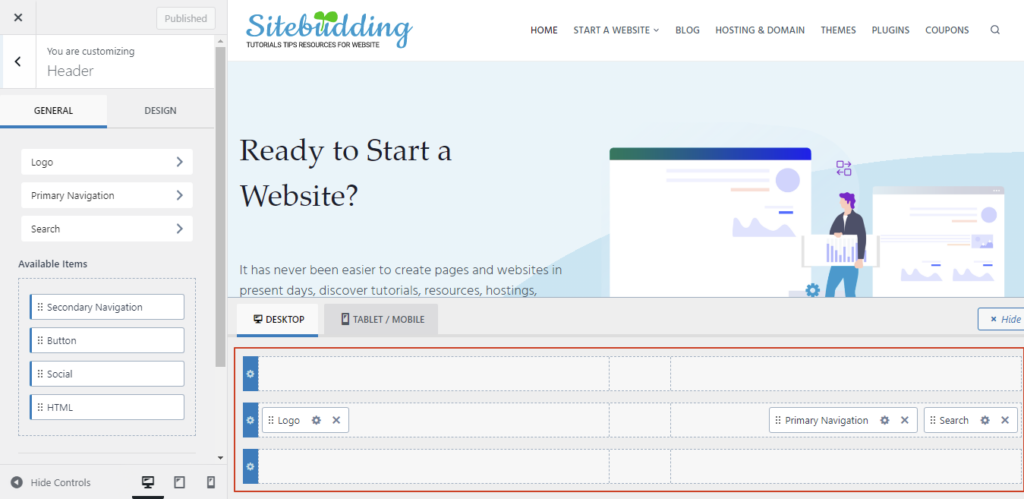
- Page Layout, Blog Posts, and Search Results – You can design the layout for different pages with these settings, they are pages, blog single post and blog archive pages, and Search results pages. Recommend you set the base of the layout on the related page. for example, you can land on the page of any single page, click on the the top customize menu, and then change the layouts.
- Site Identity, Homepage Settings – You can add a logo and site icon in Site Identity, Homepage Setting is the same as the Reading in the left Setting of the Admin dashboard.
- Menu、Widgets – I recommend you set these two from the admin dashboard -> Appearance. The menu is a navigation of your websites, you can add some different menus, like the top menu, footer menu, or social menu. the “Widgets” is a special feature in WordPress, you can add and customize the widgets from Appearance -> Widgets, and put the widgets to the footer or sidebar, it is also available for the Header in some themes.
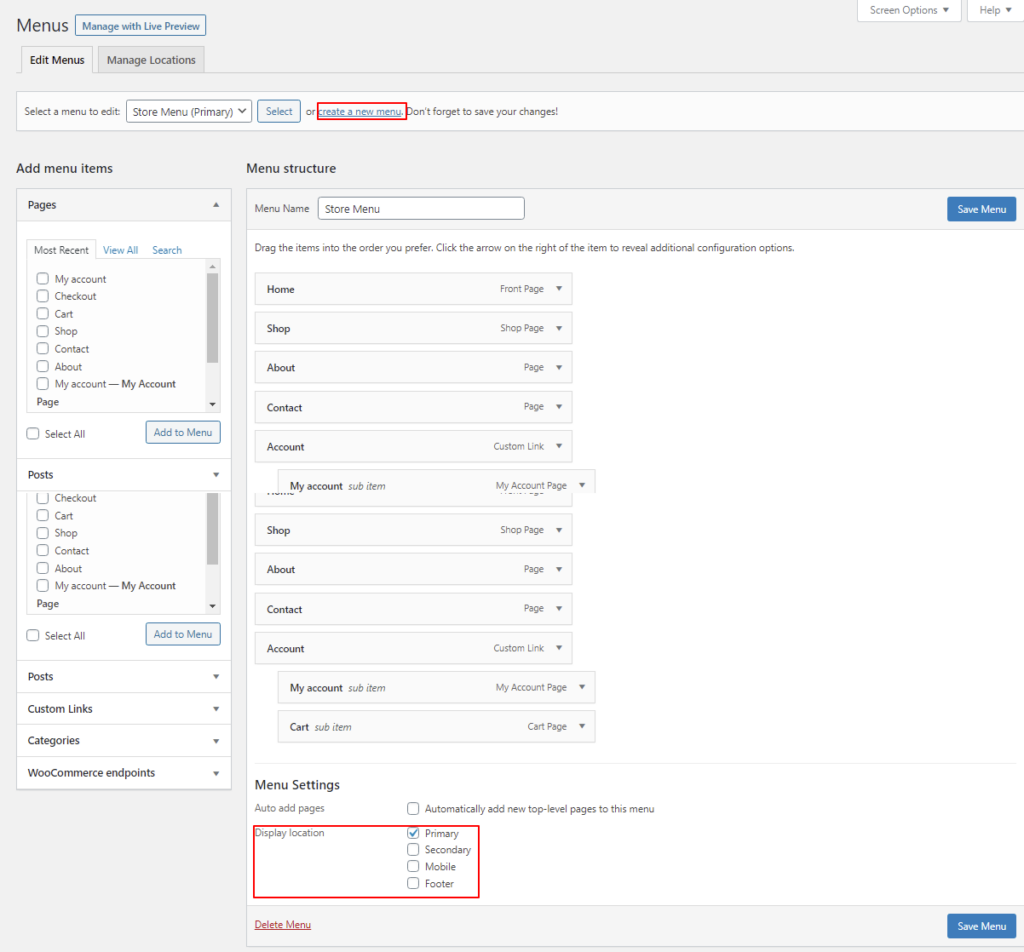
- Additional CSS – CSS is short for Cascading Style Sheets, It is a style sheet language for website development, You can add CSS to modify the layout or appearance of the websites, but you need to understand the CSS language, that’s something with code, if you don’t understand, skip it.
- import/export – you can back up all the settings of Customizer, restore, import, and export to different WordPress websites with Kadence Theme.
You May not use other themes and the customizer is not the same, but all the settings are very similar, you just change the settings one by one as per your requirement, no more difficult.
Step 5. Add Contents – Start a WordPress Blog
After you finish the customizing, your blog is genuinely ready. Now you can add pages and posts to display your own info on your blog.
But I recommend you add some pages first, which can make your blog look complete and more professional so that search engines will like your websites, as well as the visitors. you can add some pages like About, Contacts, Private Policy, and other pages that are required for your blog.
Add Page
When you import the template from the theme, it should import some common pages too, I imported the template ‘Recipe Blog’, and it imported the pages as in the below screenshot. Different Templates will import different pages, and the pages have different layouts too. you can delete the pages you don’t need, you can put your cursor on the title and click edit to modify each page as you require, and you can add new pages of course.
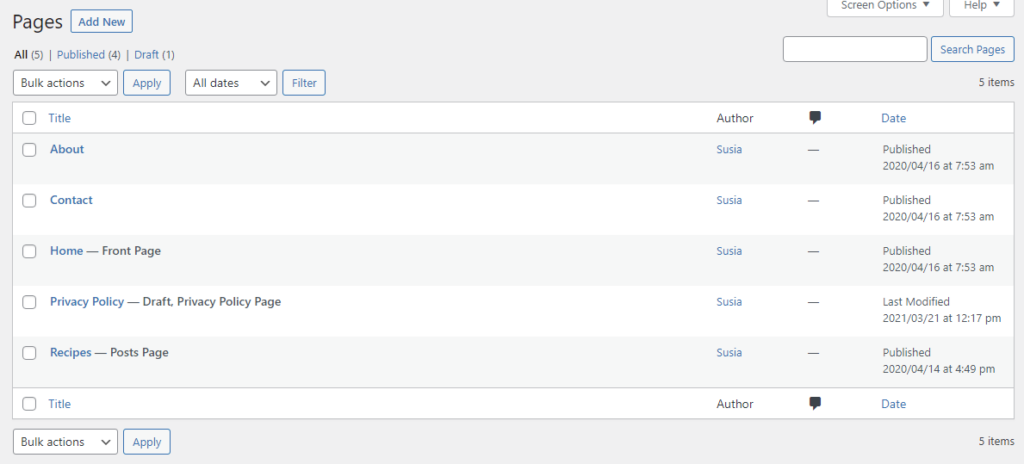
How to add a Page? Go to Pages -> Add New in the left navigation, the Gutenberg block page builder will be opened for you to create a page. For example, I added a page with the title ‘About Us’.
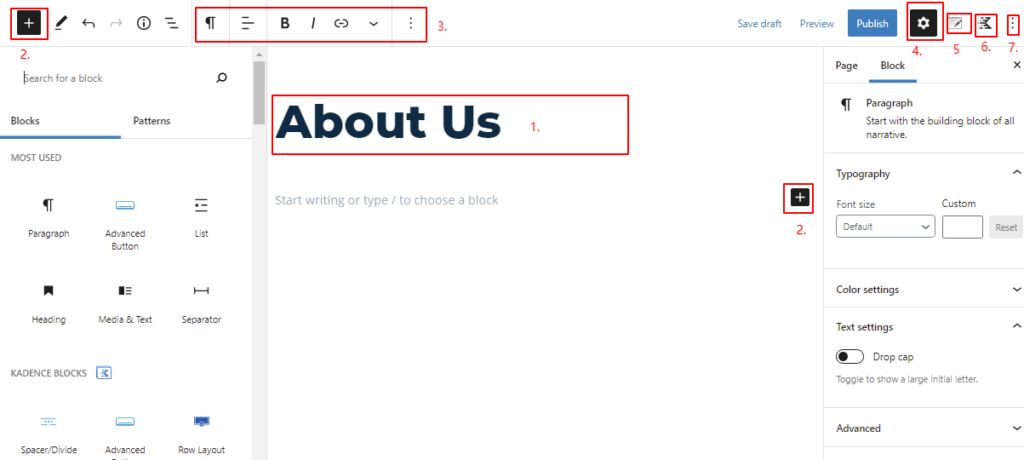
Please see below the functions for each part indicated in the above picture:
- Title, the name of your page/pots
- Add new blocks – there are 2 places you can add blocks, as you can see 2 black icons +, yes, these 2 icons are for adding different blocks, you can add any blocks from the block library, which can be very rich the web pages or posts
- Here you can change block types and set the text styles, such as changing font types, and colors or adding underlines, etc. This part can be sticky with the block that you are editing.
- Page and Block Settings
- Page / Post – Page status, Permalink, Feature Image, and more.
- block – change the block styles and layouts and more.
- Page Layouts – This setting was added after you installed the theme, The original block builder doesn’t have this option, not all themes will add this function here, it depends on what themes you installed. you can change the page layout like allow a sidebar or not, change the width of the page, change the content width, and enable or disable feature images and header or footer.
- Kadence Blocks Settings – you will see this icon only if you install the plugin of Kadence Gutenberg blocks, you can change some universal settings for all the Kadence blocks, like adding more default colors for choice, or changing the default fonts.
- Gutenberg Block Builder Settings – You can change some settings for this builder, like changing the builder in admin or full page mode, and more as you like.
You don’t need to always add new pages once you add the required all, and you can focus on the Posts, this should be the core of a blog.
Add Posts
Add a Post is basically the same as adding a Page because both of them are created and edited by the block page builder, You can add a new post from Posts -> Add new, and then edit it like you do that to a page. the difference is you can add categories and tags to posts but not for pages, in addition, posts for content and pages for function.
Categories (Posts > Categories)
In any blog, or a website that has a blog, more or less, there are groups of posts, a series of related posts, in short, posts with similar content, etc. We will hope to classify them for better management. WordPress posts have This feature, Categories.
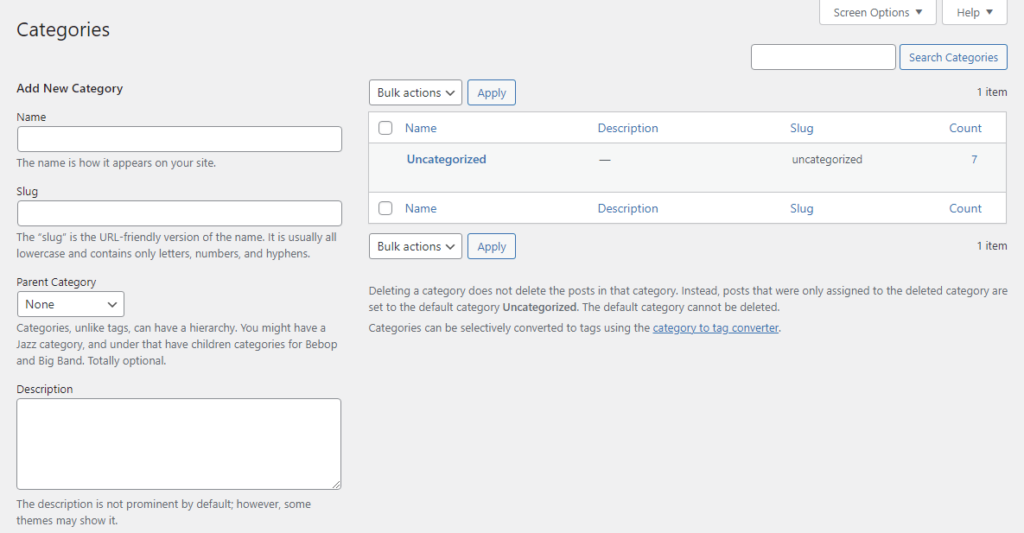
You can use categories to define sections of your site and group-related posts. Each post in WordPress can be filed under one or more Categories. The default category is “Uncategorized” until you change it in your writing settings. Each Category may be assigned to a Category Parent, allowing you to set up a hierarchy within the Category structure. In creating Categories, recognize that each Category Name must be unique.
There are two ways to create a category, you can add a category from Posts > Categories or you can add a new category when you create a new post in Block Editor. It is a very effective function to classify and manage your content and make the visitor find the related content easily on your website.
Tags (Posts > Tags)
Tags are ad-hoc keywords that identify important information in your post (names, subjects, etc.) that may or may not recur in other posts, Tags have no hierarchy so there is no Parent->Child relationship like that of Categories, but Tags name must be unique too. Like Categories, you can add tags in two ways, from Posts > Tags or add tags in Block Editor when you create a post.
Both Categories and Tags are for better management and making it easier for visitors to find the content they want on your website.
Earn With Blogging
This may not be your purpose to start a WordPress blog, but this may be the main purpose for some people, anyway, if the blog can bring some income to you, that’s really a fantastic thing. How to earn some money through a blog, here are some ways.

1. Start Affiliate marketing on the blog
Affiliate Marketing is one way to earn commission once you sell products or services to suppliers or providers. The product suppliers or service providers will show their Affiliate program on their website, Anyone with the qualifications that match their requires, they can create an account to get Affiliate links, yet some providers don’t have a limit for the affiliate members, anyone can get links once they create an account.
The members can write blog posts, or share the links anywhere, like social platform, once any buyer clicks the links and buy something, the Affiliate member can get a commission. Affiliate Marketing is becoming the most popular purpose for people to start a WordPress blog. Not only the product suppliers or service providers have their own affiliate programs, but there are also a lot of affiliate markets, like Shareasale, Clickbank, and more.
The most famous affiliate market is the Amazon Affiliate Program.
2. Add banner advertising
Put some advertisements on a website may be the most well-known method to earn money When you visit some websites, you may see some banners on the page top of the page, or on the sidebar, the banners show some promotional ads, and most of those are very attractive, you can’t stop to click on the banners, once you click, the website owner will get some ads income.
This kind of advertisement includes 2 main types:
- CPC (cost per click) – You’ll get a set payment for every visitor who clicks an advertisement
- CPM (cost per thousand) – It is also called cost per thousand (CPT), You will get a set payment for one thousand views or clicks of an advertisement, the views or clicks refer to something called the impression of the advertisement.
Yes, you can do this too, the easiest way for any beginners is to create an account with Google AdSense.
3. Using your blog to promote your own business
Of course, you can use your blog to promote your own business, if you have your own business regardless of online or offline, you can write some blog to introduce your products or service and guide them on how to buy, you can insert your shop link or put your address on your blog.
Most of the seller or even companies, and famous brands are creating their own blog to write the journal.
4. Write sponsored content
Writing sponsored content is advanced Affiliate marketing, which you need have grow your readership, We can say fans or traffic, some brands or companies will contact you to discuss sponsored posts, and you can write some promotion articles and get the recompense from the company or brand meanwhile, you can still insert your Affiliate links.
5. Land yourself a Part-time job
If you are a student or you have some good ideas, or you are good at some skills, you write some articles to share your ideas and show your skills, and some companies or agencies like your ideas to hope to pay for your skills and gain what they want, they may reach out you.
Think of it this way, if you are a student, you may get a part-time job when you are in college, If they really appreciate you, they may offer you a job right after you graduate if you are interested。
Actually, there are many other ways to get payment from your online blog, as long as you want and it is legal in the local place.
Summary
I always say it is very easy to start a WordPress blog, but it seems I wrote too much for this tutorial, That’s because I was trying to make everything as clear as possible, And what the important is you can really start a WordPress blog with any resources, not totally copy the tutorial from me. Long story short, if the domain is registered on GreenGeeks too, to start a WordPress blog on GreenGeeks, what you need to do is buy hosting -> add SSL -> start a new blog website with Quick Launch Wizard -> install the theme and plugins -> customize the website and add contents, that’s it, Enjoy your own work.


