Having an online store website is essential for e-commerce sellers. An e-commerce online store site is like your business storefront on the internet. With the advancement of the internet, setting up your online store isn’t that hard anymore. This is especially beneficial for small and medium-sized sellers with limited budgets.
This article will teach you a website-building method that anyone can learn. If you know how to use computer software or mobile apps, you can master this method too. Even a 60-year-old can follow along. This tutorial starts from scratch on how to Build an Online Store with WordPress & Hostinger.
Many people have heard of WordPress and Hostinger but have never tried to build their own online store. If you’re reading this today, consider yourself lucky—fate brought us together, Now you can follow the steps below to start building your online store website with us.
This Tutorial is
Free
This tutorial is completely Free, you can learn without any limitations, but you still need to pay for the hosting and some tools for building a site
Detailed
This tutorial provides a step-by-step guide to help you build an online store website from scratch. It’s very detailed and requires some patience.
Easy
the tutorial is easy to follow, so anyone can learn it as long as you have basic computer skills. you’ll have your online store up and running in no time.
Learn About WordPress
To build a WordPress online store, let’s first briefly introduce what WordPress is, especially since many users reading this article are learning about website building for the first time, and some are encountering WordPress for the first time. Of course, if you prefer to skip this introduction, you can scroll down and start with the first step.
WordPress is a free and open-source Content Management System (CMS). It’s a graphical interface platform that helps you build websites. WordPress itself started as a blogging system, designed for creating blog websites, but it can also be extended with various plugins.
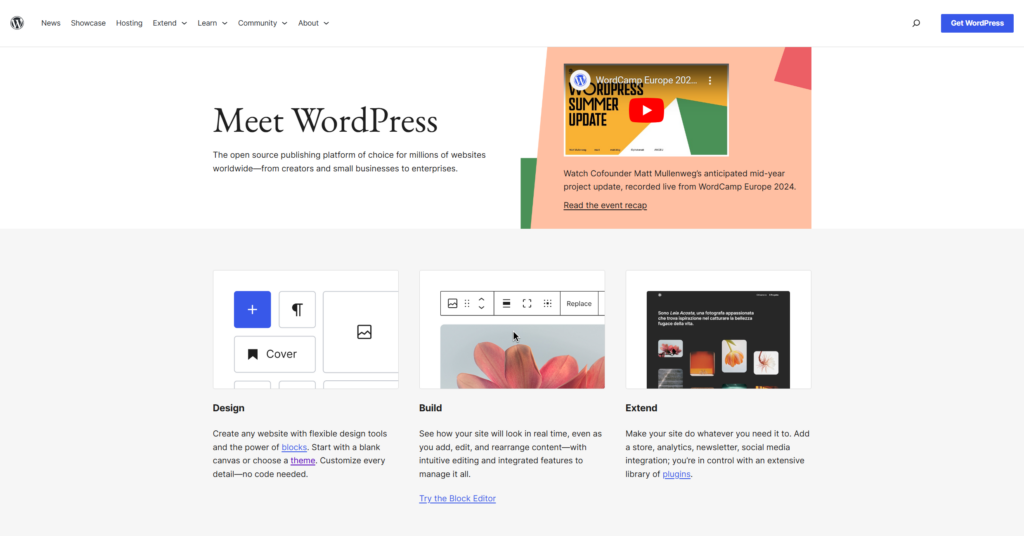
As it has evolved, users can now use WordPress to create almost any type of website. For instance, with plugins like WooCommerce, you can set up a standard e-commerce website, which is what we’re learning to build today—an online store.
WordPress.org vs WordPress.com
You should also know that the official website for WordPress is wordpress.org, not WordPress.com. WordPress.com is a SaaS (Software as a Service) platform based on WordPress.org, where you can also build online store websites. Please make sure not to confuse the two.

For more on their differences, check out our article: “WordPress.com Reviews“.
Why WordPress
Here are at least six reasons I can say why building an online store with WordPress makes sense:
- Permanently Free – WordPress is an open-source system that’s free forever, and WooCommerce, its e-commerce plugin, is also free.
- Lightweight – WordPress itself is lightweight and doesn’t require many hosting resources.
- User-Friendly – It’s incredibly beginner-friendly; even tech-savvy grandmas in their 60s can learn it without needing to know code.
- Suitable for Small to Medium Websites – It’s perfect for small businesses with limited budgets, you can build a professional site for just a few dollars a month.
- Highly Scalable – With plugins, you can add powerful tools and features like website optimization, social functionalities, and site analytics.
- Rich Resources – According to recent statistics, WordPress powers over 40% of websites globally and continues to grow. There are countless themes, plugins, and tutorials available for free, which is a huge advantage for beginners.
- More…
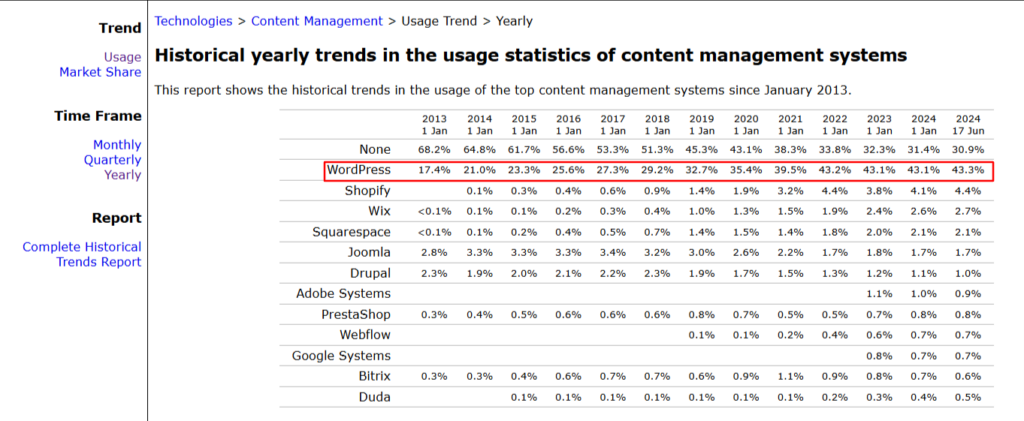
In reality, these are just a few of WordPress’s benefits. Once you start using it and get familiar with its capabilities, you’ll likely discover more.
Advantage of Hostinger
Building an Online Store website with WordPress requires hosting, same for other CMS platforms. Even if you’re developing a site from scratch, you still need hosting too. Hosting is used to install WordPress, store website data, and manage assets. In this tutorial, we’re using Hostinger hosting. So, what are the advantages of Hostinger?
- Affordability: Hostinger is known for being one of the cheapest hosting providers. Their plans are budget-friendly, making them accessible to almost everyone, and they offer premium hosting services.
- User-Friendly: They provide user-friendly control panels tailored for beginners, along with AI-powered writing assistance.
- Global Presence: Hostinger has data centers across major continents worldwide.
- Speed and Optimization: Their hosting is fast and optimized for websites.
- Excellent Security
Hostinger is a well-established hosting provider with mature technology and comprehensive services. It’s truly an excellent choice for beginners looking to start building their websites.
Step 1. Purchase Hostinger Hosting
Hostinger‘s pricing is really great and affordable for anyone. They offer premium hosting at the price of other single website plans.
First, pick a hosting plan. Hostinger has three main ones: Premium, Business, and Cloud Startup. Officially recommend the Business plan because it’s the best bang for your buck, especially for online stores.

If you’re on a budget, you can go with Premium, but the Business plan gives you better performance, more storage, daily backups, on-demand backups, and other cool features. So, I’d say go for the Business plan—it’s only $1 more.
Click on the button “Choose Plan.” It’ll take you right to the Cart page.
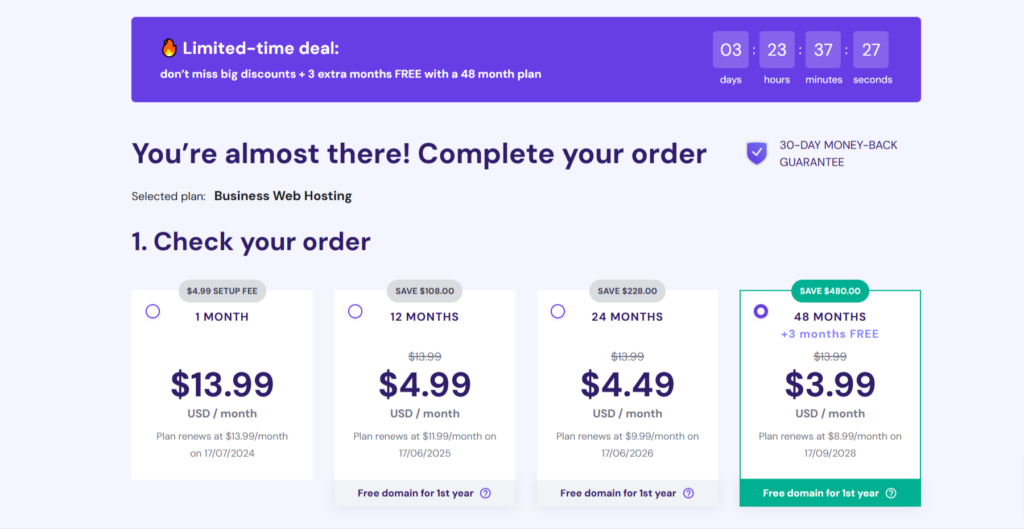
Here, you can choose how long you want to subscribe. The longer the subscription, the cheaper it gets. If you go for just one month, it’s $13.99 per month, and the renewal rate is the same. The best deal is the 48-month plan, which is 4 years. They’ll give you 3 extra months for free, and it’s only $3.99 per month. Plus, you get a free domain for the first year, and renewals are cheaper too. Pick whatever works best for you.
Next, you’ll create an account. If you already have one, just log in. To create an account, you’ll need to set up your account details and address. Then, pick a payment method that works for you.
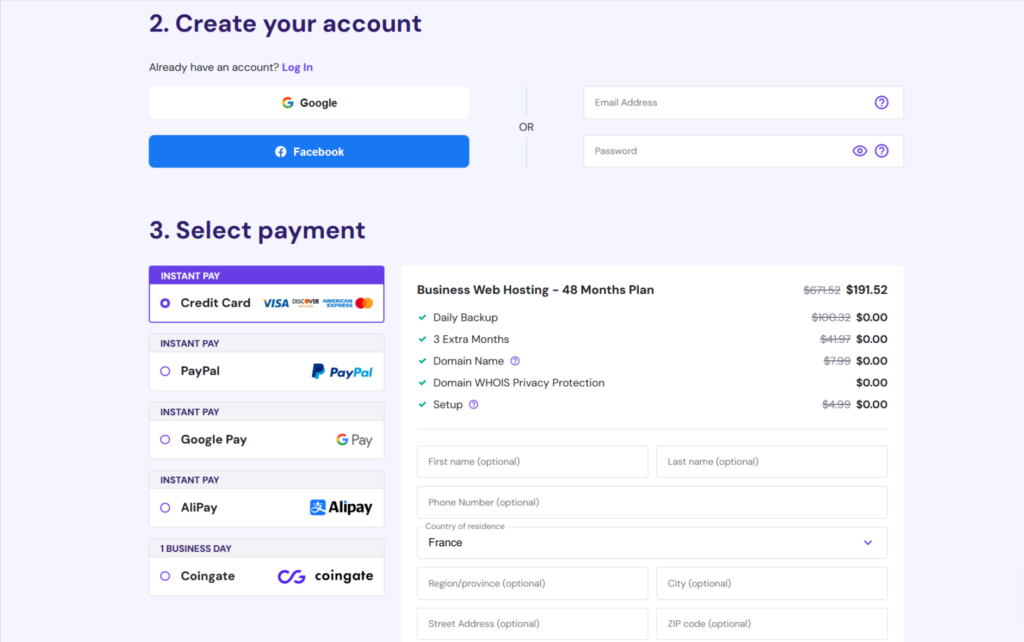
I won’t go into all the details here, no difficulty — just set it up and click pay.
Step 2. Quickly install WordPress with Hostinger’s setup wizard
After you make the purchase, new users are taken straight to the setup page. It’s an AI-powered, beginner-friendly guide. Just follow the steps and click through based on your choices. Follow along with the below details to learn how to do it!
- Who is this website for – you’ll choose who the website is for, select “myself or my business” and click next.
- it’ll ask if you want to create a new website or migrate an existing one to Hostinger. Choose “Create” and click next.
- Choose how you want to build your website, Hostinger offers two tools: WordPress and Hostinger Website Builder. Choose WordPress and click next.
- Now, set up your WordPress login info, including the site language, login email, and password. Once that’s done, click next.
- Choose your website type. Let’s go with “online store“. You can also choose to create a blank site, but for now, click next.
- You’ll pick a theme for your WordPress site in this section. There are pre-built websites available, which are pre-designed templates from Astra. Themes include Astra, Kadence, and others. My site uses Kadence, but I don’t recommend installing a theme or template here because you can do it later. So, click “Create a blank site“.
- Add and install plugins. For beginners, I suggest not installing plugins here to avoid confusion. You can always add them later from the WordPress dashboard. However, you can install WooCommerce since you’ll need it for an online store. Click next.
- You need to set your brand name here, which is your website name, and a site description. Fill these in based on your actual details. Think carefully about your brand name, but the site description can be changed later. Once done, click next.
- This step is for setting up your domain. You can use an existing domain, register a new one with Hostinger, or use a temporary domain for now. Let’s use a temporary domain. Confirm and click “Use temporary domain” to move to the next step.
- Choose a hosting data center. Hostinger has data centers on every continent. Pick the one closest to your main target audience. Click next.
- Now, it’ll start setting up your hosting and installing WordPress. Wait for the progress bar to complete, and you’re done.
These steps are straightforward for beginners, though Hostinger might make small changes occasionally. Any differences you see won’t affect your understanding of the overall tutorial.
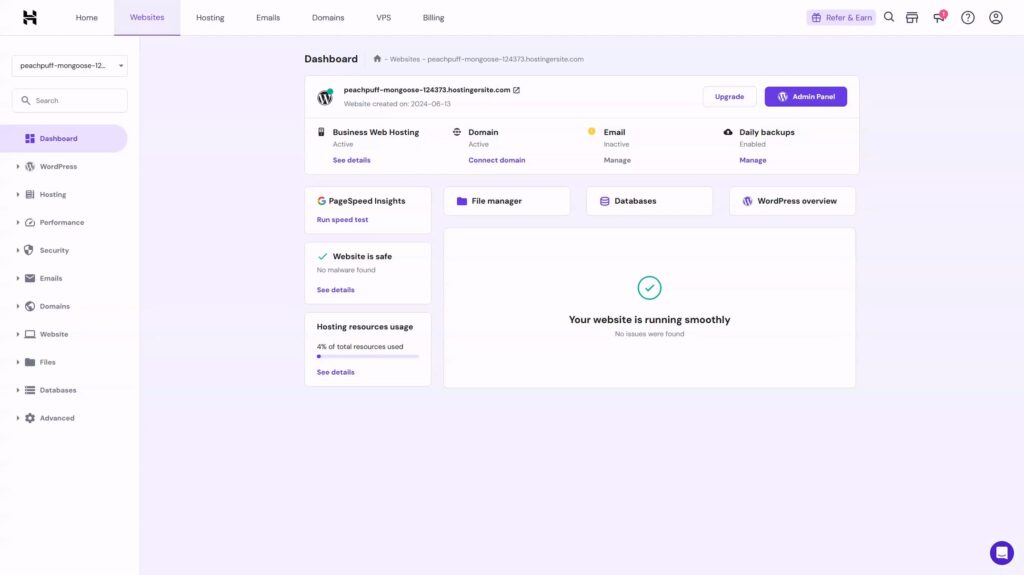
Once the hosting setup is complete, you’ll see your hosting control panel. You can click “Admin Panel” to preview your WordPress admin dashboard and frontend.
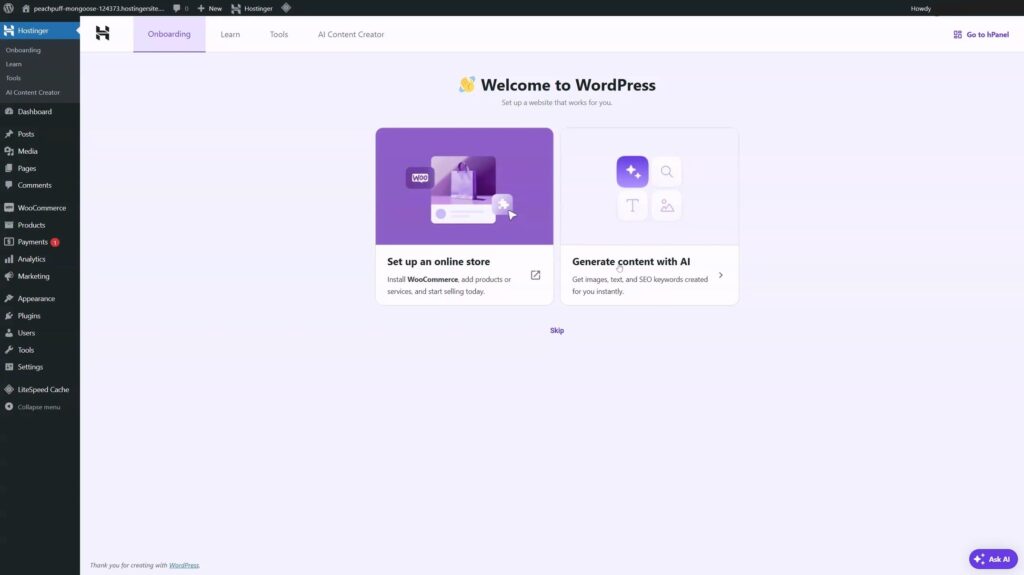
The screenshot above shows where you can start building your site and creating new content. If you add your domain to the website, you can now visit it online, but it only displays the default Homepage of WordPress.
Step 3. Connect Custom Domain and Install SSL certificate
To build an online store website, you’ll need not only hosting but also a domain name. The hosting serves to host your website and store its data, while the domain name is the address of your website. Once your website’s hosting is linked to a domain name, users can access your site through your domain. So, in this step, let’s connect the domain name to the Hostinger.
In the Hostinger dashboard, click on “Websites” in the top menu. You’ll see the WordPress site you just installed. Under the website, there’s a “Connect Domain” button. Click on it, and you’ll be taken to the step in the beginner’s guide where you add your domain.


Why am I specifically mentioning connecting the domain at this step? Mainly to help you understand the basic structure of your website. Additionally, we’ll need the domain to install an SSL certificate for your site.
As shown in the above screenshot, you can enter your domain name in the table. You can either register a new domain directly on Hostinger or use an existing one. However, I recommend beginners register a domain on Hostinger.
The reasons are:
- With any new hosting plan purchased from Hostinger for a year or more, you can register your domain for free for the first year.
- when you register a domain with Hostinger, the domain is automatically connected to your hosting. You won’t need to do any additional DNS setup.
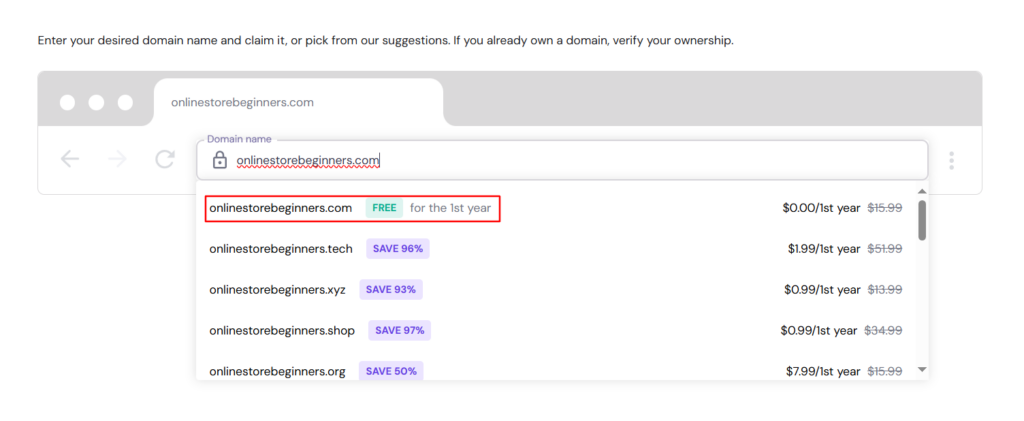
Once you entered your domain, click “Next” to enter the domain registration process. Fill in your information as required, and complete the registration. This ensures that the domain is officially yours.
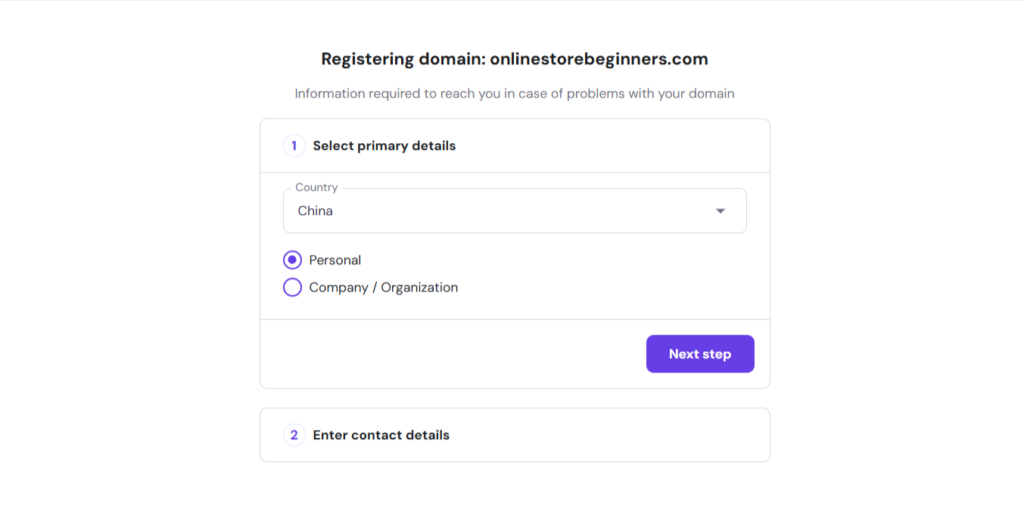
Domains registered with Hostinger include WHOIS privacy protection, which is great because it keeps your domain details private and prevents spam.
Once the domain registration is complete, it will be automatically connected to your website, making your domain your website’s URL.

Now you can use your domain to browse your website homepage.
Install SSL certificate
According to Google’s rules, all websites need an SSL certificate to rank in search results, so installing an SSL certificate is essential. Most SSL certificates are paid, but the most commonly used ones are free, thanks to Let’s Encrypt, they provide free certificates, which everyone takes advantage of.
Almost 99% of hosting providers offer free SSL certificates from Let’s Encrypt, and Hostinger is no exception. So, let’s install an SSL certificate on your website.
However, regardless of the hosting provider you use, your domain must be successfully connected to your hosting before you can install an SSL certificate. As mentioned earlier, if you register your domain directly with Hostinger, it will automatically be connected to your hosting. So now we can proceed to install the SSL certificate on your website.
Head over to “Websites” again in the Hostinger dashboard, and select the site you want to install the SSL certificate on, for example, onlinestorebeginner.com. Click the “Dashboard” button next to the site (previously called the “Manage” button).

Then, In the left-hand menu, you’ll find “Security.” Under the “SSL” section, you can install the SSL certificate.
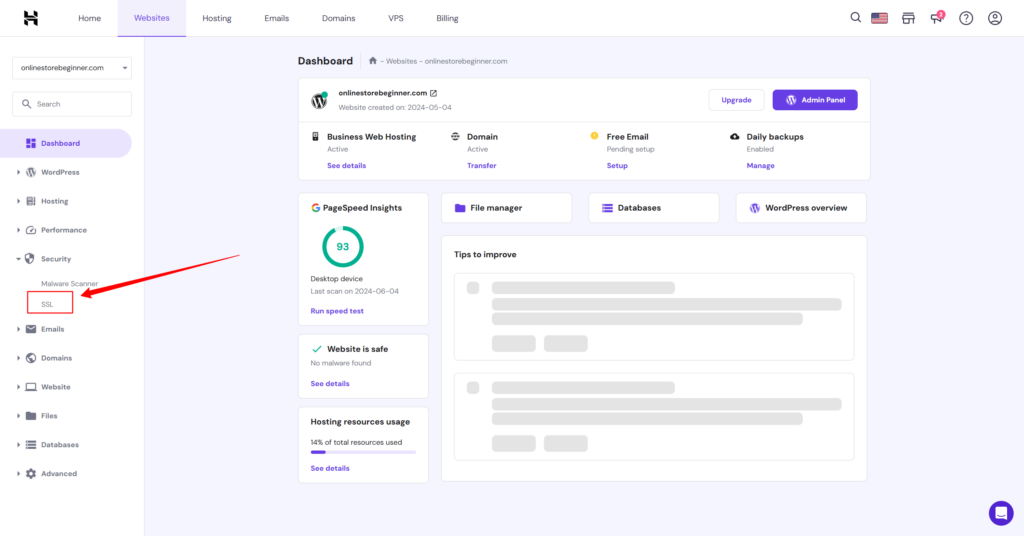
Click on “SSL,” where you’ll see the domain name for which you want to install the certificate. Simply click “Install SSL,” and the installation process may take a bit of time—officially up to an hour, but usually, it’s much quicker, typically 5 to 10 minutes.

Once installed successfully, you’ll see the SSL certificate status turn green and show “Active,” as depicted in the screenshot.

To verify if the certificate is indeed installed correctly, just enter your domain name in your browser. If successful, you’ll see a secure padlock icon before your website’s URL.

At this point, your site is ready to go, and you can proceed to configure it in the WordPress dashboard.
Step 4. Install Theme and Plugins
In this step, We’ll install a theme and some essential plugins for WordPress. Nearly all CMS platforms use themes or templates as a framework for building websites. I mentioned the option to install a theme and some plugins during the WordPress installation process above. To avoid confusion, I only recommended installing the WooCommerce plugin.
WordPress comes with a default theme, such as “Twenty Twenty-Four” for 2024. While the default theme is functional, it’s not sufficient for an online store. Therefore, we need to install a third-party theme with more features, like Astra or Kadence.
Where to Find Third-Party Themes
As the leading CMS platform, WordPress has a vast array of themes available on the internet. There are a few main places to find WordPress themes:
- Official Channels: You can search for suitable themes directly from your WordPress admin dashboard under Appearance -> Themes. Most of these themes are free with premium upgrades. You can start with the free version and upgrade to the premium version as your business grows.
- Theme Marketplaces:
Both Themeforest and Templates Monster are where you can buy themes with a one-time purchase for lifetime updates. However, I don’t recommend buying themes from these marketplaces. Many themes look great but lack performance. Often, developers use plugins to create these themes, leading to unclean code and slow loading times. If you have the time, you can do more research and make an informed decision.
For our site onlinestorebeginner.com, We use the Kadence theme. So, I’ll use Kadence as an example for the following tutorial.
Why Kadence?
Kadence is a professional WordPress theme created by a dedicated team. It’s lightweight, fast, and includes user-friendly starter templates.
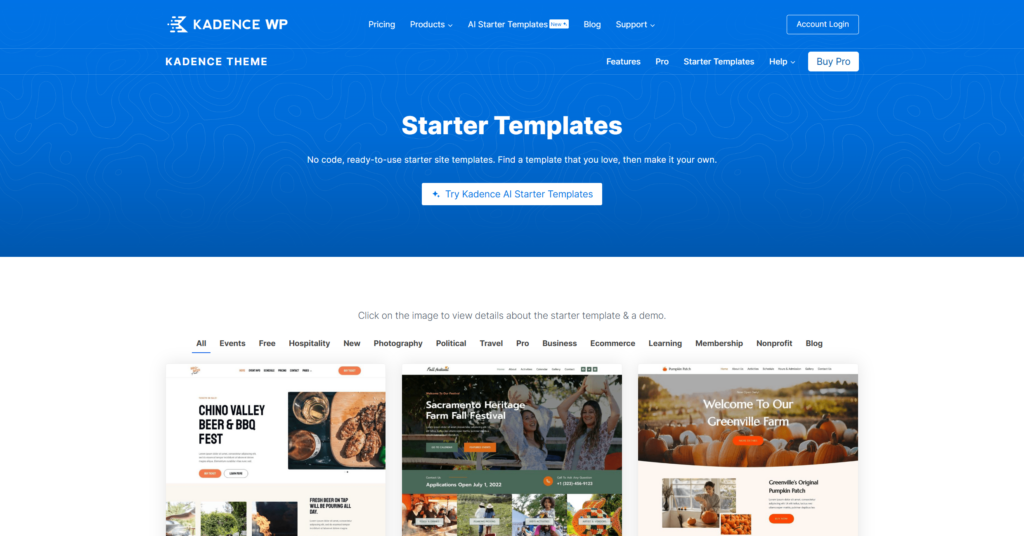
You can start with the free version of Kadence, which has many excellent features, and upgrade to the premium version if needed. It’s truly an outstanding theme.
Start to Install A Theme (Kadence)
You can install the Kadence theme directly from the WordPress admin. First, go to your WordPress dashboard, navigate to Appearance -> Themes -> Add New, and search for “Kadence,” as shown in the image. The first theme listed is Kadence.
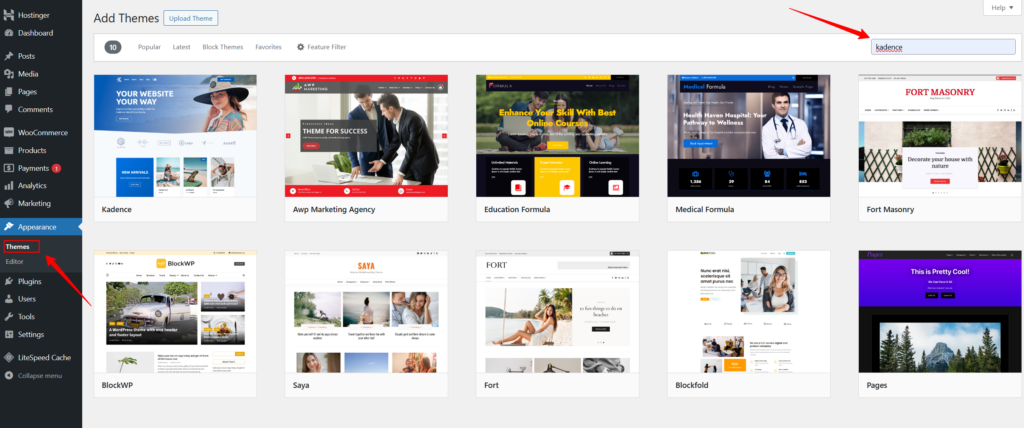
Hover over the Kadence theme and click “Install.” Once the installation is complete, click “Activate.” After activating the theme, Kadence will prompt you to install the “AI Stater Templates” plugin. Just follow the prompts to install it.
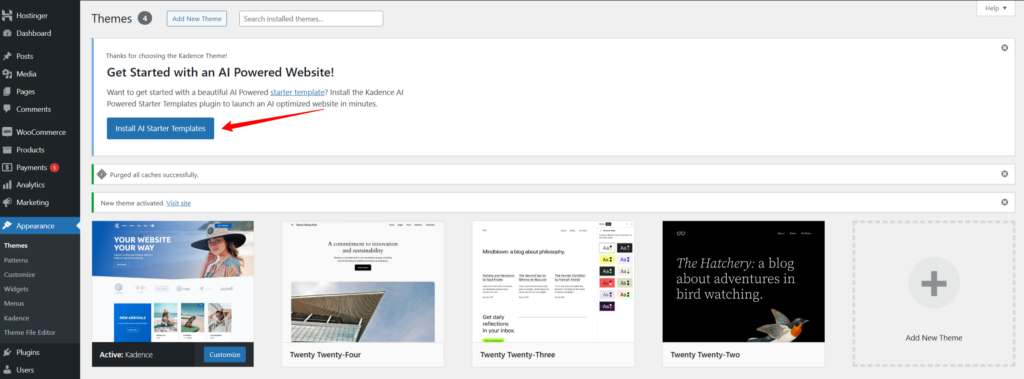
After installing the Starter Templates plugin, as shown in the screenshot below, you have two options: you can use Kadence AI to generate templates based on your requirements, or you can use the Classic mode to import their pre-designed site templates.
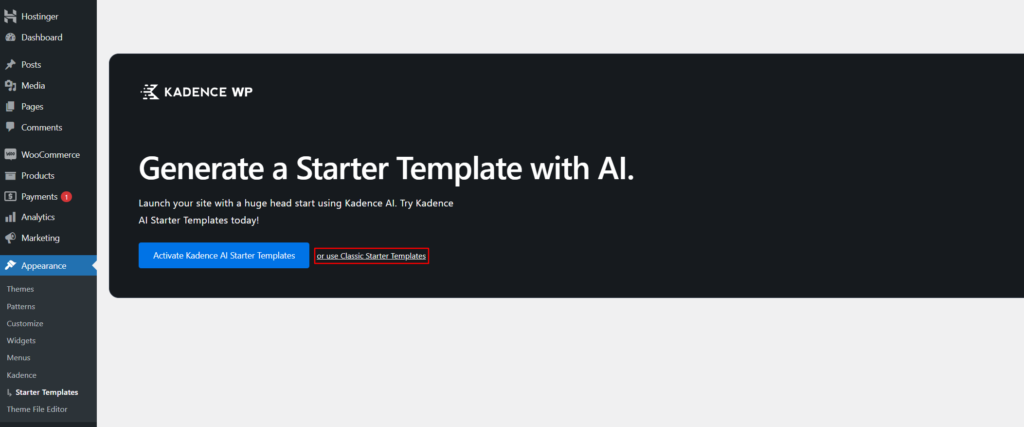
These pre-designed templates include Homepage and other functional pages like About, and Contact. While you can explore using their AI to generate templates, I recommend using the Classic mode to import their templates because these templates are created by WordPress experts, making them both beautiful and high-performance. So, click “Use Classic Starter Templates.”
Import Starter Templates
On the Templates page, first, make sure to select the right page builder tool in the top right corner. The templates vary depending on the tool you choose. There are two main page builders:
- Block Editor: This is WordPress’s latest block-based page builder.
- Elementor: This is one of the most powerful third-party page builders for WordPress. If you prefer Elementor, you might find it worthwhile to purchase their hosting plan.
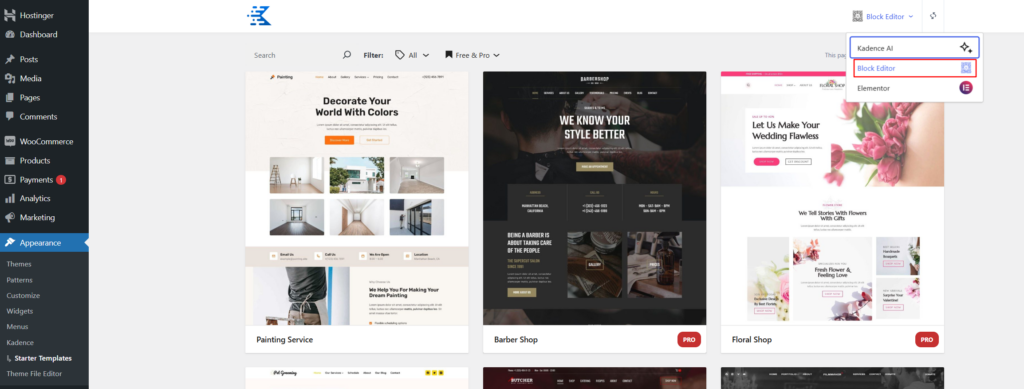
Here, we choose the Block Editor. There are hundreds of templates available, with new ones being added regularly. Since Kadence is still in its free version, select a free template to import, such as the “Outdoor Shop.”

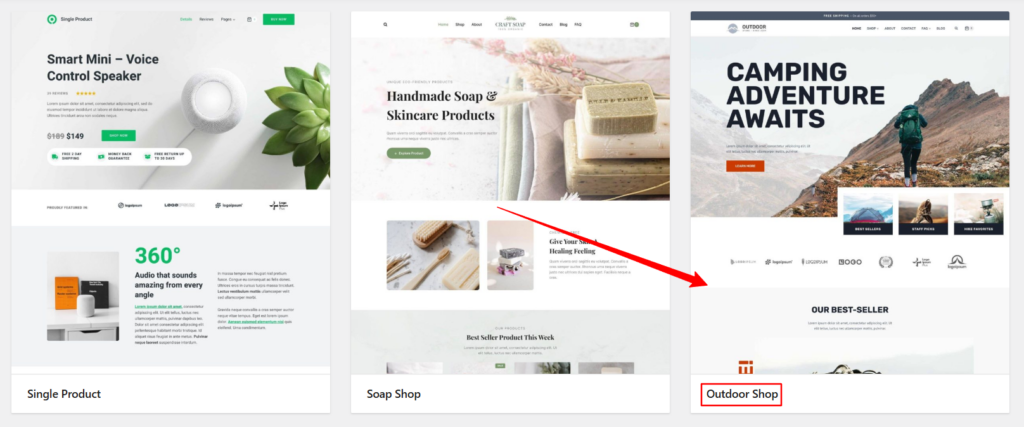
“Outdoor Shop” is an e-commerce template. Click on the template to start the setup process, which consists of three main steps: Style, Content, and Plugins. Configure the settings using the options on the left side, then click “Next” at the bottom or in the top right corner to proceed to the next step.
- Style: Choose your preferred colors and fonts.
- Content: Import the entire site design or select specific pages or widgets you want. For beginners, it’s recommended to import the whole site.
- Plugins: Install the necessary plugins for the template. Choose the plugins based on your business needs. Kadence Blocks and WooCommerce are required. Since WooCommerce was installed earlier, if no other plugins are needed, simply install Kadence Blocks.
Once you have finished the configuration, click on “Finish and Launch” to start importing the template.

Importing the template may take a few minutes, so don’t close the page. Once the import is complete, you can preview your site. Your website will now look like the “Outdoor Shop” template.
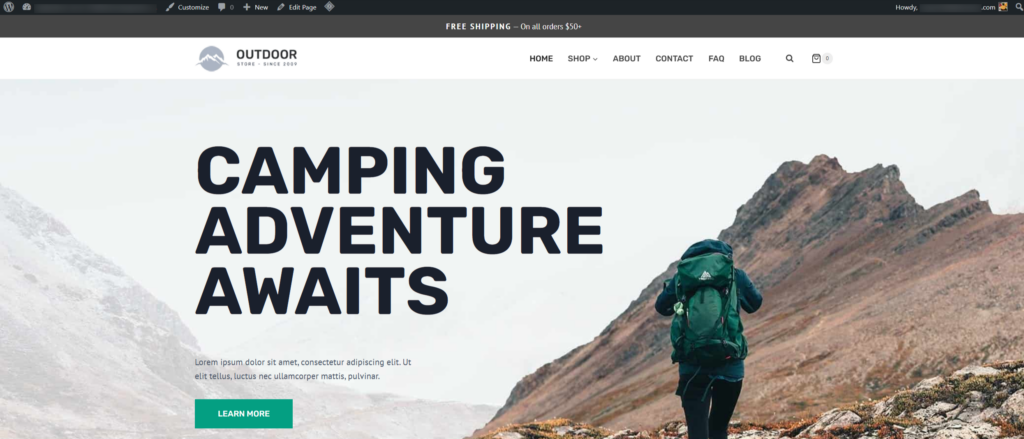
Next, you’ll need to replace the template’s images and content with your own.
Install Other Plugins
The installed plugins can be viewed under “Plugins.” In addition to these, I recommend installing some essential plugins that are crucial for your site’s functionality and future operations. To add new plugins, go to the “Plugins” menu and click “Add New,” then search for the plugins you need. You can always use this section to search for and install any plugins in the future.
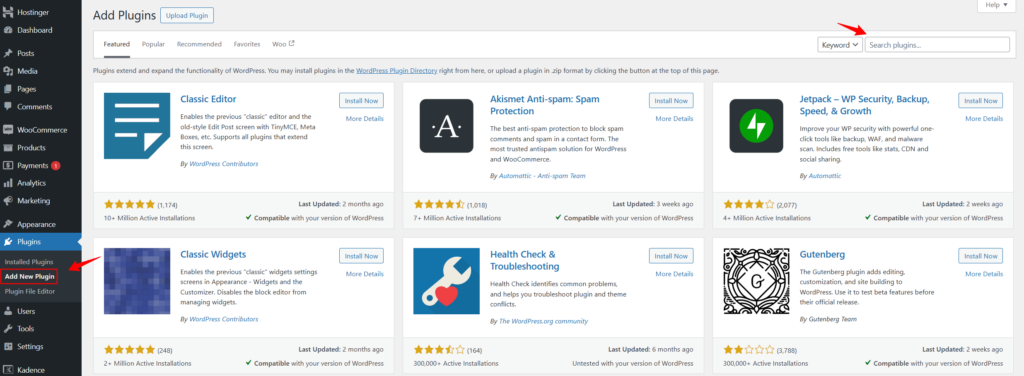
The Plugins We recommend:
- Child Theme Plugins: Before fully setting up your website, install a child theme plugin to create a child theme for the activated theme. This helps prevent any settings from being lost due to theme updates in the future. Learn how to create and why need a child theme here: How to Create a Child Theme for WordPress.
🔸 Recommended: Child Theme Wizard, WP Child Theme Generator
- Performance Optimization Plugins: These plugins optimize webpage speed, reducing page load times.
🔸 Recommended: Since Hostinger uses the LiteSpeed web server, the top recommendation is LiteSpeed Cache.
- SEO Plugins: SEO stands for Search Engine Optimization, which aims to improve your webpage’s ranking and exposure on search engines like Google.
🔸 Recommended: RankMath, Yoast SEO, All in One SEO
- Social Plugins: These plugins facilitate social sharing, promote your social media links, and enable quick social account logins.
🔸 Recommended: Sassy Social Share, Super Socializer, Meks Easy Social Share
- Form Plugins: These plugins add subscription or email forms to your website, allowing customers to submit inquiries. If using Kadence, this feature is included in Kadence Blocks and may not require additional plugins.
🔸 Other recommendations: Contact Form 7, WPForms
- Website Security Plugins: While hosting providers like Hostinger ensure robust security measures, WordPress security plugins add an extra layer of protection for sites.
🔸 Recommended: Wordfence Security, All In One WP Security & Firewall
- Privacy Plugins: If not installed, ensure a privacy policy is in place to comply with relevant regulations.
🔸 Recommended: GDPR Cookie Consent, LuckyWP Cookie Notice
Also, you can search and install any other plugins you find necessary. Installing plugins is straightforward: search, click to install, activate, and then use. However, it’s not advisable to install too many plugins, especially unnecessary cosmetic ones, as the Kadence theme itself is quite visually appealing. Avoid installing unfamiliar plugins as well, as too many plugins can slow down your website’s speed.
Step 5. Customize and Website Setting
Before editing your website’s content, I recommend customizing your WordPress site with some initial settings and design adjustments. This includes WordPress settings, Customizing the Website’s Appearance, WooCommerce settings, and Configuring menus and widgets.
WordPress settings
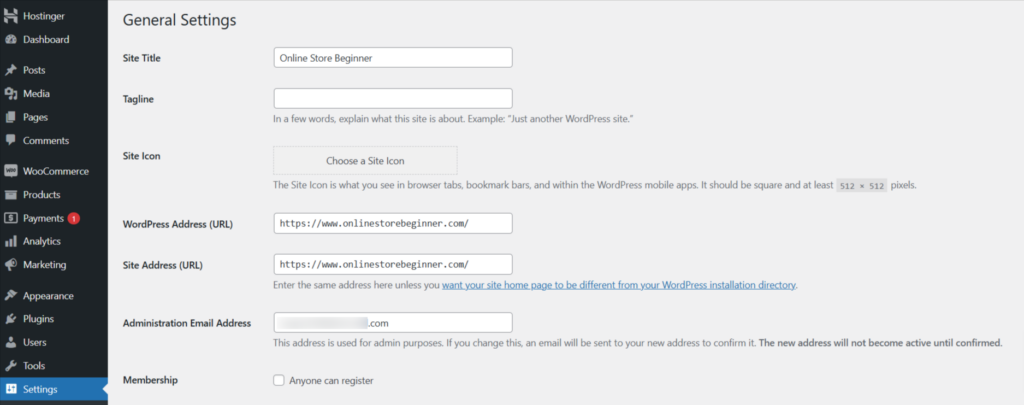
First, you need to configure some basic settings for your WordPress website, which are considered backend settings. Navigate to “Settings” in the left-hand menu:
- General Settings – Here you’ll find fundamental information about your website, including the Site Title and Tagline. It’s important to finalize your Site Title and try to avoid changing it frequently. Next, set the WordPress Address (URL) and Site Address (URL); commonly, these should be the same. Whether you prefer to include “www.” in the URLs is up to your preference; other settings can generally remain unchanged.
- Writing – This section primarily deals with settings related to writing blog posts. You can leave these settings unchanged.
- Reading – Configure your website’s homepage and blog page here. At the bottom, it’s advisable to check the option for Search Engine Visibility. Checking this prevents search engines from indexing your site. It’s recommended not to have your site indexed by search engines until it’s completed to avoid affecting rankings.
- Discussion – Settings related to comments on blog posts. You can leave these settings as they are.
- Media – Settings for handling media files. Keep the default settings.
- Permalink – Choose “Custom Structure” and enter “%postname%” or simply select “Post name“. Then, save your changes.

- Privacy – Here, you can add your website’s Privacy Policy page. It’s recommended for every website to have a Privacy Policy page, as it’s crucial. WordPress provides a sample Privacy Policy page which you can use, or you can refer to other websites in your industry to create your own Privacy Policy page.
Additionally, some plugin settings may also appear here, depending on the themes and plugins you’ve installed.
Customizing
Customizing is mainly for appearance settings, also known as front-end settings. These settings determine how your website looks on the internet and what your visitors will see. The most important part of appearance settings is the Customize section. This is where you configure the overall layout of your website.
As shown below, we’ll use the Kadence theme as an example too, different themes might have slightly different options here, so you may need to refer to the theme’s documentation for specific settings.
**Note: To set page content, go to the dashboard and find the specific page under Pages!
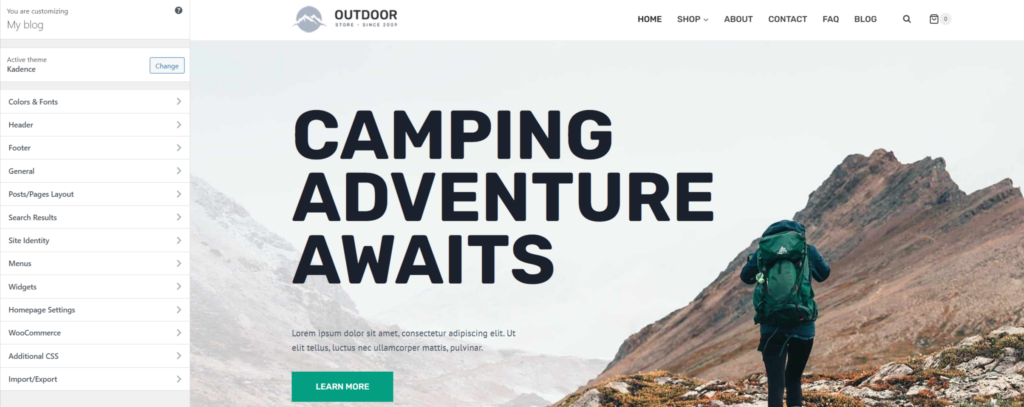
- General – Common settings, included in every theme. This mainly covers the default layout, colors, fonts, sidebar display, buttons, etc. Most of these settings depend on personal preference. You can tweak them and see the effects as you go, or you can leave them as default. And it’s recommended to check all the options under Breadcrumbs and Performance.
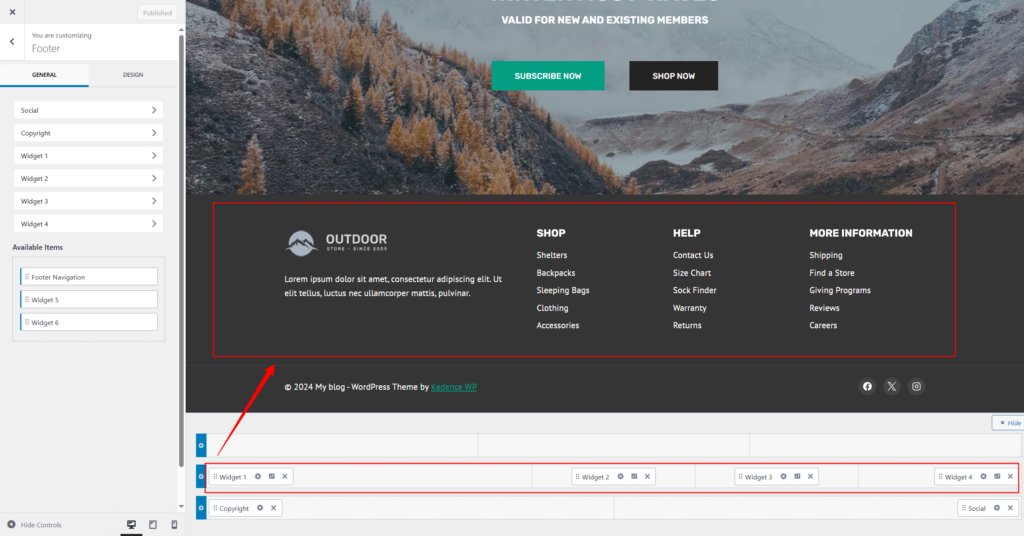
- Header and Footer – The Kadence theme offers a very user-friendly way to set up headers and footers. They are divided into three rows, and you can freely drag and drop the widgets they provide into these rows. Unlike other themes that have fixed header and footer layouts, Kadence allows more flexibility. In the latest version, the Kadence footer can use Gutenberg blocks, giving you more creative freedom to design your header and footer as you like. See the image below for reference.
- Page Layout, Blog Posts, and Search Results – These are the layouts for your web pages, blog posts, and search result pages. It’s best to have the corresponding page open while setting these so you can see the changes in real-time.
- Site Identity and Homepage Settings – Site Identity is where you add your website logo and site icon. Homepage Settings are the same as the Reading settings in Dashboard Settings.
- WooCommerce – These settings are for the layout of WooCommerce shop pages, including the catalog, single product pages, checkout page, and my account page. Adjust them according to your preferences.
- Additional CSS – This is for adding custom CSS to change the appearance and layout of your site. If you’re not familiar with CSS, you can skip this section.
- Import/Export – This allows you to export and import your customized settings. Once you’ve set everything up, you can export the settings as a backup in case you need to restore them later.
- Menu and Widget settings – Do not configure these here; we will cover them separately later.
Menus and Widgets
Let’s go for Menus and Widgets now.
Menus
“Menu” is the navigation of your website, essentially the roadmap, allowing visitors to access different pages and sections. Without a well-structured menu, your visitors might get lost.
In the Kadence theme, you can edit and set up menus within the Appearance section. Navigate to Appearance -> Menus to start setting them up, as shown in the image below.
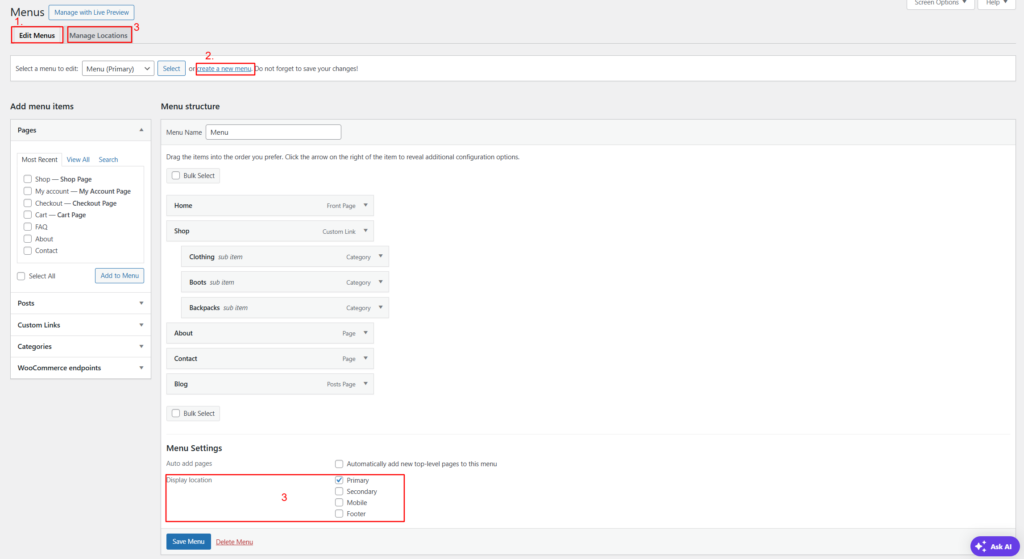
The settings are quite straightforward. After importing the Kadence template, the theme usually comes with a few pre-set menus. You can edit, add, or delete them as needed.
- Editing Menus: The selected menu you see is the primary menu, which is the menu in your site’s header. You can click the small triangle on the right of each page to edit or delete links in “Menu structure“. To add new links, select them from the links on the left and click “Add to Menu.” The left side includes nearly any type of page from your site, and you can even add custom links.
You can drag and drop links within the menu to arrange their positions or to create submenus. Each link in the menu can have a custom display name, so if your page is named “About,” you can set it to display as “About Us,” etc. - Creating a New Menu: Click “Create a new menu” (highlighted in red in the image) to create a new menu. Give the new menu a name for easy reference, then start editing. Deleting a Menu: If you don’t need a menu, scroll to the bottom and click “Delete Menu.”
- Menu Locations: you’ll see a “Display Location” section in the bottom (highlighted in red). When editing or creating a menu, you can choose where to place your menu. Only the primary menu location needs to be selected here; others can be set in the header or footer in the Appearance -> Customize. You can also manage menu locations by clicking “Manage Locations” at the top.
Once everything is set, hit “Save” to preserve your changes. Then, go to your website to see how it is. For some intricate menus like mega menus, you need to install plugins.
The logic for setting menus is to first create or edit your menu, then place it in the desired location. You can set the location here or in the Appearance -> Customize section under Header and Footer.
Widgets For Sidebar
Widgets are a special feature in WordPress, generally used to set up the sidebar and footer. Some themes might also add other locations like the header.
In the Kadence theme, since there’s a dedicated header and footer editor, widgets mainly function for the sidebar, refer to the image below for a quick look.
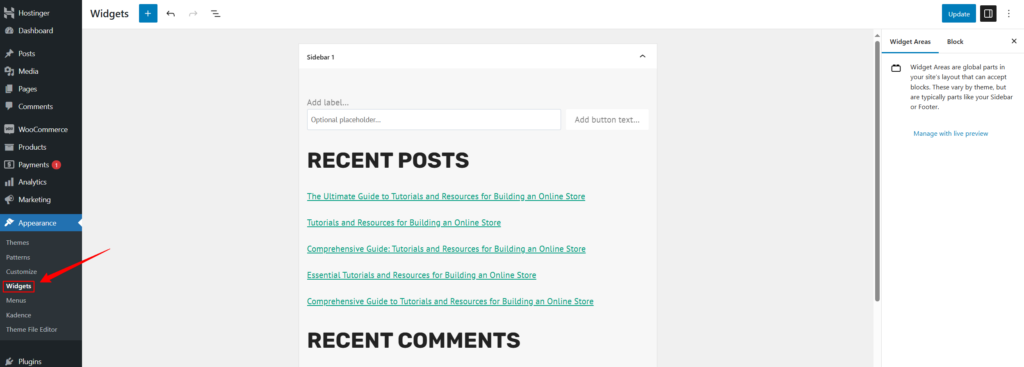
Widgets now use WordPress’s block editor, making setup easier than before. I won’t go into detail about how to use widgets here, but I’ll explain it in more detail during the page creation step later.
WooCommerce settings
Setting up an online store requires configuring your shop, similar to setting up a store on e-commerce platforms like Amazon or eBay. This involves setting up the store backend and adding personal information, payment methods, and shipping options.
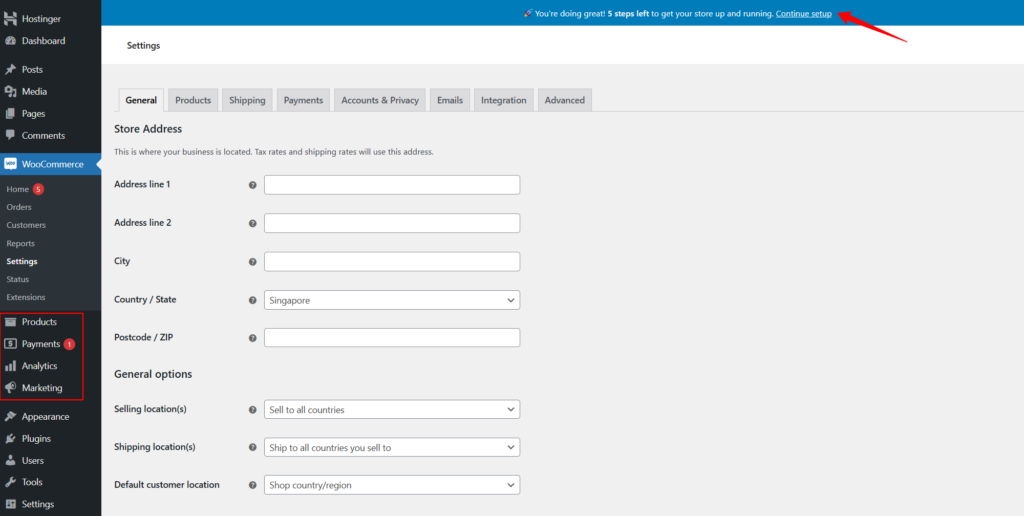
There isn’t much to elaborate on this step. It mainly involves entering information related to your business. WooCommerce also comes with built-in analytics and marketing tools, which you can find in the left navigation menu.
That’s about it for the WordPress online store site settings and customization. The WordPress dashboard has other settings, but there’s no need to modify them unless necessary. As you become more familiar with WordPress, you can explore these settings in more detail.
Step 6. Add and Edit Contents
If building an online store is like constructing a physical stop, then the previous steps can be considered as completing the basic structure. Now, it’s time to decorate and add products.
Edit and Add Pages
When you import the Kadence template, the theme automatically adds some related pages, which you can view in the Pages section. Keep the pages you need and directly edit them to replace the content with your own. If there are pages you don’t need, you can delete them.
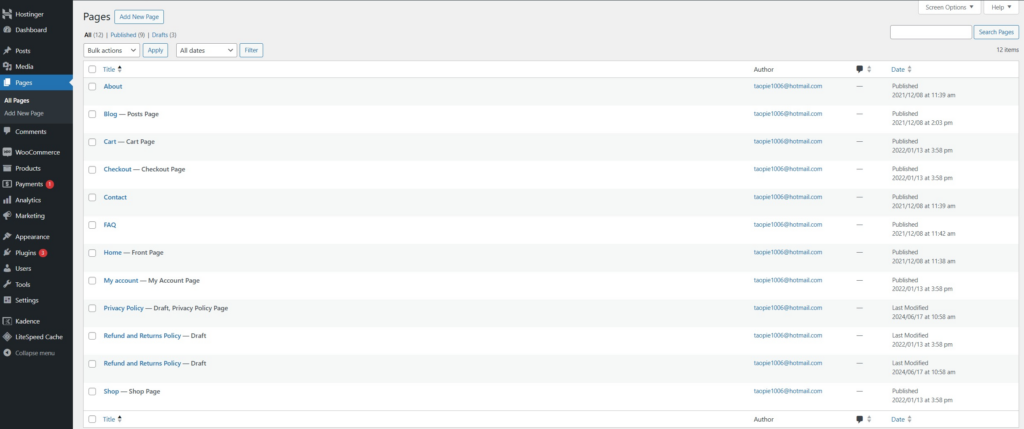
It’s important to note that you should not delete any default WooCommerce pages, but you can edit, modify, or delete other pages as needed.
For an online store, you might need to add some pages to enrich your website and make it easier for customers to understand your brand and products. The specific pages you need will depend on your business requirements.
Here’s how to add or edit a page, using the existing “About” page as an example:
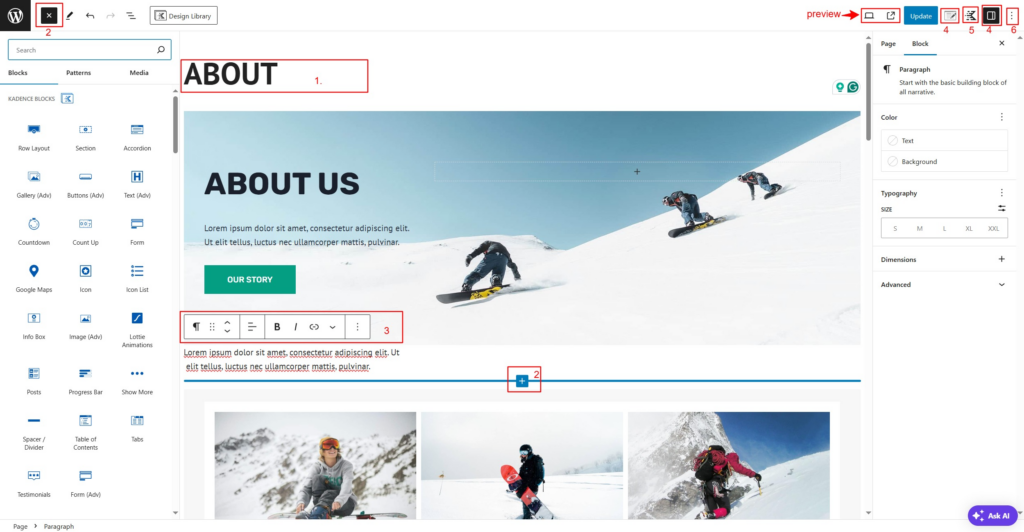
Refer to the image above to understand each feature, labeled with numbers:
- Title
- Add Block – There are two places to add blocks, marked by the two ➕ buttons. Click on the “➕” to see which blocks are available on the left. You can add the required blocks as needed to enrich the webpage. Besides the default WordPress blocks, the Kadence blocks are installed. You can also search for other block plugins, but Kadence blocks can handle most functionalities.
- Block editing is visual, allowing creative freedom in designing your WordPress website. New users might need to practice a few times to become proficient.
- Block Quick Toolbar – You can quickly adjust the selected block using this toolbar. For example, with a paragraph block, you can easily change the font and color, add links, underline text, and more.
- Page Settings
- Page – Includes publishing time, permalink, comments, etc.
- Block – More detailed settings for the selected Block.
- Page Layout Settings – Specific to the Kadence theme and may vary based on the installed theme.
- Kadence Blocks Control
- Settings for the block editor.
Additionally, you might see other settings brought by plugins, such as SEO plugins. Familiarize yourself with these settings based on the specific plugins you have installed.
Once you understand these basics, you can start replacing the content and images with your own. You can also add any necessary content as needed. The page content is usually auto-saved, but it’s a good habit to manually save your work to avoid losing new content. Once you’ve edited all the content, you can preview your page first, and then update or publish it if everything looks good.
Add Products
Products are the core of any e-commerce website, I think. When you import the Kadence template, it will automatically add some sample products too. Don’t delete these right away; you can use them as references. Once your products are ready to go live, you can remove these sample products. These samples are typically incomplete, with placeholder prices.
The WooCommerce product description editor still uses the classic WordPress editor, which many seasoned WordPress users prefer. While I find the latest block editor more efficient for creating pages and posts, the classic editor might be simpler and more practical for editing product descriptions. Here’s a breakdown of each function, marked with numbers:
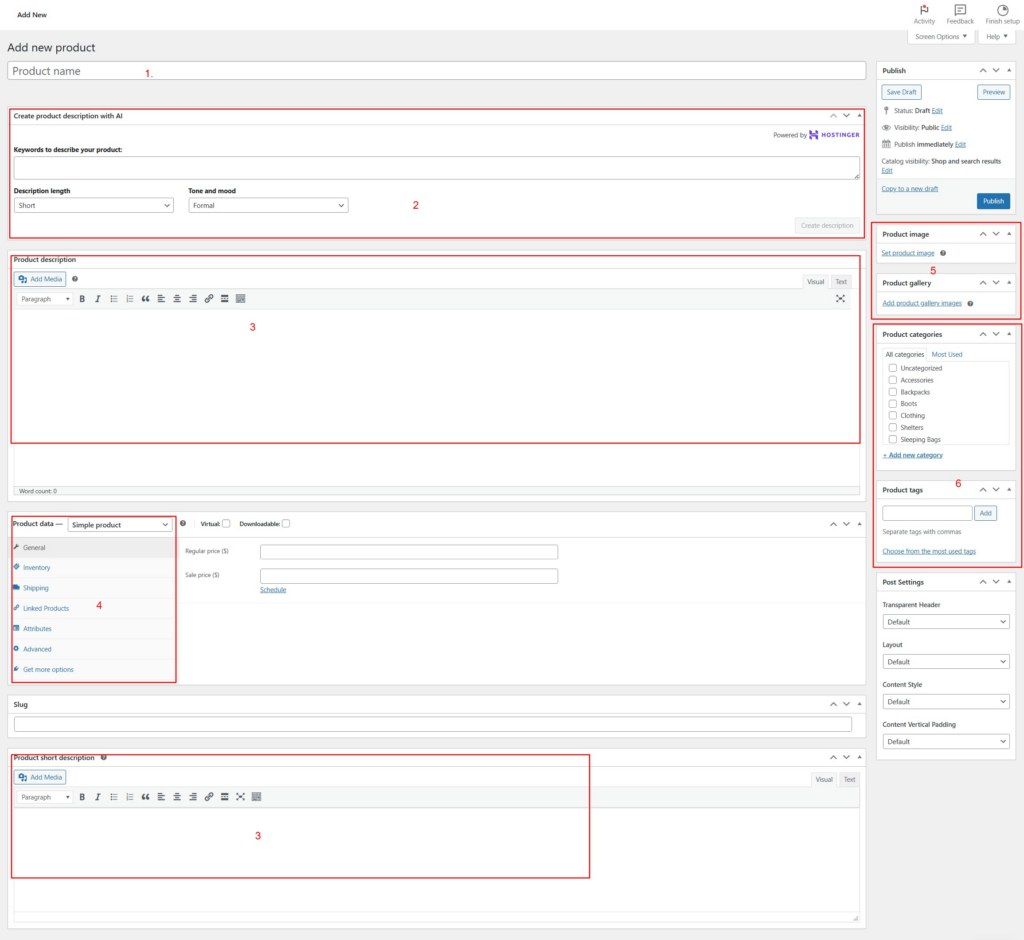
- Product Title
- Create Product Description with AI – This is an exclusive feature of Hostinger, designed to help users create their product descriptions more effectively. However, I recommend editing the details yourself because AI may not fully understand the specific features of your products.
- Product Description and Short Description – Here you can edit your product description and details, and also add images, links, etc.
- Product Data Settings – This includes product type, price, inventory, shipping, related products, attributes (such as color and size), and other settings.
- Simple Product – A single product with a single color, size, and model. You can also add virtual products like subscription memberships or downloadable products.
- Grouped Product – A set of products sold together, such as an outfit that includes a jacket, pants, and a shirt.
- External/Affiliate Product – A product that links to another website, such as Amazon, where you can promote your own products or earn commissions by promoting others’ products.
- Variable Product – Most products fall into this category, as they come with different options like colors and sizes.
- Product Images – This includes the main product image and additional images for a gallery. The screenshot misses one detail:
- Product Image – Set the main image of the product here.
- Product Gallery – This is for additional images that will be displayed in a carousel after the main image.
- Product Classification – There are two types:
- Product Categories – For organizing your products.
- Product Tags – For tagging your products with specific keywords.
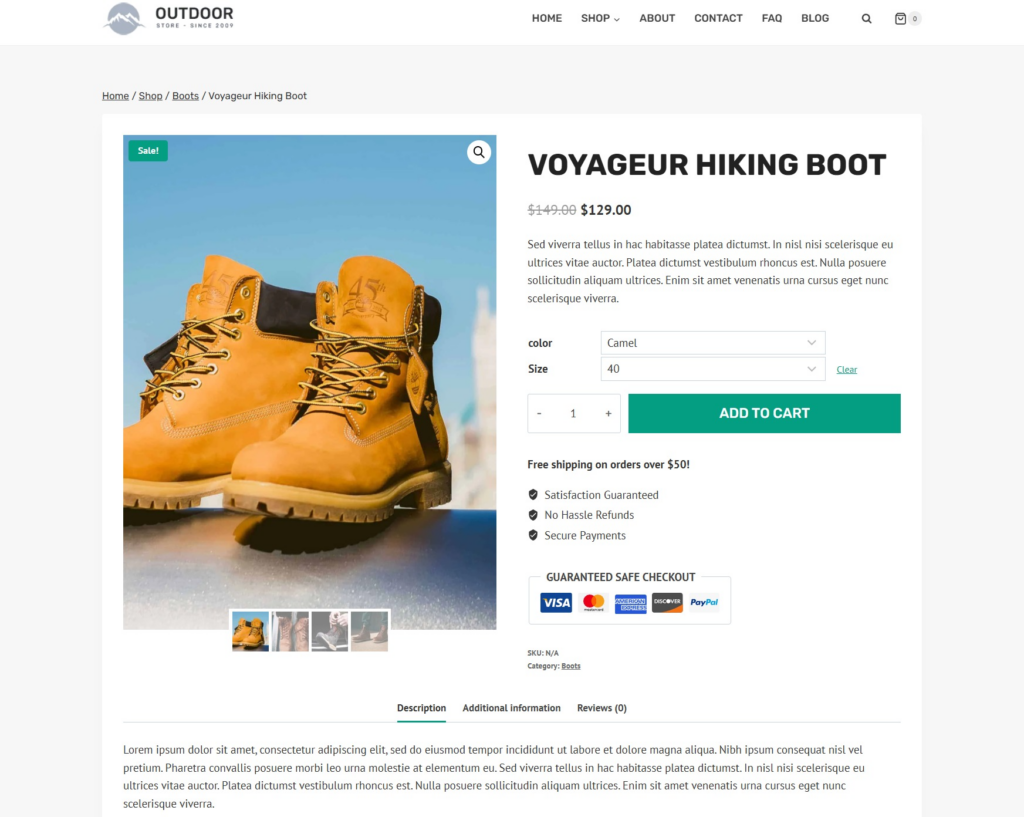
I tried editing a variable product, as shown in the image. Doesn’t it look quite professional?
In addition to pages and products, you can also write blog posts to enrich your website content. After all, WordPress is originally a blogging CMS. You can add posts in the “Posts” section of the dashboard. Writing articles about your products or industry can attract traffic to your site through search engines. Creating posts is similar to editing pages, both use the block editor.
Step 7. Publish your Site
Once you have sufficient content on your website, it’ll be ready to publish on the internet.
- You need to go to the Reading settings in the dashboard and uncheck the option to discourage search engines from indexing your site.
- Submit your website to search engines like Google and Bing to crawl your web pages. Check this article to learn How To Submit A Website To Search Engines For Beginners.
After launching your website, pay attention to the following:
- Avoid changing fundamental elements like site name and description unnecessarily.
- Refrain from switching themes without careful consideration.
- Avoid plagiarizing content from others.
- Optimize your website using SEO plugins.
- Regularly update your website by adding new content such as products and blog articles at least two to three times a week. This helps search engines view your site as active, which is beneficial for crawling and ranking purposes.
Conclusion- Build an Online Store with WordPress & Hostinger
This article is quite lengthy, but our goal was to thoroughly explain the methods so that everyone, regardless of your choice of hosting or theme, can learn to build your own website. This aligns with the core philosophy of WordPress and Hostinger—to empower individuals to create their own online presence.
We have delved into many WordPress settings that are not easily discovered, which can save newcomers from unnecessary pitfalls. There’s an old Chinese proverb that says, “Give a man a fish and you feed him for a day; teach a man how to fish and you feed him for a lifetime.”
Furthermore, with the rise of artificial intelligence, many platforms promote AI-powered website building. However, I believe this approach has limitations as AI has not yet reached high levels of sophistication. AI-generated websites often lack customization and can be prone to errors. Therefore, while AI can provide some initial insights, building a website still requires human ingenuity and oversight.
If you have any further questions, feel free to leave a comment at the bottom of the article or reach out to us via social media platforms.


