Prestashop(for version 1.7.x) is a professional open-source e-commerce CMS (Content Management System) platform from France. Like WordPress, it’s relatively lightweight and suitable for small to medium-sized websites. Prestashop e-commerce sites have a large number of users across many countries and regions, especially in Europe, as evidenced by the number of Prestashop themes available on major platforms.
The latest version of Prestashop is Prestashop v.8.
The most famous CMS is, of course, WordPress. However, to build an e-commerce site with WordPress, you must install the WooCommerce plugin, while Prestashop is an e-commerce platform. Once you install this open-source system, your website will already be a store.
There aren’t many comprehensive tutorials available online, so if you’re also interested in Prestashop, my tutorial might be helpful for you: 8 Steps on How to Build an Online Store with Prestashop for Beginners.
Requirements to Build an Online Store with Prestashop
Setting up a Prestashop e-commerce website is quite similar to building a WordPress site, as both are open-source content management systems. At the very least, you’ll need hosting. Prestashop and WordPress are both lightweight tools for small to medium-sized sellers, so hosting requirements aren’t very strict. To start, a shared web hosting plan will suffice.
Here’s a list of basic things you’ll need to prepare to build a Prestashop site:
- A hosting plan, which can be shared hosting: 6 excellent Prestashop hosting providers (cPanel hosting)
- A top-level domain
- The Prestashop open-source system, which can be directly installed through your hosting
- A theme
- Some modules, which are similar to plugins
Now let’s officially begin building the site. Follow my steps, and you’ll easily be able to create a Prestashop e-commerce website.
Step 1. Subscribe to a Hosting Plan
For small to medium-sized websites, shared web hosting is sufficient, especially for beginners. Since shared hosting is managed, all matters and issues related to the server can be handled by the hosting provider. If you’re not familiar with hosting, you can check out this article to learn more about it. There aren’t many specialized Prestashop hosting providers, but most web hosting services with cPanel already have Prestashop installation options ready. To save you time, here are a few recommendations:
- Chemicloud Web Hosting – A relatively new but very popular shared hosting provider. I’ve covered this host in detail in my WordPress website tutorial article.
- Hostinger cPanel Hosting – Affordable overall, using Litespeed web servers, starting at $2.59/month.
- Inmotion Hosting – Uses the globally top-ranked Nginx web server, along with other excellent features.
Most cPanel hosting providers support direct installation of Prestashop 99% of the time. Today, we’ll use Chemicloud as an example to begin our tutorial.
Purchase Chemiicloud Web Hosting
Go to the Chemicloud website. For a new small-medium e-commerce site, shared web hosting is sufficient. Click on “Shared Hosting” and select the “Starter” plan. This is the lowest plan, priced at $2.95/month for the new customers and $9.95/month for renewal, if your business grows in the future, you can upgrade to a premium plan at any time.
The lowest price requires a 3-year commitment upfront, but you’ll notice that many other hosting providers follow this same pricing model.
Click “Order Now,” and the page will redirect to the domain selection page. Choose “Register a new domain” to register a new domain. If you have a domain purchased from a third party, you can select “I already have a domain” and enter your domain, but you’ll need to know how to set up domain DNS settings. Therefore, I recommend beginners register a new domain directly through Chemicloud and you will get the domain name for free for the first year.

After purchasing a new domain here, click “Check.” The page will prompt you to purchase WHOIS privacy protection, which I strongly recommend to avoid receiving spam emails and calls. Proceed to the next step, which is the “Configure” page, where you’ll find related information and additional options.
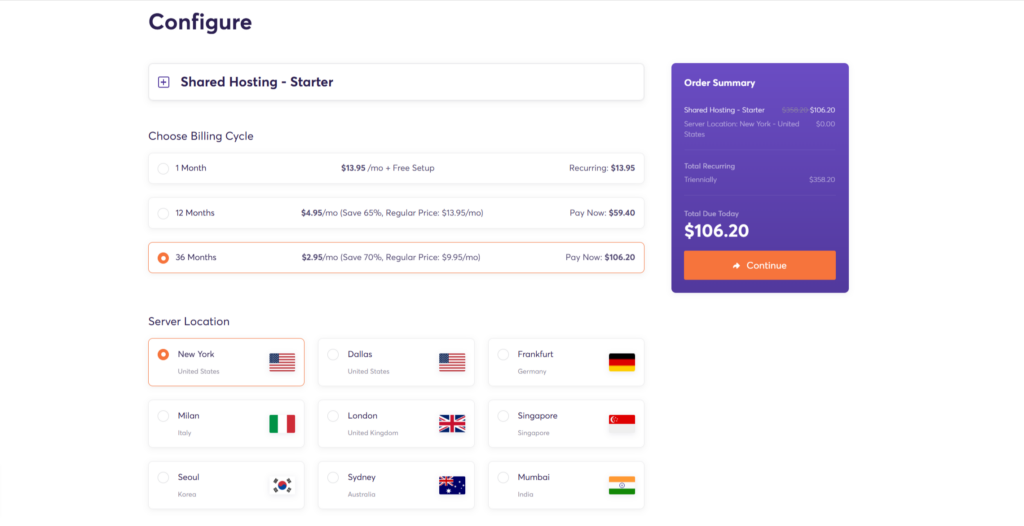
On this page, there are two things you need to select.
- The first is the duration of your purchase. I recommend choosing the 3-year plan. If you’re serious about starting an international business, 3 years isn’t long. Even if you opt for the 2-year plan, the price difference isn’t significant, and the 3-year renewal rate is cheaper.
- Next, choose a data center. It’s best to select the one closest to your primary customer base. You don’t need to choose any other options.
And there is no need for additional add-ons at present, the total price, including WHOIS protection, should be around $100+ for three years, averaging just a few dollars per month—probably the cost of a cup of coffee.
Then, click “Continue to Payment.” At this point, ChemiCloud will ask you to register an account. You can pay via credit card or PayPal. Once the payment is successful, you can log into the dashboard and manage your hosting.
Step 2. Install SSL certificate
After your purchase, you will typically receive several emails providing information about your hosting order and login details.
Log in to the ChemiCloud dashboard. Before installing Prestashop, you’ll need to install an SSL certificate for your domain. In the ChemiCloud user panel, you’ll see the hosting service you purchased.

Click the icon indicated by the arrow in the image above to enter the cPanel. In the cPanel, find the “Security” section. If you’re uncomfortable with English, you can change the language by clicking on your username in the top right and selecting “Change Language.”
Look for “Let’s Encrypt™ SSL.” Click on it to install a free SSL certificate. Scroll down to “Issue a new certificate,” and find the domain for which you want to install the certificate.
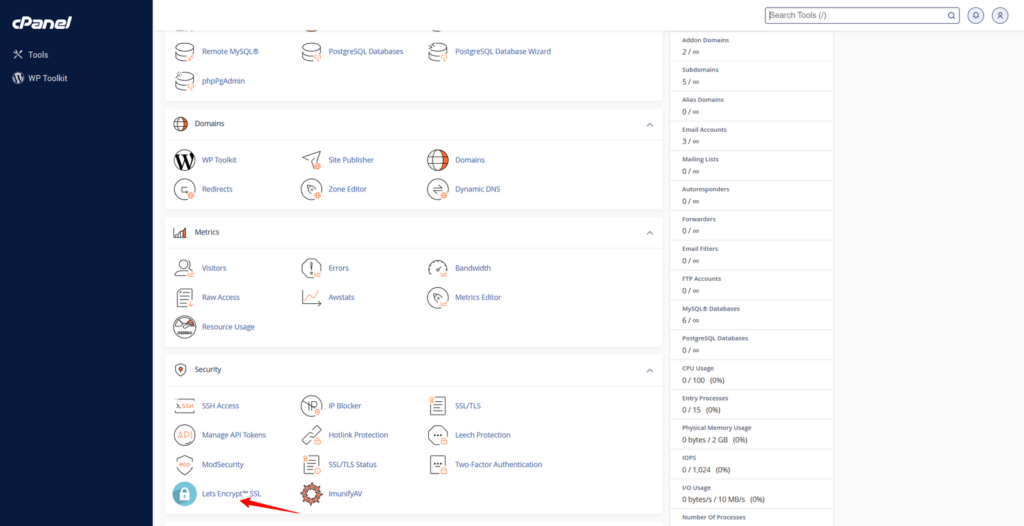
For example, today I’m installing Prestashop on my subdomain, prestashop.qingsongb2c.com (this is just an example). When you’re setting up your site, you’ll see your domain (example.com). Click “Issue.”
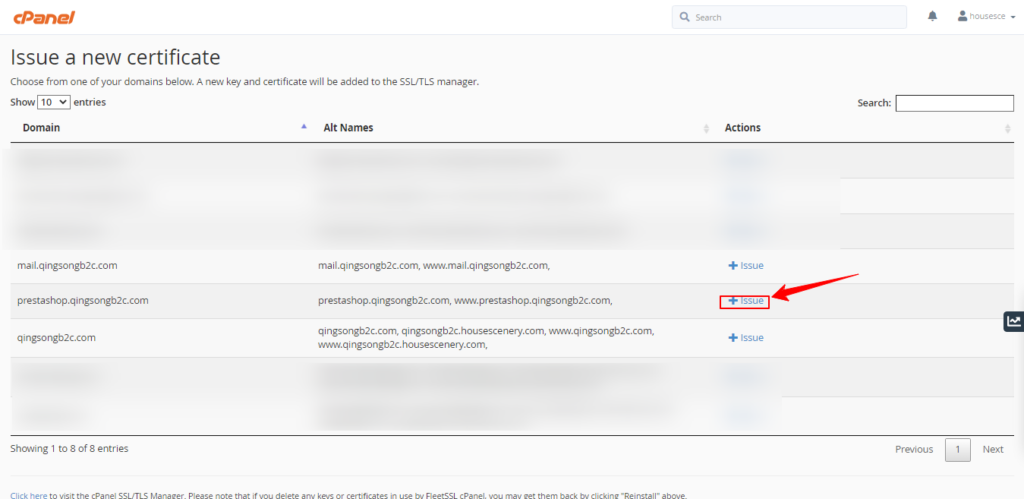
On the next page, select the subdomains you want to install the SSL certificate for. If you don’t need SSL for certain subdomains, leave them unchecked.

Then, click the blue “Issue” button at the bottom.
- If both your domain and hosting are purchased through ChemiCloud, the certificate will be immediately created and installed.
- **If you are using a third-party domain, you must ensure the domain is correctly pointed to ChemiCloud hosting before you can successfully install the SSL certificate. Otherwise, the installation will fail.
To verify if the certificate is installed correctly, simply enter your domain into your browser. If successful, you will see a security lock icon in front of your URL.

For example, on my site, onlinestorebeginner.com, you’ll see the lock icon.
Step 3. Install Prestashop in cPanel
Most of the hosting functions can be managed in cPanel. If you need to install Prestashop, WordPress, etc., it can also be done from the cPanel. Scroll down to the bottom of the cPanel.
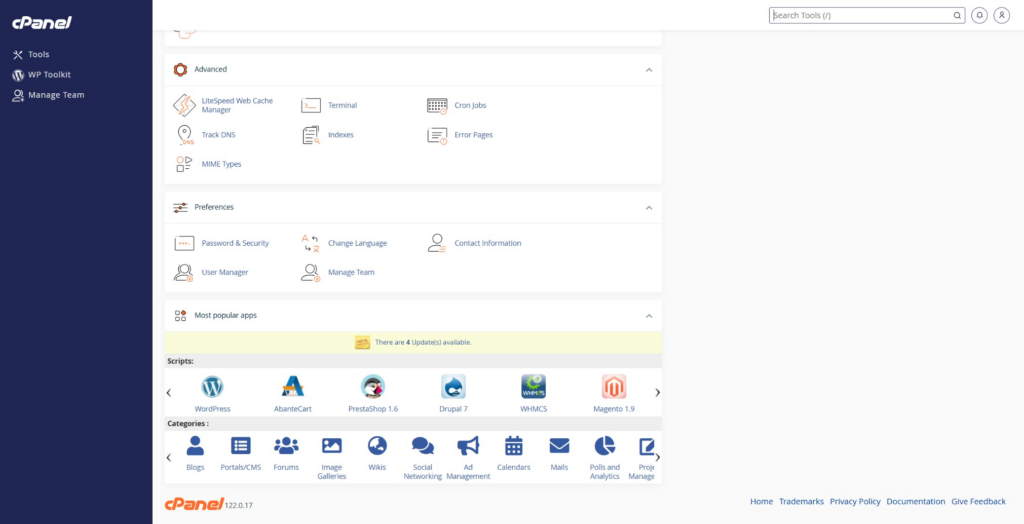
As shown in the image, you’ll see Prestashop listed, displaying version 1.6. However, you can choose different versions once you enter the installation screen, including the latest version, 1.7.8. I recommend installing the latest version because older versions may no longer receive official updates or support, and many new resources may not be compatible. Click on Prestashop to enter the installation page.
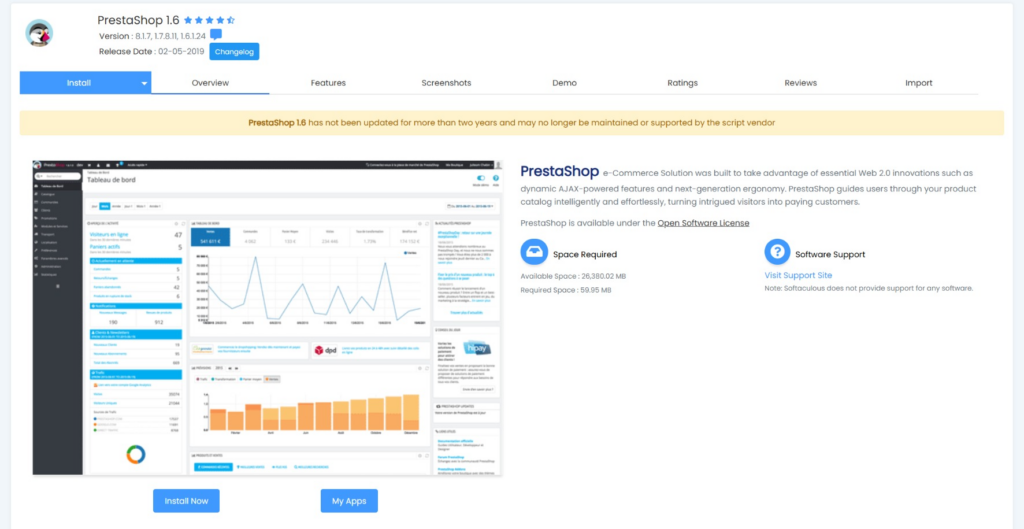
Click “Install Now,” and you’ll need to set up some login information—this will be for your Prestashop store’s admin panel.
As shown in the image, note that Prestashop 1.6 hasn’t been updated for over two years, so it’s not recommended to install that version.
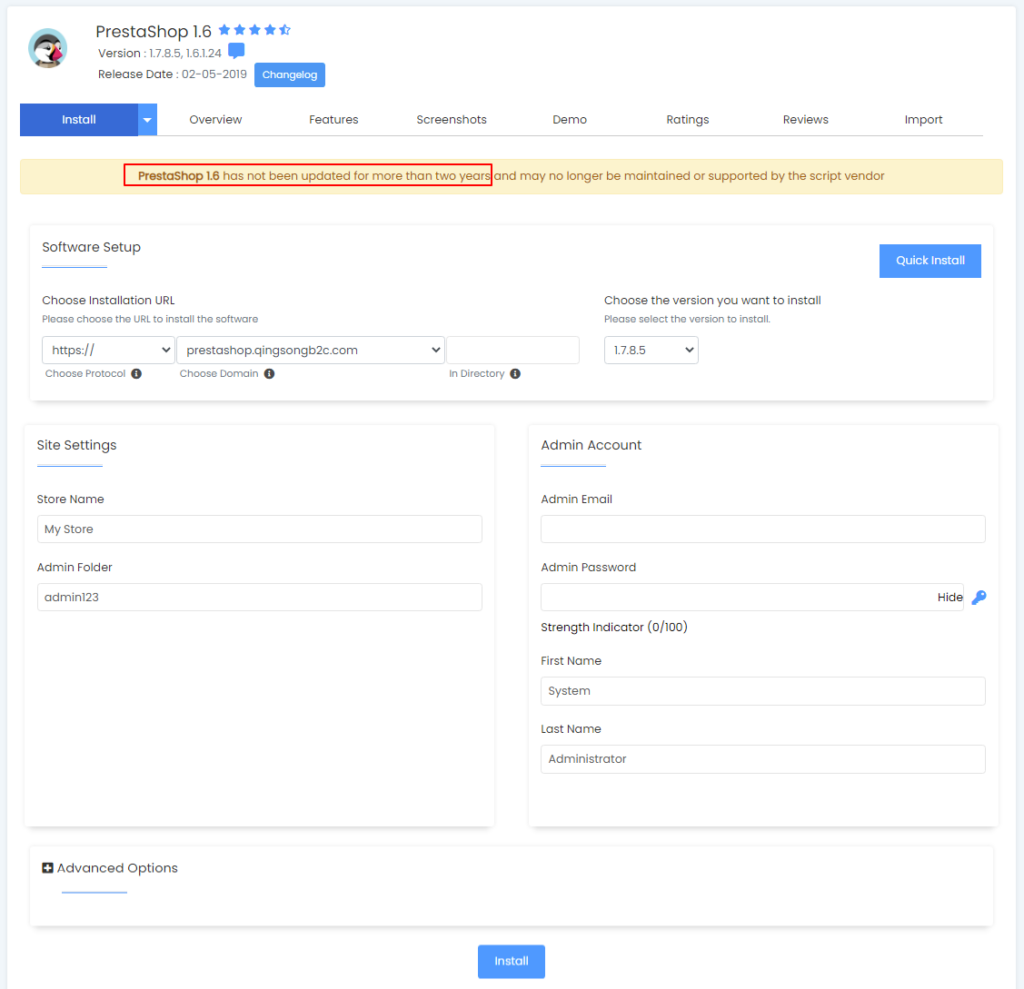
Here are the sections you’ll need to configure:
- Installation URL: This is your website’s homepage URL. In my case, I’m using a subdomain for reference purposes only. You will also select the version to install.
- Site Information: This includes the site name, which can be changed later in Prestashop. For the Admin Folder (admin directory), it’s recommended to modify it for security reasons.
- Administrator Account: Fill in this information according to your preferences.
Scroll to the bottom and click “Install” to start the process. The installation is quick, usually finishing in a few minutes. If any issues arise during the installation, contact your hosting provider for assistance. Once installation is complete, you’ll see the success page.
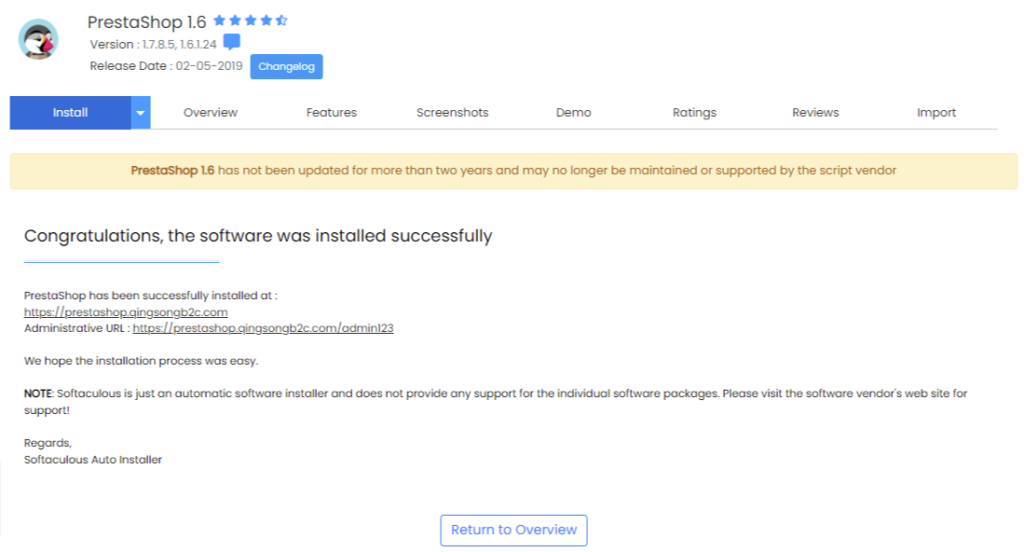
You can click on your website’s URL to preview it, or click the “Administrative URL” to enter the admin dashboard.
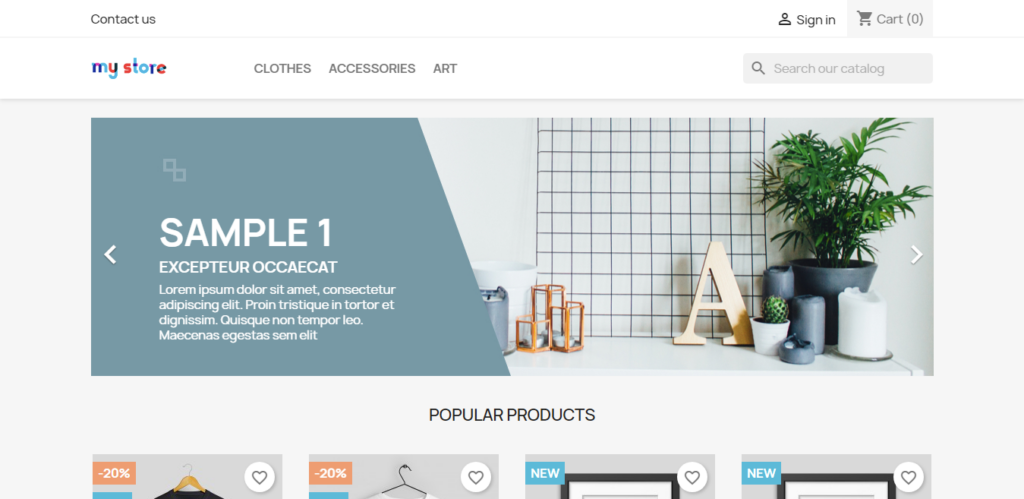
This will give you a fully functional e-commerce site right away. Compared to WordPress, it’s quicker, and if you don’t mind a simple layout, you won’t even need to install a separate theme. Just customize the site and upload your products, and you can start selling.
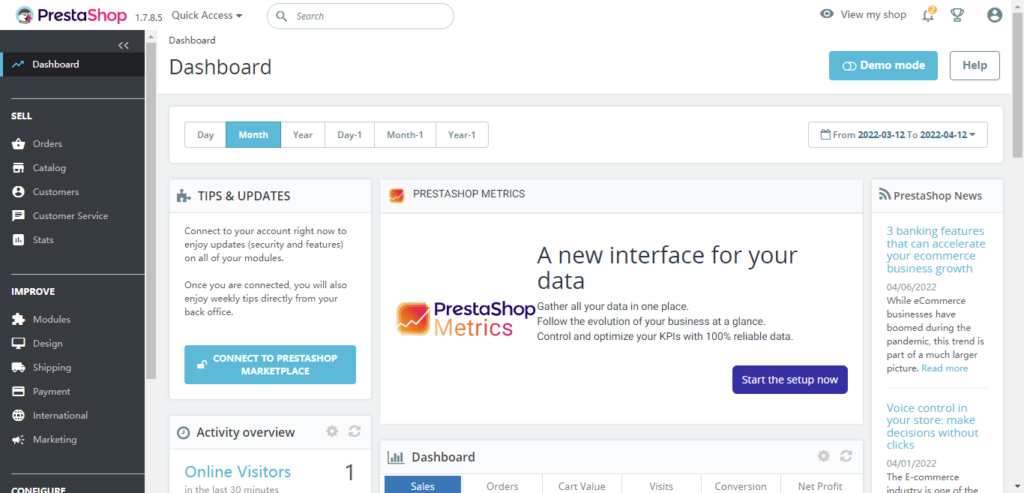
By clicking the “Administrative URL” (remember to save your login details for future use), you can log in to the admin page. The image shows the Prestashop admin dashboard. Similar to WordPress, there’s a navigation menu on the left, and the interface is user-friendly.
Generally, it’s not recommended to make your site live before it’s fully ready, as this may negatively impact SEO. Since the site’s content will be limited at first, search engines may view it unfavorably. After installing Prestashop, the system automatically makes the site live, so I recommend unpublishing the site while you continue working on it. You can do this by going to CONFIGURE > Shop Parameters > General in the backend to unpublish the site temporarily.
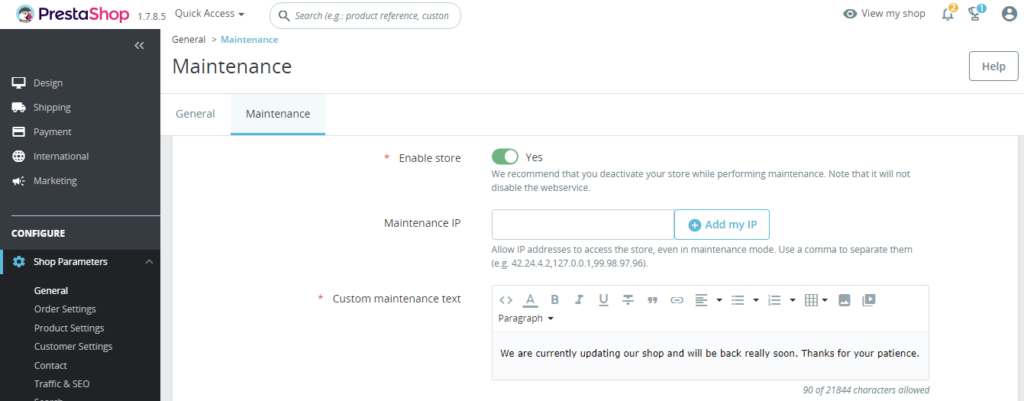
In the General section, there’s a “Maintenance” tab. As shown in the image, the Enable Store option is turned on by default. You can toggle it off. Other settings can remain unchanged because, at this point, the site is essentially invisible to anyone except you.
Step 4. Install Theme and Modules for the Prestashop
To avoid your site looking too generic, I recommend purchasing a paid theme to install. To install a new theme, you’ll need to log in to your website’s admin panel.
Prestashop comes with a built-in theme called “Classic,” which is quite minimalist. Some users may like it if they don’t have high demands, but if you need more functionality, you’ll want to install a third-party theme. So, where can you find third-party themes?
- Prestashop’s official marketplace: It has over 2,000 themes, though the prices tend to be higher.
- Themeforest: This platform hardly needs an introduction—anyone familiar with website building knows this marketplace. It’s probably the world’s largest, with decent pricing, though the quality can vary. It’s usually safe to choose the pricier themes or those with a lot of users.
- Template Monster: Prestashop themes here are comparable to the official marketplace, and it’s also a large marketplace. The overall quality tends to be better than Themeforest due to manual review.
- Hiddentechies: Strictly speaking, this isn’t a marketplace but a theme developer. Their themes are excellent, and today we’ll be using one of theirs.
Installing the Etrend Lite Theme
Based on the number of themes available in these marketplaces, using Prestashop to build an e-commerce site is no less capable than WordPress with WooCommerce. The theme I’ll use today is called Etrend Lite, developed by Hiddentechies. It comes in both free and paid versions. If you’re serious about building your e-commerce site, I recommend purchasing the paid version. It costs a few dozen dollars as a one-time purchase, and includes 3 months of technical support, more features, and more timely updates. But if you’re just experimenting, the free version will do.
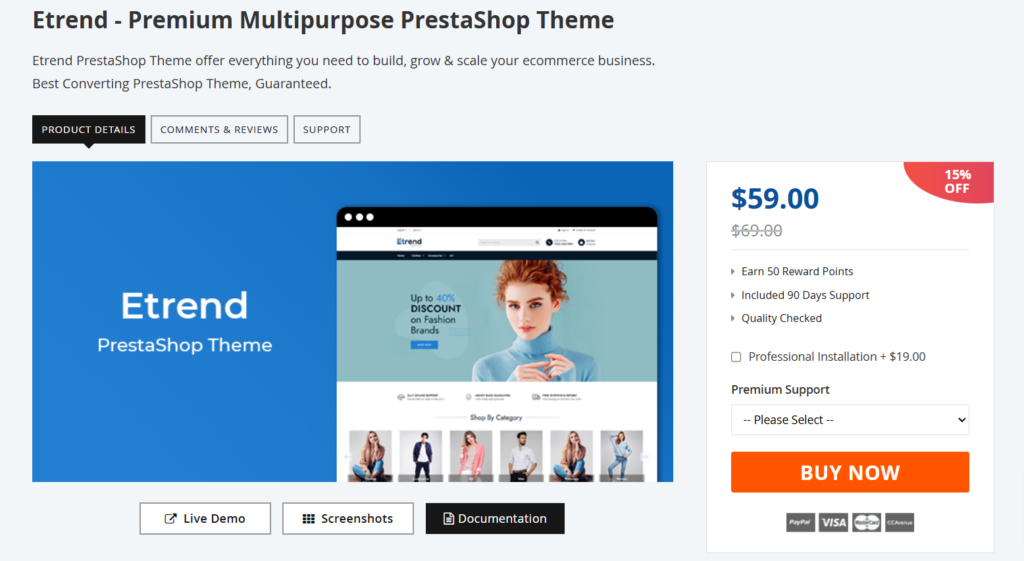
After purchasing, log in to your user dashboard. Under My Downloadable Products, you’ll find Etrend Lite. There should be three download options. Make sure to download the theme, but don’t download the patch, which is for upgrading older versions. There’s also a Demo image (sample images) option.
Next, go to your Prestashop admin panel and navigate to IMPROVE > Design > Theme & Logo > +Add New Theme.
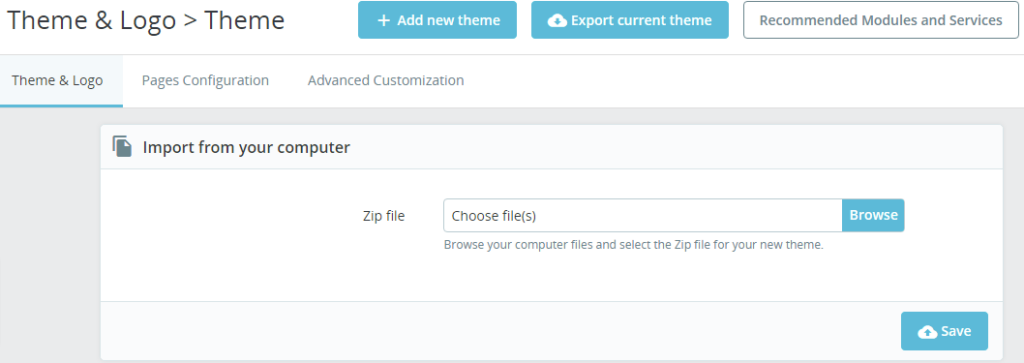
Click Browse, upload the theme file you just downloaded, and click Save to start the automatic installation process. Don’t close the page, as the upload may take a few moments.
Once the theme is installed, the page will redirect to the previous one. Scroll down, and in the My Theme for My Store shop section, you will see the newly added theme.
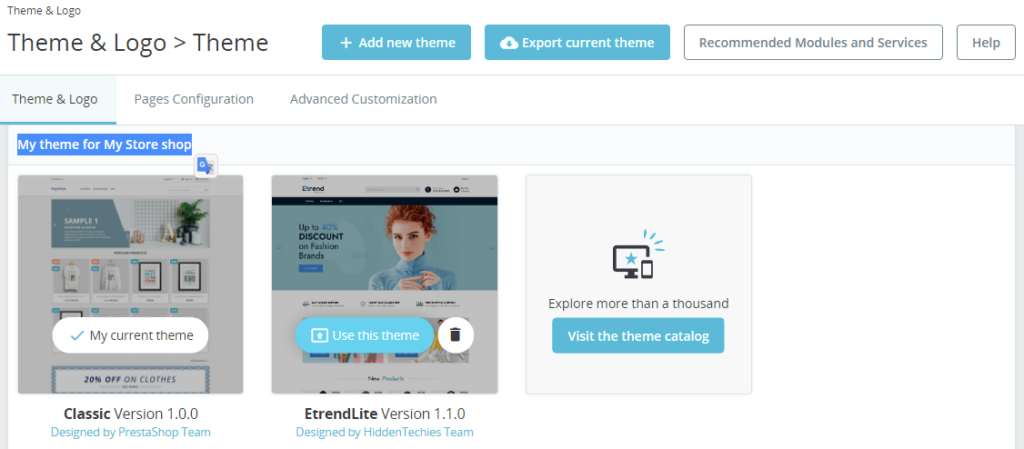
Click Use this theme, and your site will switch to the new theme. You can preview your site by clicking View My Shop at the top right corner of the admin panel. Since some images may not have been imported, you might see missing images on the front end. If you need them, you can download the Demo Images mentioned earlier. However, since you’ll likely want to customize your site with your content, these images aren’t that important. For instructions on how to import images, refer to the theme’s documentation.
Installing Modules
Modules in Prestashop are similar to WordPress plugins, but not exactly the same. Sometimes they function like plugins, and other times more like blocks that you can use in various parts of your site. Prestashop comes with some built-in modules, and after installing a theme, additional modules provided by the theme might also appear.
So, how do you install a module on your own? For example, if you want to install the PayPal module (which isn’t included by default), or a popular module like TikTok, you’ll need to install them separately.
There are two ways to install a module:
- From the official catalog: Go to IMPROVE > Modules > Module Catalog and search for the module you need.
- Upload a third-party module: If you’ve purchased or downloaded a module from a third party, go to IMPROVE > Modules > Module Manager. On the module management page, click Upload a module to upload and install it. You’ll also see many already installed modules on this page.
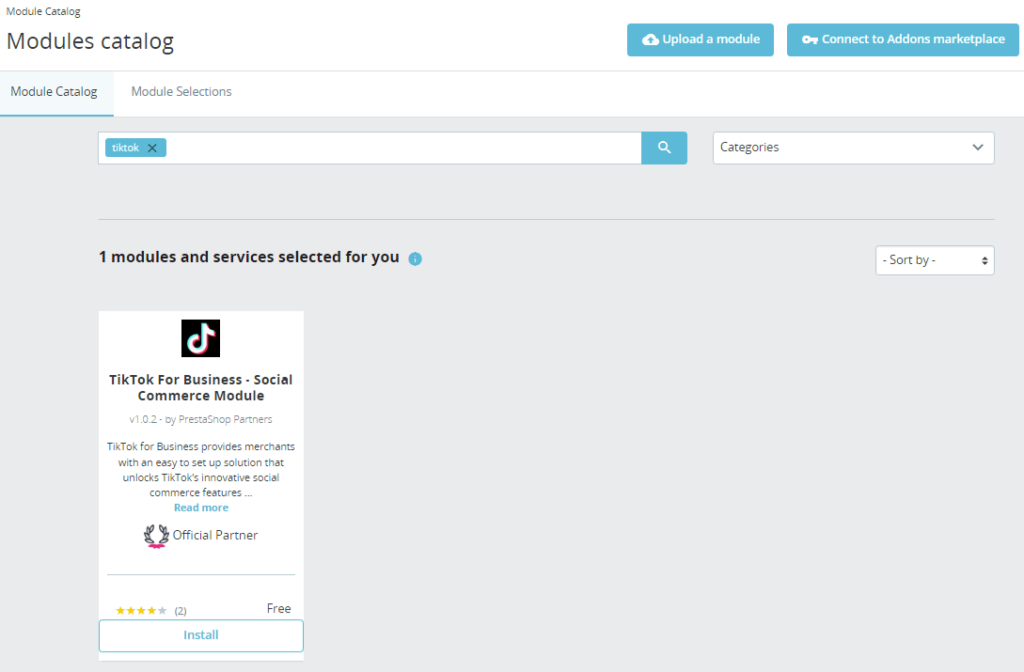
As shown in the screenshot, you can easily install a module like TikTok by simply clicking Install. If you’re unsure about what certain modules do, it’s best not to modify or delete them.
There’s also a Module Selections tab, where you can find more official marketplace modules. You can search for modules here, but to install some of them, you’ll need to go to the official Prestashop Marketplace. For example, if you search for “PayPal,” it will direct you to the Prestashop official module marketplace and display the search results.

You’ll need to “purchase” the module first, even if it’s free (the price will just be $0). After completing the purchase, download the module and install it from your website’s admin panel.
Step 5. Setting of Website
This step might seem a bit challenging for beginners since it involves learning a new system. However, there’s no need to worry. Just like when you first started using Amazon or eBay, you had to understand their backend systems and learn various aspects. Similarly, Prestashop will also require some learning for newcomers. The first step to mastering a system’s backend is through basic settings and customization.
Website Title (Name)
During the installation of Prestashop, you were able to set the website title, which is essentially your store’s name. If you didn’t set it or want to change it later, you can do so in the backend, although it’s a bit tricky to find. Here’s how:
Navigate to CONFIGURE > Shop Parameters > Contact. On this page, you’ll see two tabs—select Store, as shown in the image below:
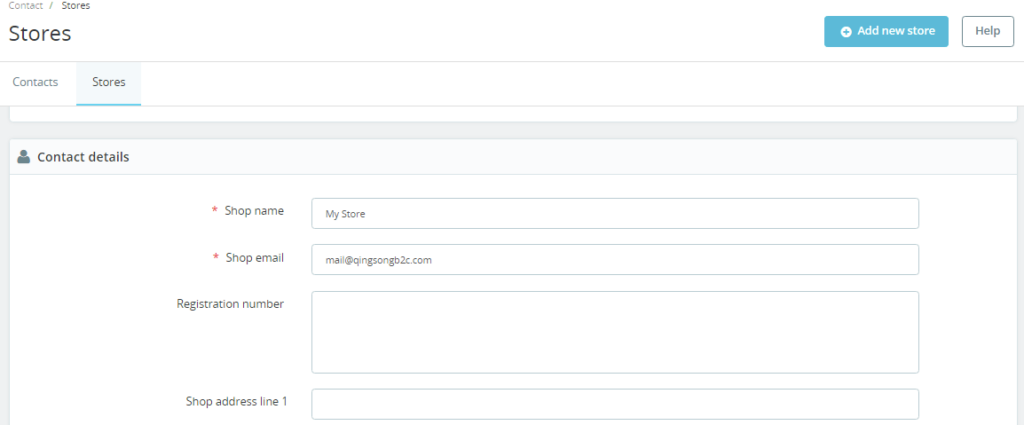
Scroll down to find Contact details, where you can set your Shop name (i.e., the website name), email, and contact information. Although you can add multiple stores, as a beginner, it’s best to focus on one store until you get more familiar with the system.
The reason why changing the website title might seem tricky is simply because you wouldn’t expect it to be located in this section.
Website Logo
Your website logo is another key part of your site’s identity. Ideally, the site’s title and logo should be set in the same place, but they aren’t, which is something the developers could improve.
You likely noticed the option to upload a logo when installing the theme, as it’s in the same place. Go to IMPROVE > Design > Theme & Logo.
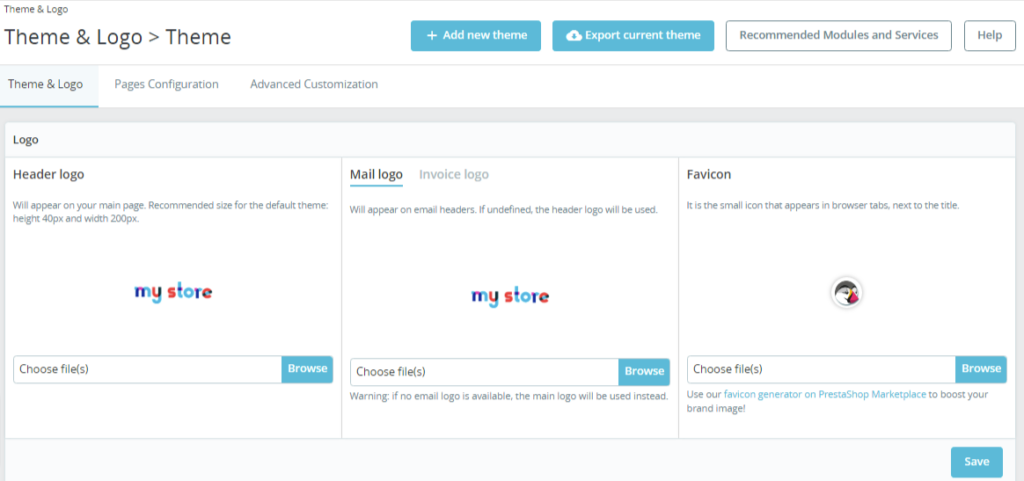
Here, you can set your site’s logo, the logo for invoices and emails, as well as the favicon (the small icon that appears in the browser tab next to the site name).
Module Settings
Module settings play a crucial role in the design of a Prestashop website. The entire layout and functionality of the site are largely dependent on modules, which sets it apart from other popular website-building methods. Prestashop’s approach is very different from WordPress, which is more visual, especially with its BLOCK (page block) design.
Earlier, we discussed how to install modules; now, let’s talk about how to use and configure them. To do this, go to the IMPROVE > Module Manager page. Scroll down to the Facebook & Social Networks section and use the Social Media Follow Links module as an example. Why this module? Because other modules are already in place, this will show you how to configure and use a module—a skill that can be applied to others.

Click Configure to enter the configuration page for this module. As shown below, fill in your social media profile links for each platform and then click Save.

Next, you need to place the module on your webpage. Click the Manage hooks button at the top right. On the following page, click the blue Transplant a Module button, and you’ll be taken to a page where you can choose where to place the module.

- Module – Select the module you want to place.
- Transplant to – Choose the position where the module should be placed. For example, in the image, “displayNav1()” represents the top of the page’s header. There are many different positions, and each module has unique locations where it can be placed.
- Exceptions – Exclude pages where the module should not appear.
One common question is: how do users know where each position corresponds on the webpage? Yes, this is a challenge. That’s why you need to go to IMPROVE > Design > Position to see all module positions. Here, you can find the position codes for the modules you want to place, like “displayNav1()“, and then insert the module into that spot. You can also drag modules within the same position to change their order.

Although this example focuses on one module, most modules work similarly. The difference lies in where each module can be placed—some modules can be placed in multiple locations, while others can only be placed in a few, and some are fixed. You can learn more by exploring the Module Manager and Position sections.
This step might seem overwhelming for some users. However, once you understand Prestashop’s design logic, the key is mastering how to use modules. After that, everything becomes much easier, as every part of the site, from top to bottom, is controlled by modules. The main challenge is figuring out where the modules should be placed, which can sometimes be tricky to find.
Step 6. Customization and Layout setting
This step is all about helping you understand and learn the structure of the PrestaShop front-end interface from top to bottom, as well as how to adjust its settings.
Header
The website header is the first thing users see. Since it varies by theme, I’ll use the Etrend Lite theme as an example. This theme’s header already displays most necessary elements, so only a few changes might be needed.
Language and Currency Settings
The default language is typically English, or whatever language the user has set, and the currency is usually the same. If your site only has one language or currency, the front end will not display language or currency selectors. If you want your site to have two or more languages or currencies, you can add them through the back end, and the front end will display the options.

To add additional languages and currencies, go to IMPROVE > International > Localization. There are two ways to add languages: manually or automatically. I recommend using the automatic method, as manual addition requires country codes and language numbers, which can be complicated.
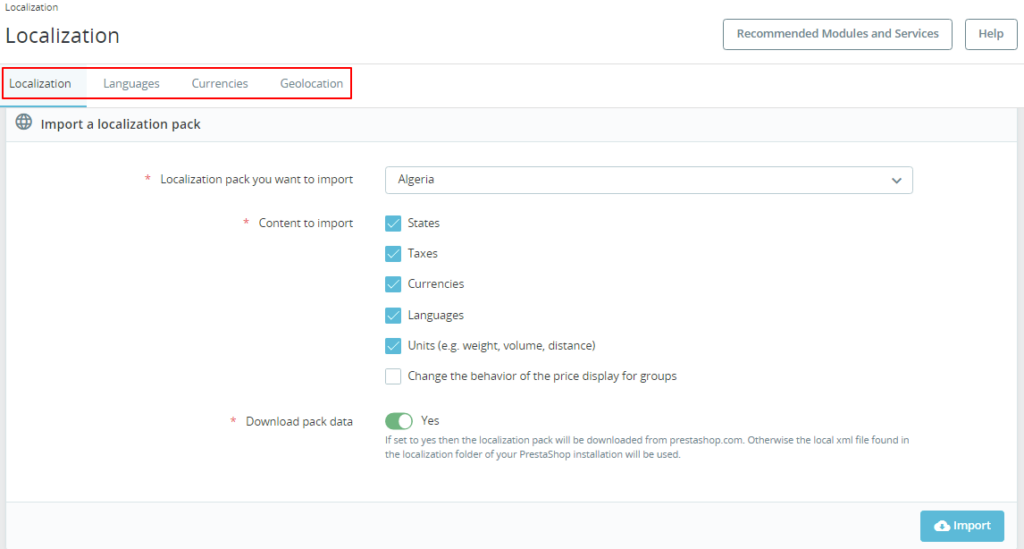
As shown above, there are four tabs:
- Localization – This is where you can automatically add languages and currencies, as well as set the default language and currency. You can import a localization pack, choose a country (e.g., France), and select the data to import, such as states, taxes, languages, currencies, etc. Check the “download pack data” option and click “Import” to automatically bring in the necessary data.
- Languages – Here, you can view the languages available on your site. You can also manually add or remove languages.
- Currencies – Similar to the languages tab, you can add or remove currencies.
- Geolocation – This option allows the website to change the currency or language automatically based on the user’s IP location. You will need to register for a third-party service, which I won’t go into detail about here.
Once you have more than one language or currency, the front page will display language and currency selectors.

You can also add modules to the header, such as the social media “Follow” module mentioned earlier. You can also rearrange the modules in this section, as previously discussed.
Menu and Categories
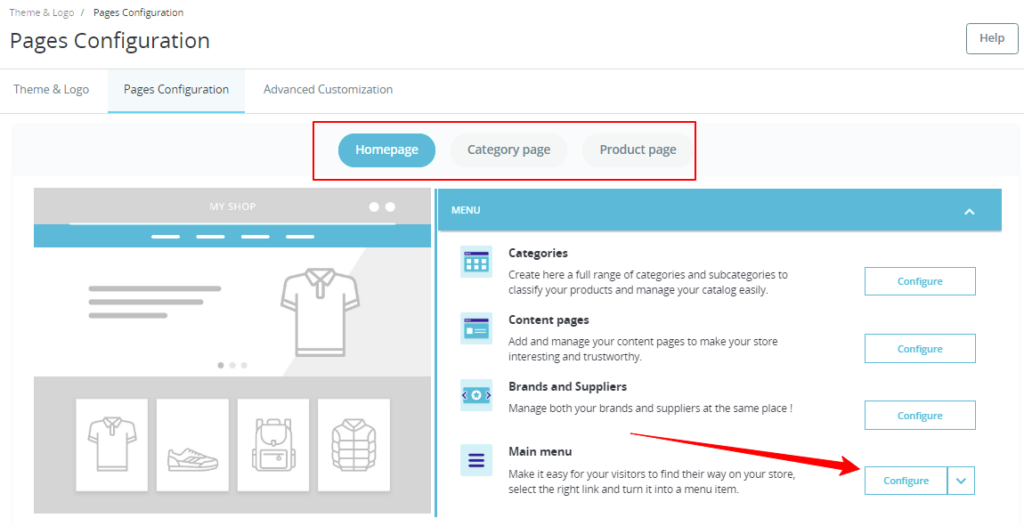
Another important part of the header is the menu. This is likely the first thing visitors look at, as it outlines the website’s main structure. To set up the menu, go to IMPROVE > Design > Theme & Logo > Pages Configuration:
![image 60] In the “Pages Configuration” section, you can configure the content for three types of pages: home, category, and product pages. For each page type, you can configure the menu, page modules, and footer. Note: The homepage modules here are not for the Etrend Lite theme’s homepage, but you can use these modules on the Etrend Lite homepage.
The menu settings are divided into four parts:
- Categories – Refers to your store’s product categories.
- Content pages – You can add custom pages here, like “About Us,” which many themes provide templates for.
- Brands and Suppliers – If your store has multiple brands (e.g., Adidas, Li-Ning, Nike for a sportswear store), you can add them here.
- Main menu – This is the main website menu that appears in the header. You can add the previous three elements to this menu.
Click “Configure” next to the “Main menu” to access the menu setup page:
The main menu is also a module. You can add any link from your site, such as categories, content pages, or brands, by selecting them from the “Available Items” on the right and clicking “Add.” After that, save the changes.
You can also manually add new links with the Add a new link option, allowing you to insert external third-party links. Once configured, you can click “Manage Hooks” to choose where the menu appears. The main menu doesn’t just have to be in the header; it can be placed in various locations. For placement details, refer to the module usage instructions above.
Footer
The footer is also an important part of a website, located at the bottom of the page. Every website should have footer. Setting up the footer primarily involves using modules. In the section IMPROVE > Design > Theme & Logo > Pages Configuration, there is an option for Footer settings. However, this only applies to the default theme’s modules. For a new theme like Etrend Lite, you need to go to IMPROVE > Design > Position to set up the footer.
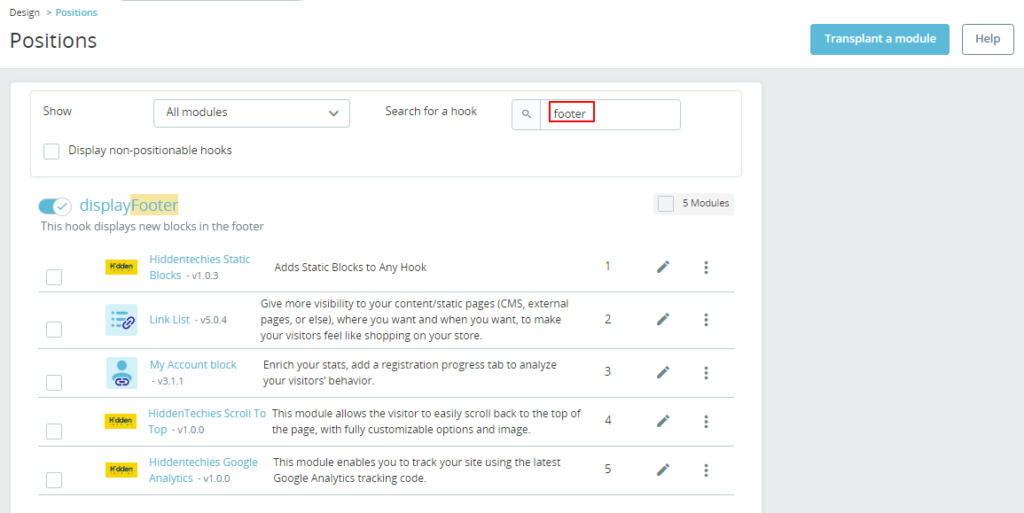
“Positions” refers to the location of modules. Since there are many, going through them one by one can be tedious, it’s easier to search for “footer,” and all the footer modules will be displayed. Simply find the one you want to modify. I’m confident you can figure out what each module does based on its name. For example, footers often contain many links, and the module used to add or modify these links is Link List.
However, Position only lets you find and rearrange modules, not edit the module content. To modify the content, you’ll need to go to the Module Manager (IMPROVE > Module Manager) and search for Links.
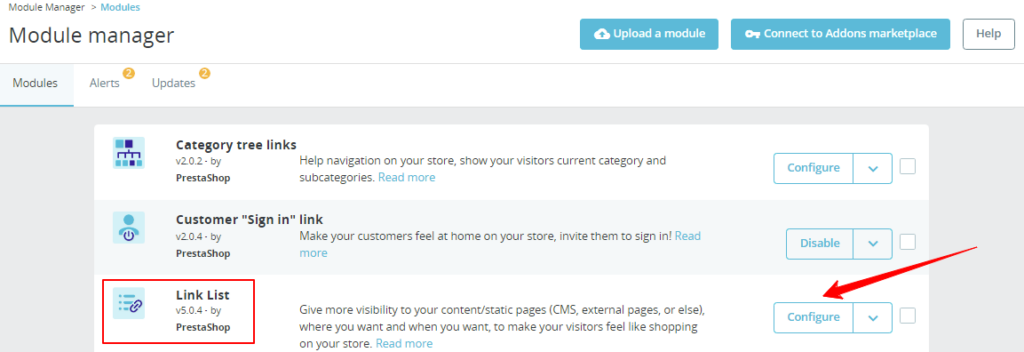
Click Configure, and you’ll be able to set up the footer links.

In the list of menus, there are two blocks: one for product-related links and one for company-related links. You can click the “pencil icon” ✏️ next to them to add or edit links. These two lists appear in the center of the website’s footer. If you need additional lists, click the New Block button in the top right corner to add another menu list.
You can also drag and drop the menus to change their order.
Page Layout
Page layout generally refers to how the webpage is divided into sections. Some pages have a single column, while others might have a sidebar, or even sidebars on both sides. This depends on your personal choice. In PrestaShop, page layout settings are found in the theme settings menu (IMPROVE > Design > Theme & Logo).
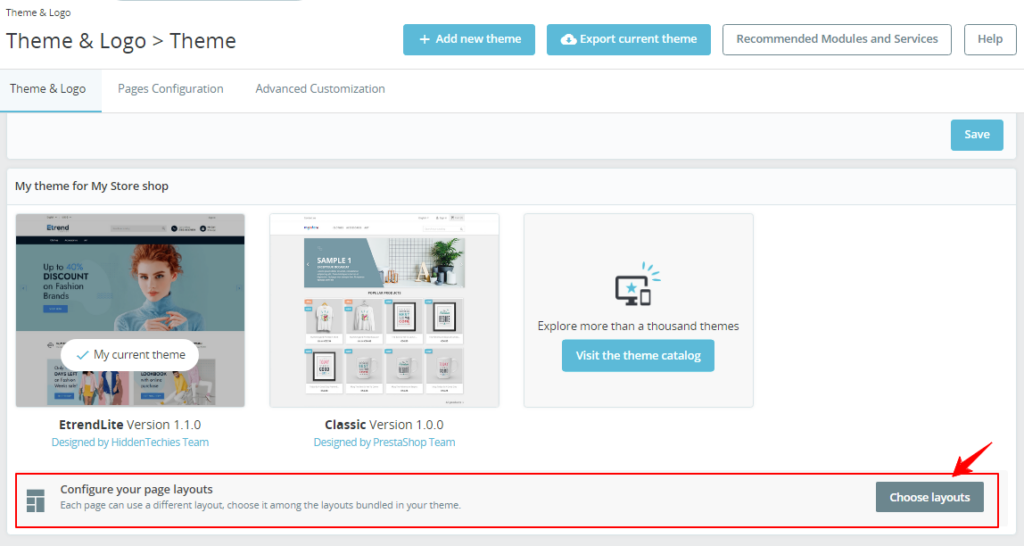
Scroll down to the bottom of the page, and you’ll see Configure your page layouts. This is where you set up the page layout. Click the Choose layouts button to access the page layout settings, where all the website’s pages are listed. You can set the layout for each individual page. After adjusting the layout, don’t forget to save your changes.
Step 7. Setup Payment and Shipping
Payment and shipping are two essential steps in running an e-commerce business. When building your website, these two settings are crucial and must be configured before you start receiving real orders. Otherwise, customers won’t be able to place orders on your site.
Payment
Payment settings can be found under IMPROVE > Payment. In Payment Methods, Prestashop only includes two default payment options, which most people don’t use. To add other payment methods, you’ll need to install modules. For example, PayPal needs to be downloaded from the Prestashop official store, while options like Stripe or Amazon Pay can be installed directly from here.
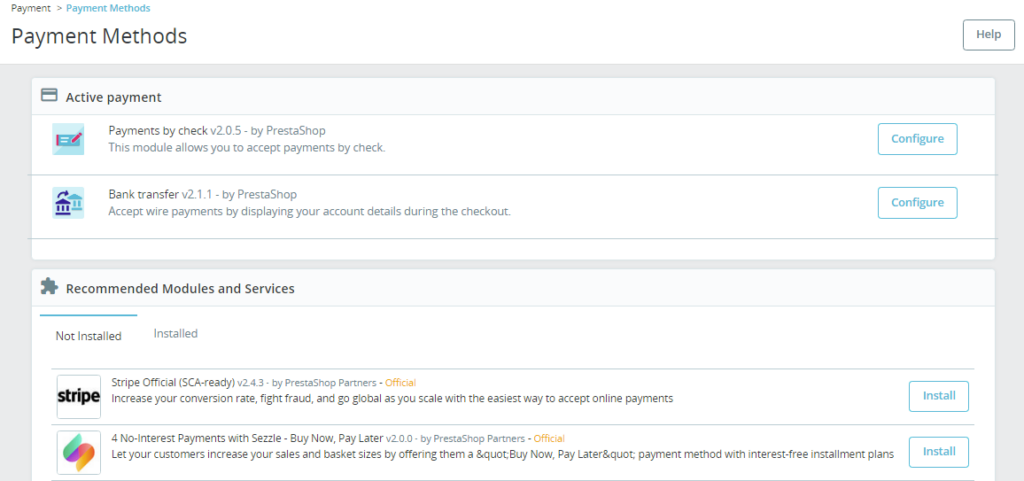
Once you’ve installed the necessary module, follow the provided instructions to configure it.
There’s also a Payment Preferences section where you can set currency information and other payment restrictions. You can adjust these based on your specific needs.
Shipping
Shipping settings are fairly simple. Go to IMPROVE > Shipping > Carriers, where you can either edit existing shipping methods or click Add New Carrier to add a new shipping option.
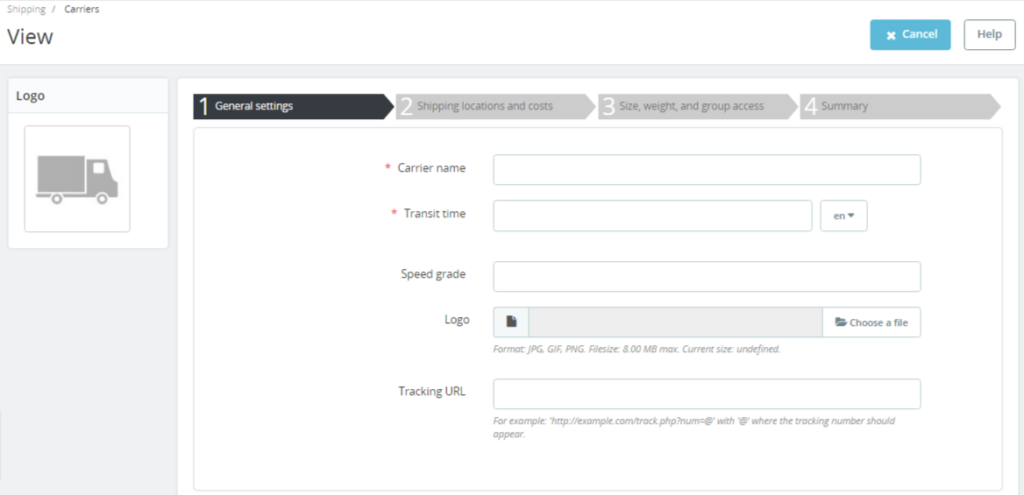
Follow the steps to configure the available shipping methods, and click Finish to save. In the Preferences section, you can also set conditions for free shipping and other shipping options based on your requirements.
This guide is just an introduction to the main settings in the Prestashop backend. You’ll need to spend some time exploring and familiarizing yourself with the platform—just like beginners with WordPress, Amazon, AliExpress, Shopify, and other platforms.
Step 8. Add Pages and Products
Once your website is set up, the next step is to add your own content. For an e-commerce site, the most important elements are your products and pages.
Adding and Editing Pages
Let’s start by adding and editing some necessary pages for your e-commerce site. You can do this by going to IMPROVE > Design > Pages:
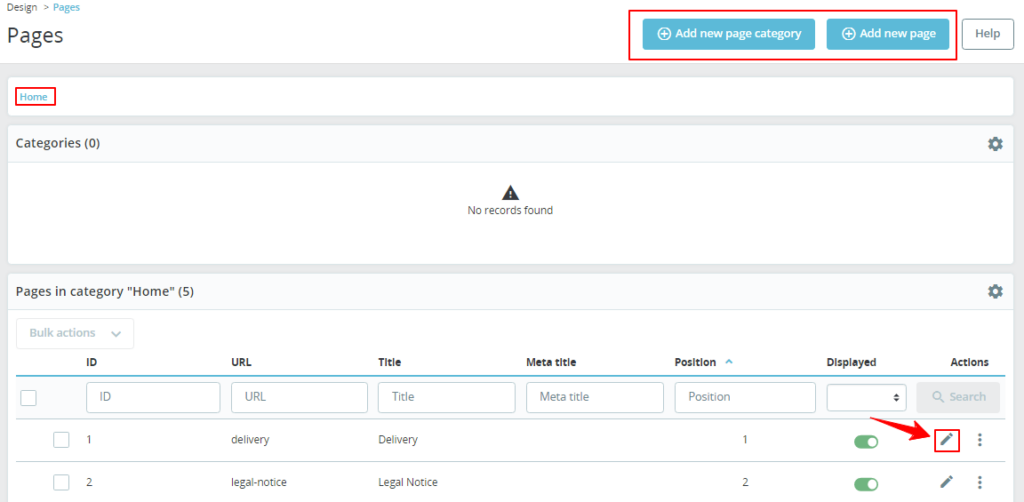
- You can organize pages into categories by clicking Add New Page Category in the upper right corner.
- The system has a default Home category, which cannot be changed. If no new category is created, any newly added pages will automatically go into this default category.
- You can also edit existing pages by clicking the pencil ✏️ icon.
- To add a new page, click Add New Page in the top right.
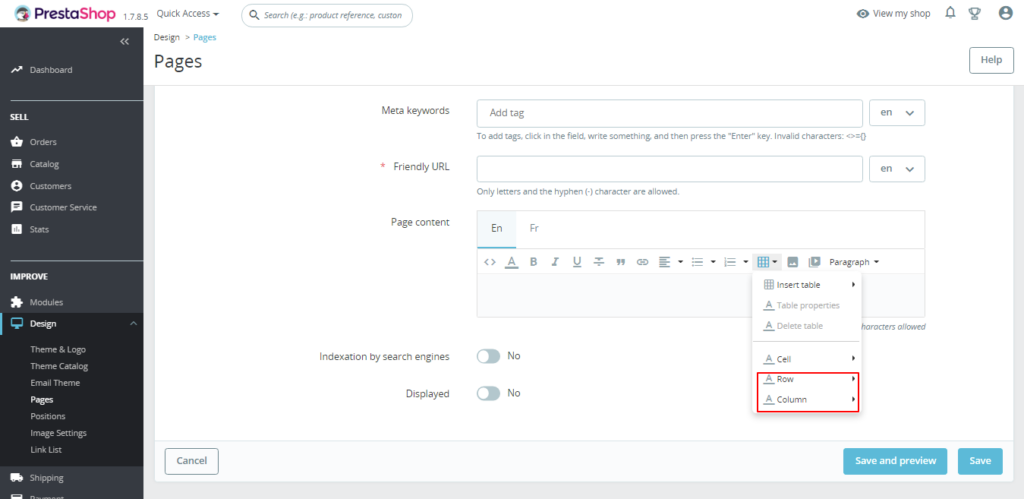
Prestashop’s page editor is a simple, classic editor that’s easy to use. Below is a brief explanation of each section in the editor:
- Page Category – The directory the page belongs to, default is “Home.”
- Title – The page title.
- SEO Preview – A preview of how the page will appear in search engine results.
- Meta Title – The title that will be displayed in search engine results.
- Meta Description – A brief description of the page for search engines.
- Meta Keywords – Keywords related to the page.
- Friendly URL – A customizable URL that you can change to something simple, recognizable, and SEO-friendly.
- Page Content – This is where you add your content. It’s similar to using a Word document, with added features for inserting rows and columns. For example, you can split the page into multiple rows and columns and insert images or videos.
- Indexation by Search Engines – Set to “Yes” if you want search engines to index the page. If you don’t want the page to appear in search results, set it to “No.”
- Displayed – Controls whether the page is visible on the frontend. If “Yes,” it will be displayed. If “No,” the page won’t be visible to users.
Once you’ve finished editing the page, don’t forget to save it. You can also preview the page before publishing.
Adding Products
All the preparation so far leads to this step—adding products, which is the core of any e-commerce site. To start adding products, go to SELL > Catalog > Products. You’ll see some sample products on the product page by default. Don’t delete these right away—they can serve as examples. Once you’re familiar with how to upload products, you can delete or modify them.
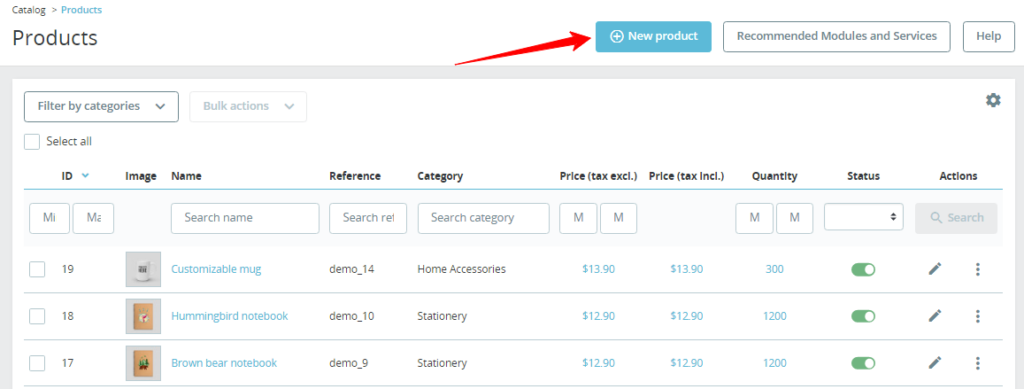
Click the New Product button to add a new product. The new product page is pretty straightforward. Here’s a brief introduction to its main sections:
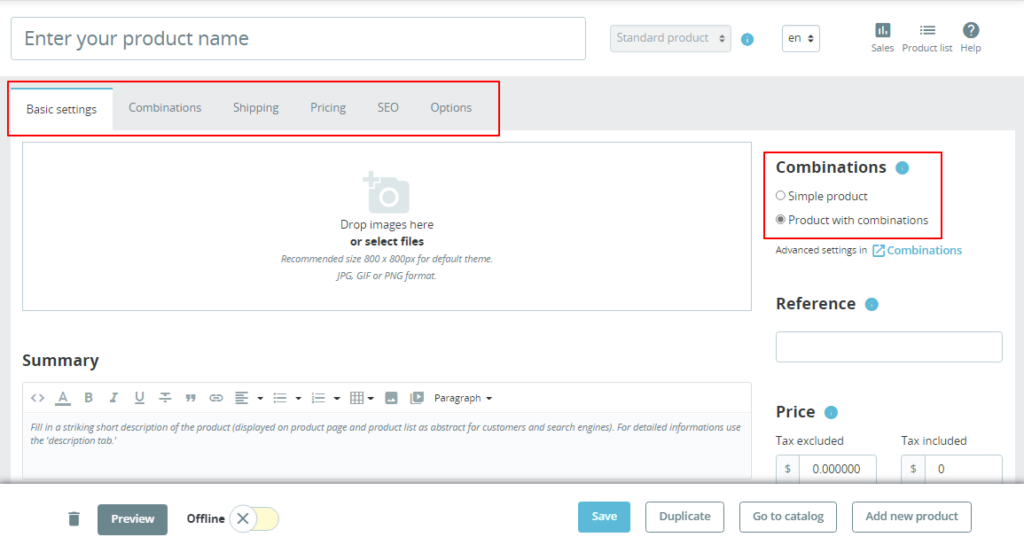
The product editing page is divided into six main sections, with tabs at the top for easy navigation:
- Basic Settings – This section allows you to edit the product type, title, description, base price, product categories, etc. An important point is the Product Type option, where you can switch between a single product and a variant product (Combinations). If the product has variants (like different sizes or colors), you can configure them here.
- Combinations/Quantities – For variant products, you add different variants (like colors or sizes) and their respective quantities. For single products, you can directly edit the stock quantity. The variant options can be added under the Attributes section.
- Shipping – Here you can input the shipping details, including packaging info, shipping time, and costs.
- Pricing – While you’ve already set a base price under Basic Settings, you can specify the actual retail price here, which can differ from the regular price. Make sure to account for tax-included or tax-excluded pricing. You can also set different prices for different countries or scenarios.
- SEO – This section is similar to the SEO settings for pages, where you can configure the page title, meta description, and product URL for better search engine optimization.
- Options – In this tab, you can set whether the product is visible on the front end, add product tags, configure product codes like UPC barcodes, and manage suppliers.
Once you’re done editing, click Save. You can also preview the product before publishing it. If you’re uploading similar products, you can use the Duplicate button to copy an existing product and modify it as needed. The more you practice, the easier it will become — especially if you’ve worked with e-commerce platforms like Amazon or ebay, this process will feel familiar.
Publish Your Website on the Internet
You can publish your website once you have around 4 to 5 products ready, and you need submit your website to search engines like Google and Bing. then continue updating products daily. This helps show search engines that, although your site is new, it is constantly being updated.
At the end of step three, I suggested unpublishing your website. You can go back to CONFIGURE > Shop Parameters > General and toggle the switch to publish your site again.
After that, keep a consistent schedule for adding products. Upload one or two products each day, or at least a few per week, to ensure that your website has regular updates, especially during the first three months. If you don’t have new products to add, you can write some blog posts. You can either install a module or set up WordPress in a subdirectory for this purpose. Also, create accounts on major social media platforms and link them to your website for comprehensive promotion.
Conclusion
Finally, the tutorial on how to Build an Online Store with Prestashop for Beginners is complete. It is indeed a bit lengthy, so take your time to study it.
No matter where you purchase your hosting, once you know how to install Prestashop, the usage will be the same. The general process of building a website using various CMS platforms is quite similar, but the “how to use the website-building system” part differs.
Using Prestashop after setting up your website is quite different from using WordPress. WordPress is now a visual builder, while Prestashop is a modular tool. You need to understand how the page design works, mainly by grasping the logic of modules.
While writing this tutorial, I went back and learned the basics of Prestashop from scratch. Many topics within could be expanded into standalone articles, but for the sake of continuity, I’ve put everything into one piece to make it easier for readers.


