Bluehost Website Builder is a brand new tool for website creation that was released in 2021, if you want to use it to build a website(for example, an e-commerce website) but are not sure how to start with it, then our Bluehost website builder tutorial may help you.
The newbies can use the Bluehost website builder to build websites comfortably, why say that? that’s because it uses a drag-and-drop editor to make users create a page easily, and it is even live editing, you can view changes to your website in real-time, which means what you can see is what the visitors will see after the website is published.
Read and follow our article, I will show you how to build a website with Bluehost website builder step by step from zero, this tutorial is also for people who want to build an e-commerce store website.
Bluehost Website Builder was discontinued in 2022 and is no longer available to new customers, but it can be used as a plugin for WordPress still.
What is Bluehost Website Builder
I simply introduced the Bluehost website builder in the beginning, it uses a drag-and-drop editor for people to edit the website in real-time. it was built instead of the old Bluehost builder and aimed at building a website with WordPress more easily and quickly for more people.
Actually, the Bluehost website builder is a tool based on the WordPress system, The users not only can create their website with this builder interface but also can manage their website in the WordPress dashboard.

WordPress is the most popular open-source CMS(content management system) in the world, It is relatively easy to use compared to most of the platforms, but it still needs to take some time to acquainted with it for any newbies and beginners. The Bluehost website builder is playing a role in saving people time on WordPress.
You may also know the famous e-commerce website builders Weebly and Ecwid, both of which can be used on top of WordPress, the Bluehost website builder is a bit similar to them in this point. However, it is not very similar to Weebly and Ecwid, since the Bluehost website builder can’t be used totally dedicated, you may need to access the WordPress dashboard to complete some work, for example, to create an e-commerce website, at least for now.
To learn more about the Bluehost website builder you can read our Review for Bluehost Website Builder.
Overview Tutorial: Build a Website with Bluehost Website Builder
Ready to build an e-commerce website with Bluehost website now, it will come with several simple steps, here you can preview all as below:
- Purchase a plan of Bluehost website builder, or web hosting from Bluehost
- Create a new website with the Bluehost portal,
- Customize the website in the builder dashboard,
- Add Pages, blog posts, or other content,
- Install WooCommerce (for e-commerce website),
- Add Products,
- Install SSL for the domain and publish your website.
let’s get started step by step.
Step 1. Purchase a Plan of Bluehost Website Builder or a Web Hosting
Before you start to build a website with Bluehost website builder, you need to choose and purchase a plan or a Bluehost web hosting.
Bluehost website builder Plan
There are 3 different feature packages for the Bluehost website builder, as you can see in the below screenshot.
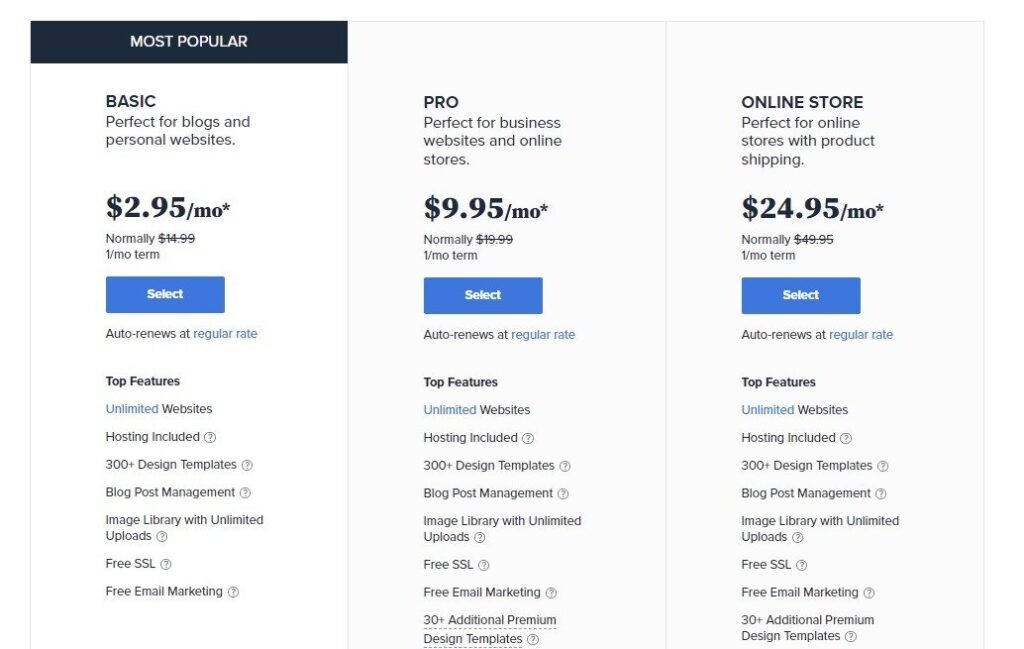
The Basic plan includes the features for building a normal website, like blogs and personal websites, you can edit pages and customize the website, but it doesn’t have features for e-commerce.
Both the Pro and Online Store plans have features for eCommerce, you can edit your eCommerce store pages in the builder interface if you purchase one of these 2 plans.
All prices are special sale prices that you need to pre-pay for 1 year at a time, and you will get a 1-year free domain name for the first year.
E-commerce Features
You may think it will be better to order Pro and Online Store plans if building an eCommerce website with Bluehost website builder, yes, it is absolutely good for beginners.
However, after I used the Pro one, I found I still need to install the Woocommerce plugin and add all products from the WordPress dashboard. if you have some knowledge of WordPress, you can install and manage the Woocommerce store in the WordPress dashboard even with a Basic Plan.
So which plan should you choose for an e-commerce website?
- if you are a totally beginner without any knowledge of WordPress, I recommend you purchase the plan of Pro or Online Store.
- For the experienced WordPress users, I think Basic one is good unless you also need more features in the dashboard of the builder.
But you can edit the store pages and add more professional templates for the products and product lists to your website if you choose a Pro or Online Store plan.
Web Hosting Plan
You can also build a website with Bluehost website builder if you buy any web hosting from Bluehost, Bluehost provides many types of hosting, but I recommend shared hosting for starting, all the plans include the Bluehost website builder.
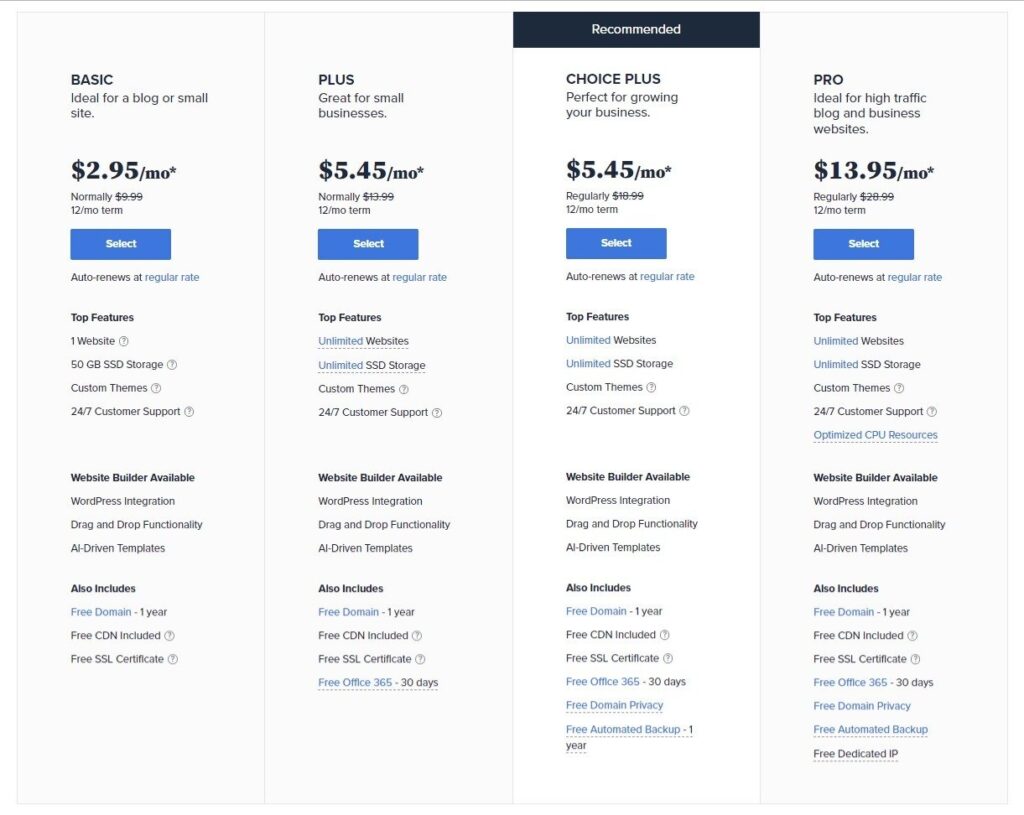
The Basic one is good for starting a website for the majority of beginners, if the features are not enough for your business, you can choose other higher plans, or you may upgrade the plans in the future.
*Tips: All of the shared hosting plans only include the Basic Features of Bluehost website builder(not including the eCommerce feature).
Like the Bluehost website builder, you need to purchase any hosting plan for 1 year at one time. Pre-pay for a 1-year service seems a bit more for some people, actually, you will find that almost all the hosting providers are doing the same thing.
The advantages offered by Bluehost website builder plans over the shared hosting:
- You can build unlimited websites with any Bluehost website builder plan.
- All the website builder plans provide a quick launch wizard so that the users can quickly create a website only by clicking next and next;
- The Bluehost website builder offers live editing and drag-and-drog editor as I mentioned in the beginning, the users can customize website easier and faster;
- If you want to build a ecommerce website, You can edit the products list, categories, product pages and more store pages with some ecommerce templates, that’s to say you can make your online store looks more professional with Pro and Online Store plans.
If you are confirmed to choose the right plan for your website you just click Select to go for next.
Get a Domain Name
Once you select any plan, the next page will ask you to choose a Domain name, regardless of the shared hosting or Bluehost website builder plan. you can use your own existing domain or register a new one, I recommend you register a new domain name since all plans include 1-year free domain name.
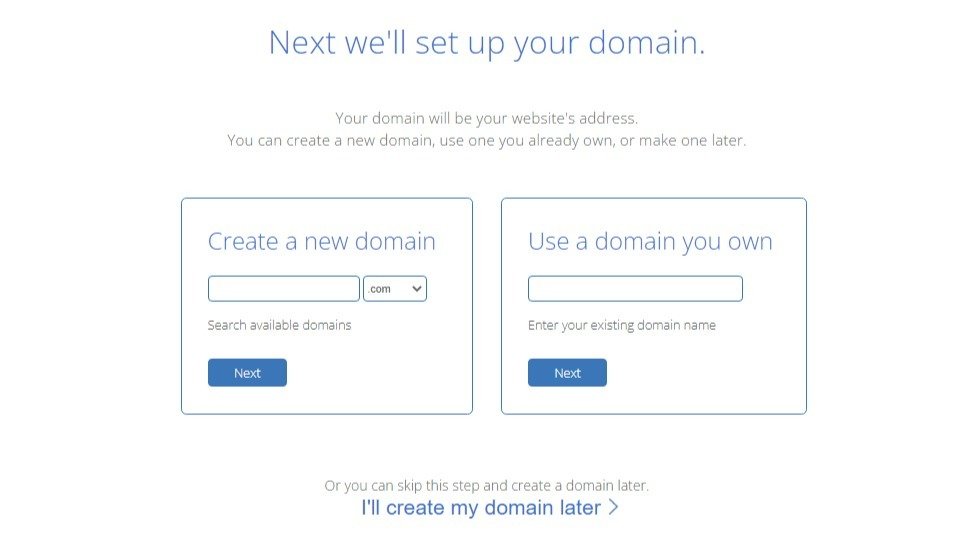
After entering into the domain name, just click Next, or you can even skip this step and add the domain later. On the next page, you can create an account and finish the purchase, you can also add some extra add-on if demanded. Then choose a payment method to process the order, credit card and PayPal are available, later, click Submit and make payment.
Several emails will be sent to your email box once the payment proceeded, set your password from the link of one email, after that, you can login to your Bluehost account and get ready to start now.
Step 2. Create a New Website with Bluehost Portal
The Bluehost dashboard is called “Bluehost portal”, you will create a new website from this place.
Bluehost Website Builder
If you purchased the Bluehost website builder, once you logged in to the account, it will start with a Quick launch Wizard, it is very easy and fast, you just start the website by answering some questions or selecting some options.

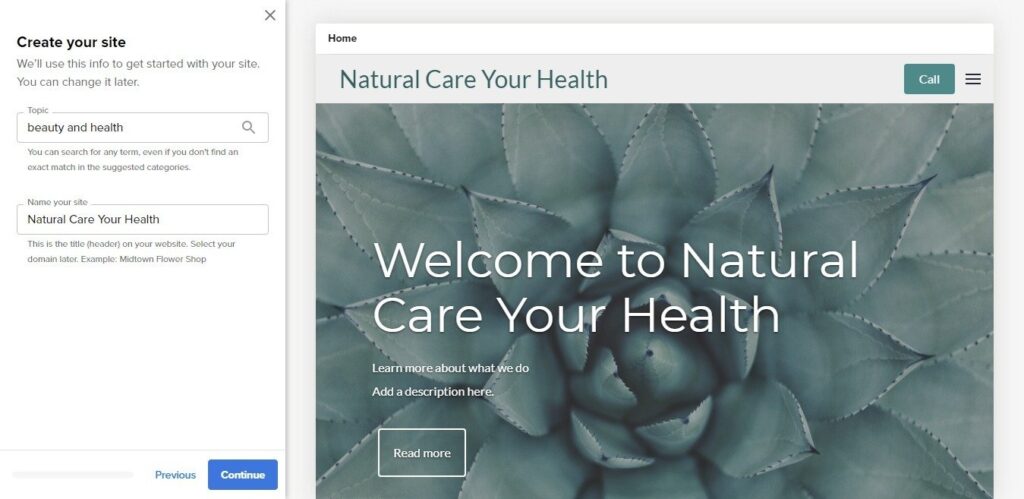
After a couple of clicks, you will go to the website creation interface of the launch wizard, you can search something of your business industry on this page, just enter any related queries into the search bar, the system will generate a website based on your input, the appearance will be matched with your business automatically.
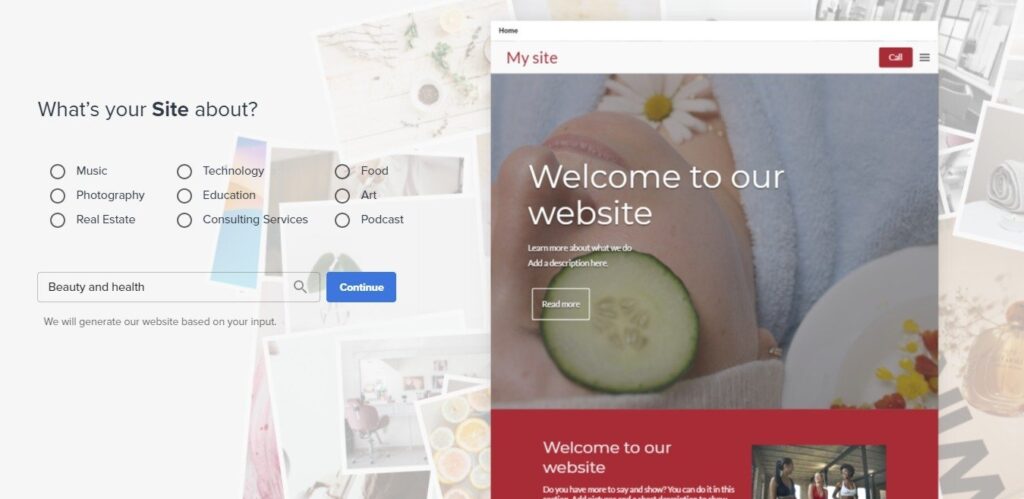
As you can see in the above screenshot, I entered into “Beauty and health”, the right side will display an example of the website, if you don’t like the matched images, you can delete and input again.
Then you can click on the button Continue to the next if you feel the site is what you want, Now you will need to enter some information about your website and change color, fonts, layout, etc., click Continue or Previous step by step.
Actually, all this information can be changed in the future, once you finished all, click on Finish to process the creation of the website.
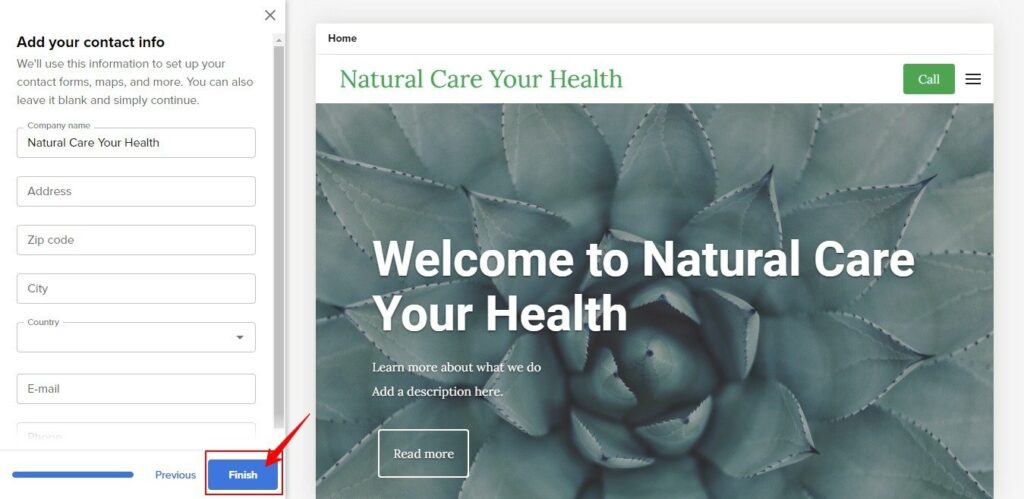
the system will take a couple of minutes to finish all since it needs to install the WordPress and some plugins, as well as the Bluehost website builder.
Bluehost Shared Hosting
If you bought the shared hosting plan but not the website builder plan, when you logged into the account, you will access the Bluehost account dashboard as in the below screenshot, the place is more like a control panel.
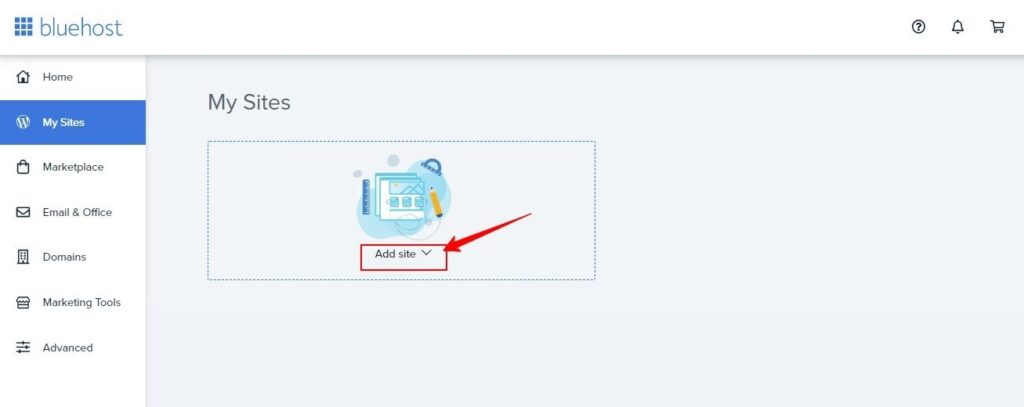
You can start building your website from the menu “My Sites” on the left side navigation, then click Add Site, you will have 2 options to start a site:
- Build your website with wordpress directly in a traditional way
- Build a website with Bluehost website builder
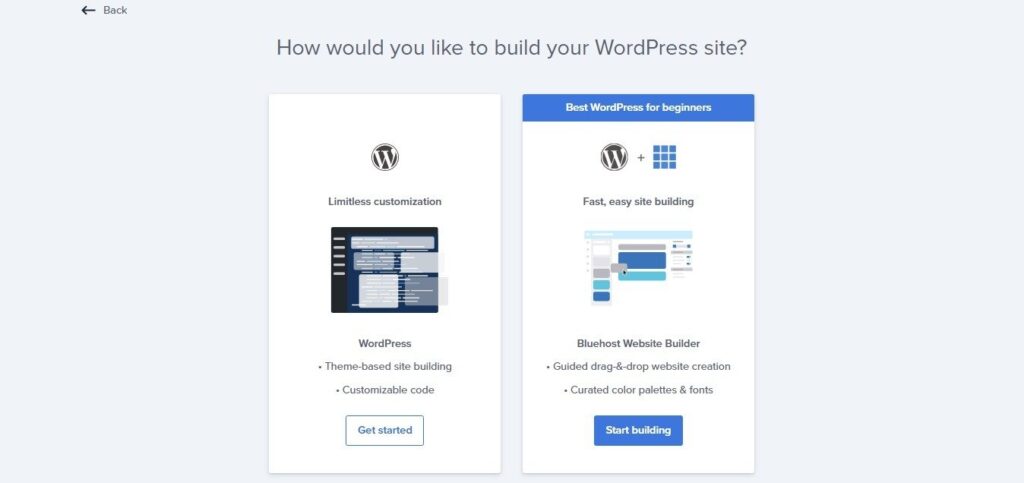
I will take the 2nd option of course for this post, click on Start Building, then you will need to choose a domain name.

Choose the correct domain name you want to build a website, leave the Directory empty, and click on Next. you will access the website creation interface of the launch wizard directly as below:

From this step, everything is exactly the same as above, you can search for anything about your business, and so on…till the system finish all and create the website for you.
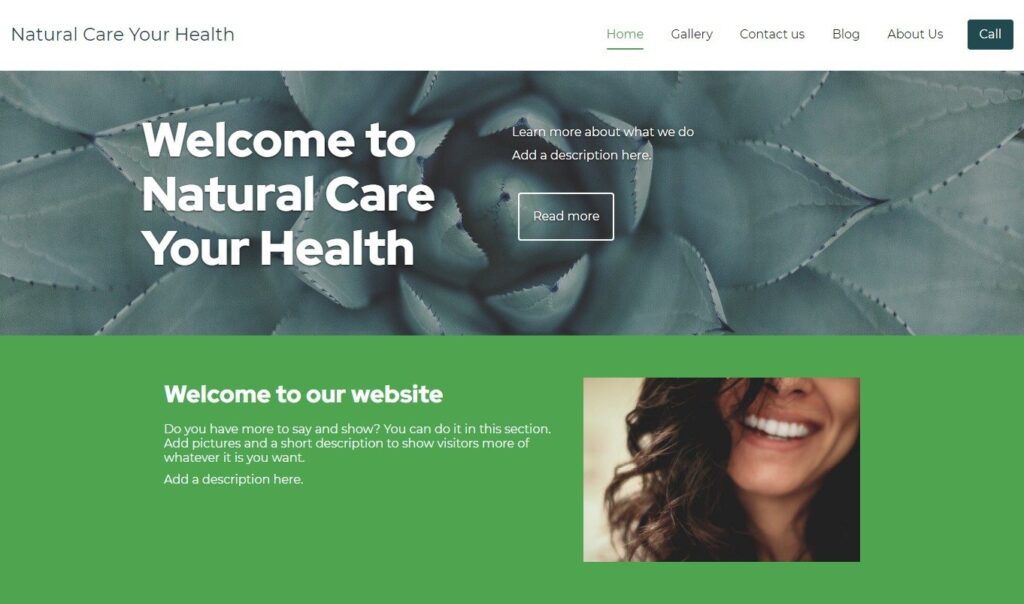
Finally, the website is created and you can have a look at the full interface of the Bluehost website builder now, you can also click on Preview on the top right to see how your website is on the desktop screen.
Step 3. Customize Your Website
Although the website is created, it is not completed, no one would publish a website like this, hence, you need to customize and edit it with your own information.
There are 4 main parts on the dashboard of the Bluehost website builder
- The options on the top bar – It is very clearly that these options used for what.
- The left side navigation – All of the major features or functions are displayed here.
- Setting for Sections on the Right side – it is different depens on what section or page you select to edit.
- The page area in the center – You can add or edit text and some elements on the page or section directly in this area.
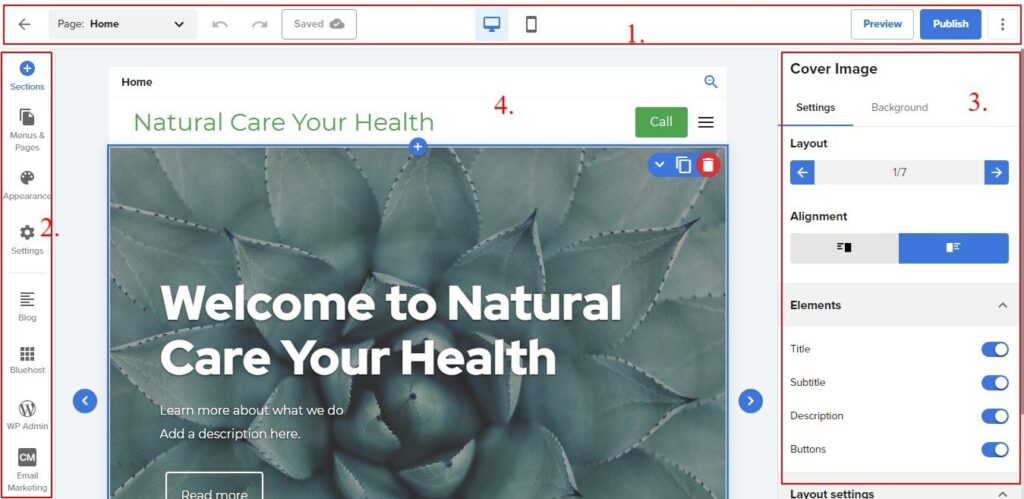
Before customizing the website, let’s get to know each menu in the left navigation:
- Sections – There are more than one hundred sections for you to choose to add to pages
- Menus & Pages – You can add pages to menu and edit menu, it allows you edit the primary menu at present.
- Appearance – you can design your website with different fonts, colors or some effects.
- Setting – the general setting for the website with your business information
- Blog – Add WordPress Blog post to your website, you can go to WordPress dashboard to edit or add new blogs, and edit the blog layout in the website builder
- Bluehost – Go to Bluehost dashboard
- WP admin – Go to WordPress dashboard
- Email Marketing – This menu was created by CreativeMail Plugin, you can use this plugin to do email marketing in WordPress Dashboard, but you need to subscribe a plan firstly.
There may be other menus, such as Store, if you install the Woocommerce plugin, then you can add some e-commerce templates of section for pages in the builder.
Setting
The first step to customize the website, I suggest you go for Appearance and Setting,
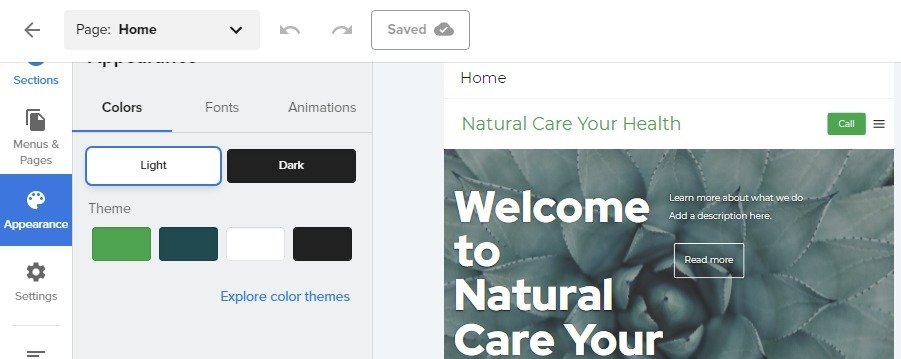
In the Appearance, you can change colors, fonts, and some animation effects, I don’t think you need to do many changes since you’ve done this job in the Quick Launch Wizard.
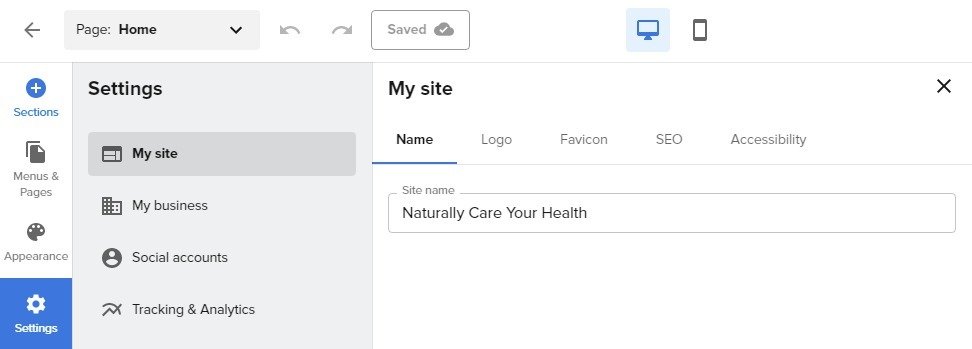
In the Settings, There’re some submenus, actually, you also finished something when you start the website in Quick launch wizard, such as adding your business information to the website, website name, logo, etc.
the Bluehost website builder also offers a simple SEO setting in this menu, and you can also change language in the Accessibility part.
Furthermore, you can add your social links in the Social accounts menu, and add your google analytics Tracking ID too.
Whatever you changed, remember to click the save button on the top bar.
Editing Menus and Pages
Secondly, you can edit the Menus and existing pages for the website, it seems you can only edit the primary menu with the Bluehost website builder for now.
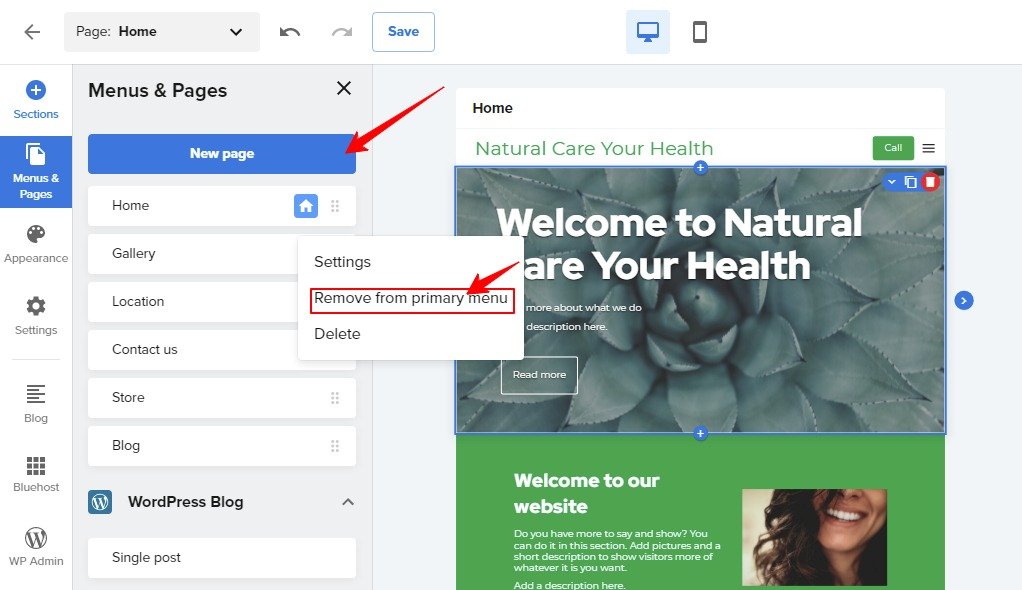
Head over the left navigation and click Menus & Pages, you will the listed pages in the primary menu, you drag any menu and put it to any position in the list, and when you hover your mouse on any menu, it will show you a vertical ellipsis, click it, you will some options as you can see in the above screenshot.
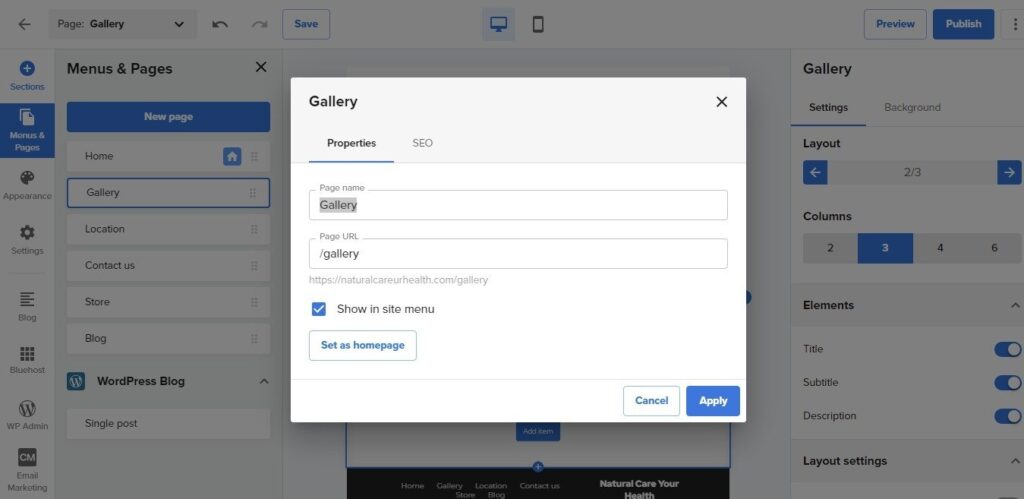
1. page setting, you can change the page name and the URL, the new name will be shown in the menu, and choose to show it in the menu or set it as homepage, you can also do some simple SEO setting too.
2. Remove from Primary Menu, when you click this option, you will remove the selected page from the menu
3. Delete page, you will permanently delete this page.
You may also see a big blue button New Page on the top of the menu editor, If you click on it, you will create a new page, I will show you how to add a new page in the next step.
In my personal opinion, the Menus feature is too simple and very limited, maybe it is a very new tool, Bluehost is still developing and trying to add more functions to the builder, you may edit the menus in other locations like in the footer in future.
Editing Header and Footer
In the Bluehost website builder dashboard, you can also edit the header and footer, both of them are like a section, the below screenshot is shown the header section.
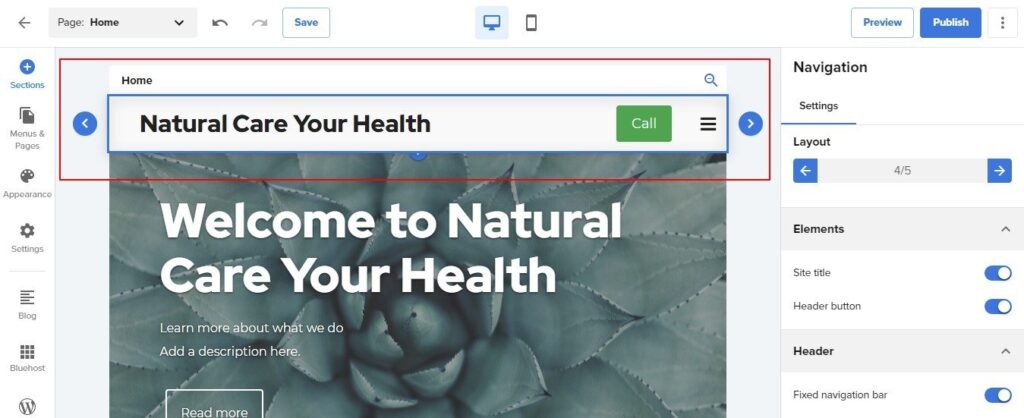
Click the header in the central page area, it will be selected, and you can change the layout for the header, there are 5 layouts for choice, you can click the arrows on both sides of the header to replace different layouts, or you can change it in the right Navigation setting, you can also change some elements in this setting.
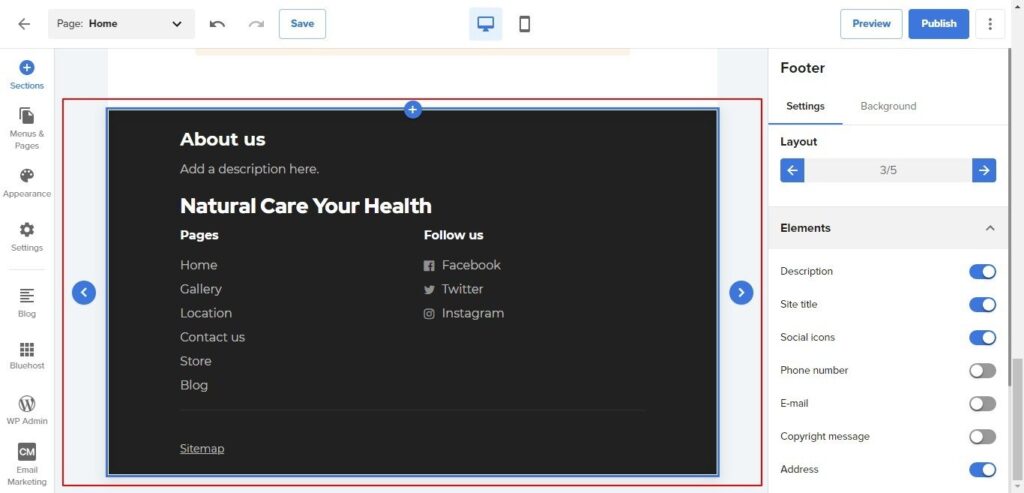
You can edit the footer in the same way, change layouts and edit Elements in the footer.
Step 4. Add Content: Pages, Blog Posts or More
After you customized and designed the appearance of the website, you need to add some content to the website.
Add Pages
The first thing for content is adding some necessary pages, such as about us, contact us, and so on. Let’s add the “About Us” page as an example.
- Click Menus & Pages on the left navigation, then click on New Page.
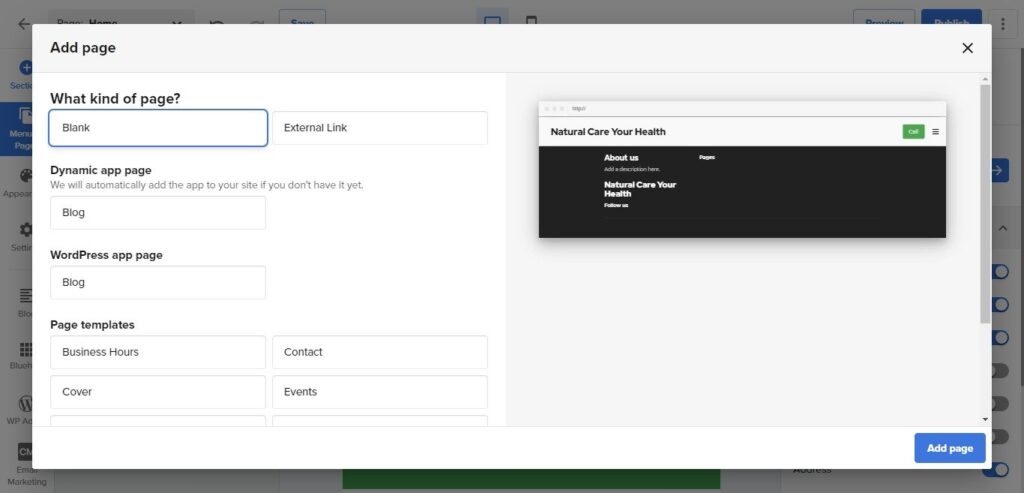
You can add some different types of pages,
- Add a blank page without any content
- You can also add a external link to the menu, this option should be only for menu.
- Dynamic App Page, you can also add some pages that generated by some APP or plugins, like worpdress blog page
- If you don’t know how to create a page, you may also choose a template to start, you can see the page templates in the below image.
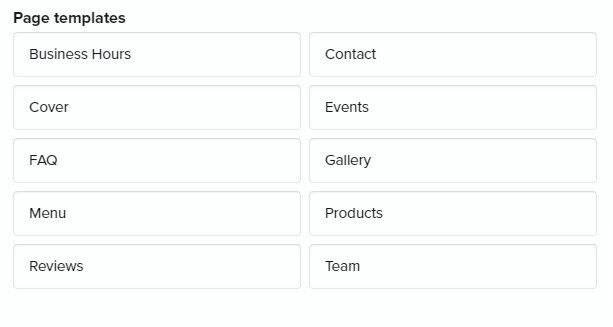
2. select the Blank page, and click on Add page, then you need to enter a page name: About Us.
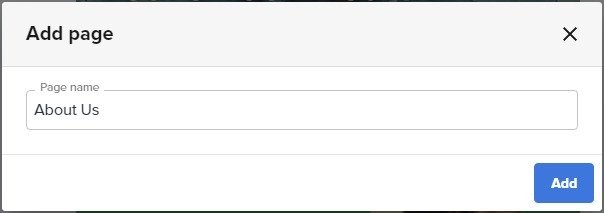
After clicked the Add button, a new About Us page was added, you can also find it in the Menu list.
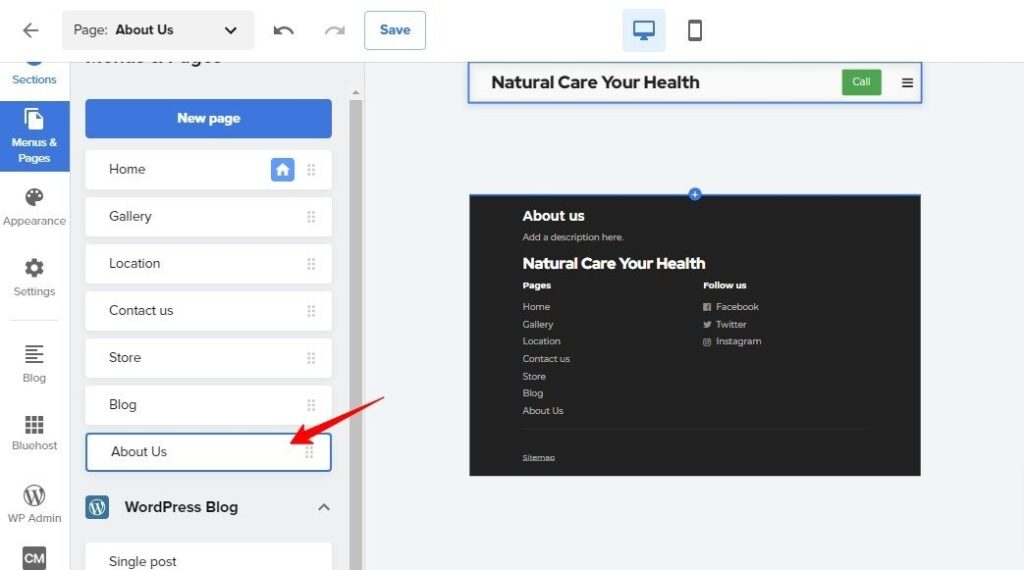
3. And you can see the page only showing header and footer, now you can add some content to the page, just go to the left navigation, click the Sections, find some proper sections and drag them into the page.
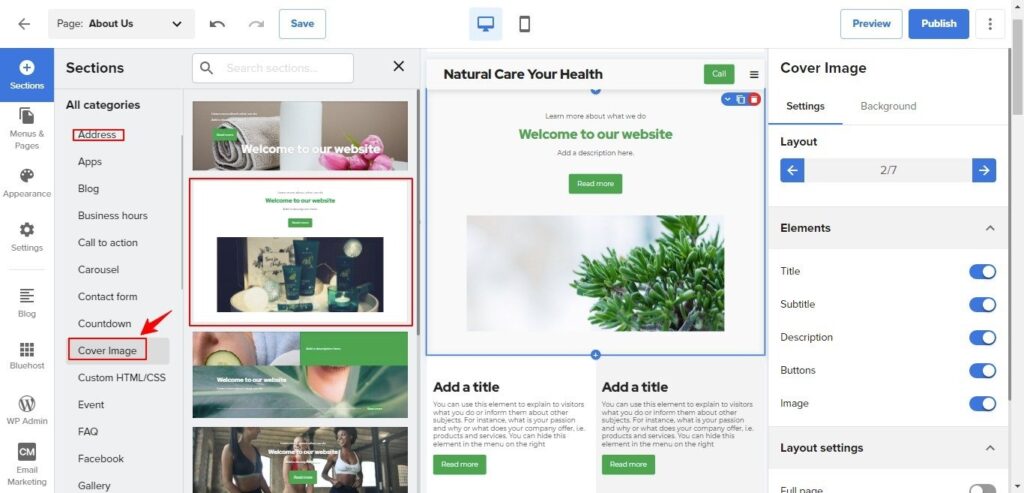
for example, adding a cover image, some texts, team, and Address, just so easy.
4. You need to edit the sections with the content of your business, it is also very easy, you just click the section, and edit the texts or images directly on the section.
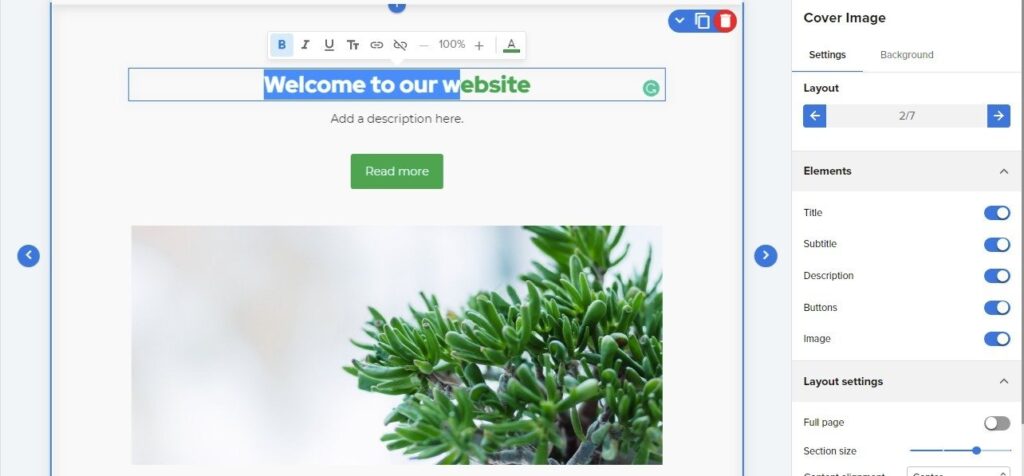
As you can see in the above screenshot, you can edit the texts like in Microsoft Word, and you can replace the image easily too, you can upload new images or replace the image in the media library.
In addition, you can change the section layout on the right setting bar, edit elements, change the background for the section, and more.
Besides the default section templates, you can add some other sections generated by some plugins or APP, such as Woocommerce sections(if you purchased the Pro or Online Store plans), WordPress blog section, or even the WordPress blocks.
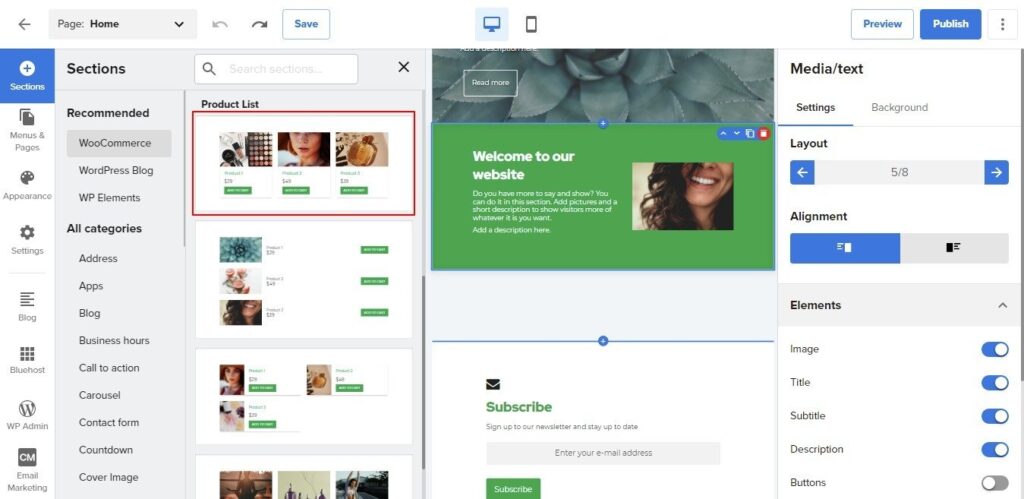
Once you completed one section, remember to click save on the top bar, then edit the next one.
Add Blog Post
The blog post is the core feature of WordPress, the Bluehost website builder also includes some features for Blog posts, see the below screenshot:
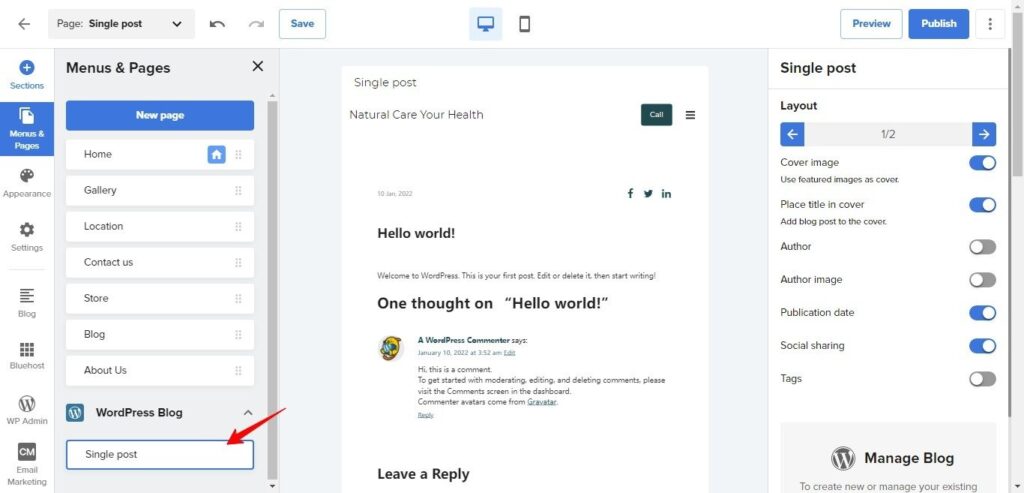
You can edit the layout of the single post page. If you want to edit the blog home page, you can add it to the primary menu firstly, you can also add some sections to the blog home page.
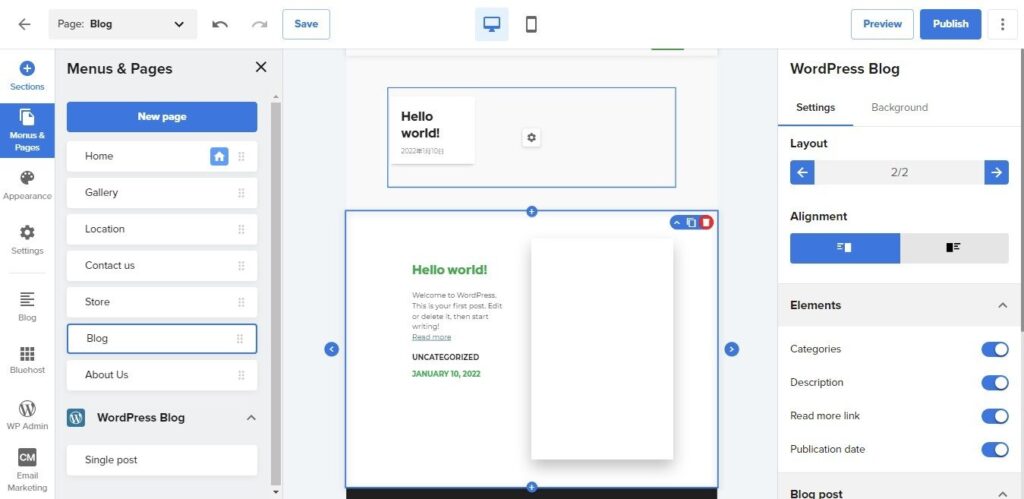
The Bluehost website builder can only change the blog post page’s layout and appearance, if you want to write some blog post or article, you still need to access the WordPress dashboard to add new posts.
You’ve achieved your site if you just hope to build a personal website or a blog or other simple website. That’s it, Build a website with Bluehost website builder is actually so easy, you can go to the last step now.
Step 5. Install And Set WooCommerce
For people who want to build an e-commerce website with Bluehost website builder, you need to keep reading this tutorial.
You need to manage the whole e-commerce store in the WordPress dashboard if you purchased the Basic plan of the Bluehost website builder and the Bluehost web hostings since these plans are not included the e-commerce feature.
As this is a tutorial to teach people to build a website with Bluehost website builder, the following steps will be based on the Pro plan of the Bluehost website builder, it is also good for the Online Store Plan.
Install Woocommerce
The Bluehost website builder is on top of WordPress, so if you want to build an e-commerce website with it, you can also install some e-commerce plugins, the most popular one is Woocommerce, and both the Pro and Online Store plans are included with some Woocommerce features in the packages.
Head over the left navigation in the dashboard of the builder, scroll down the page to the bottom, you will see a Store menu on the bottom of left navigation (only available in the Pro and Online Store plans), that’s for the Woocommerce.
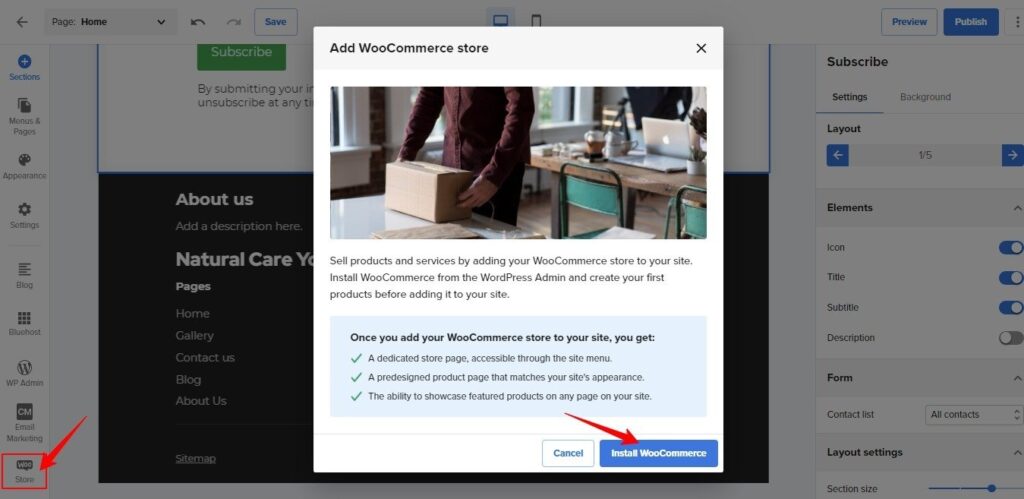
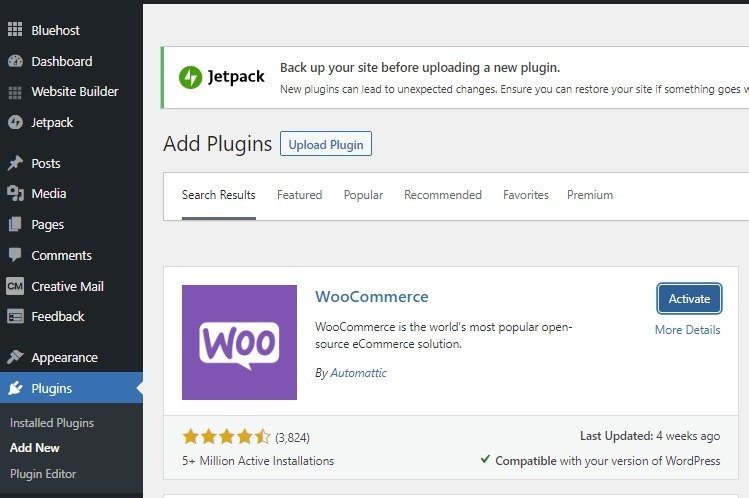
Click Store to install Woocommerce, you will go to the WordPress plugins page to install the Woocommerce plugin, after installed it, you need to activate it.
It will show a setup wizard for you to set the store quickly once you activated the Woocommerce plugin:
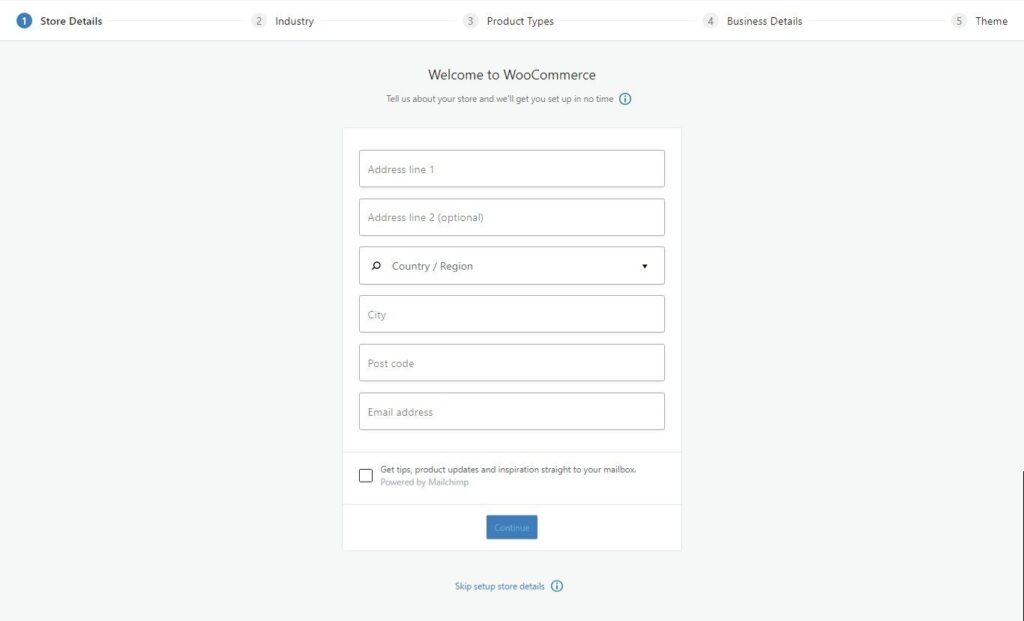
I personally suggest you skip it since you can set everything in the Woocommerce setting menu.
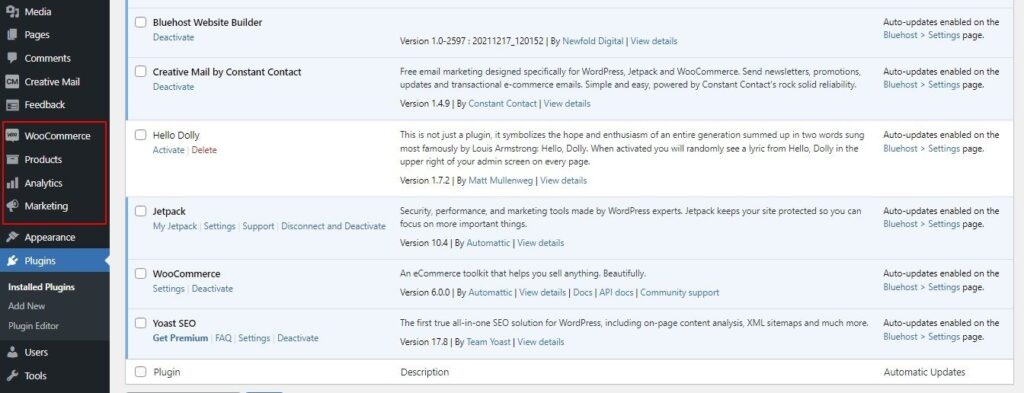
And there’re 4 menu options that will be added to the left navigation of the WordPress dashboard, now you finished the installation of Woocommerce.
I strongly recommend that beginners go and delete some plugins except the Woocommerce and Yoast SEO, many plugins are too annoying to the newbies, and actually, you can install those plugins any time in the future.
Setting of Woocommerce
You will need to complete some settings for Woocommerce before you can sell products.
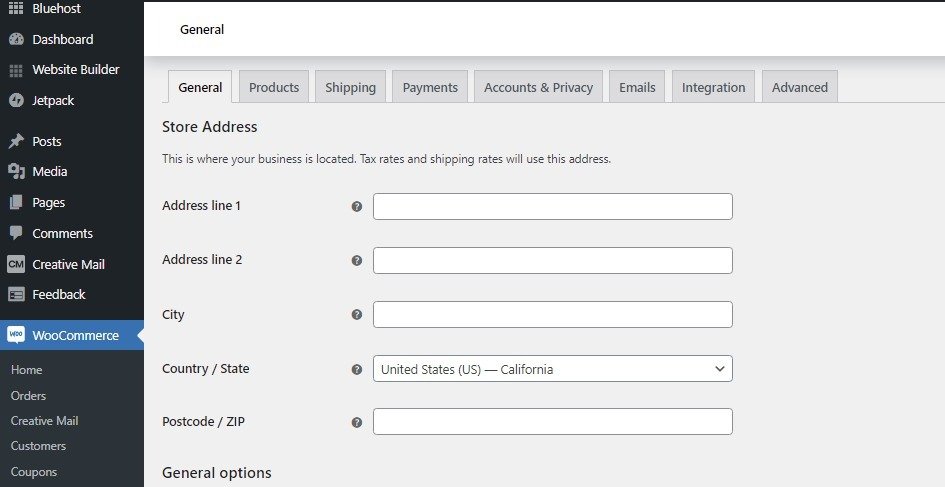
Once you set all the options properly, you can add products to your website and sell them like on Amazon or eBay. Let me show you the details for each option.
- General – you can add your business information, like location, address, currency and where to sell your goods, etc.
- Products – you set the shop page, measurement, reviews, as well as inventory, and some settings of downloadable products
- Shipping – obviously, this is for shipping and delivery setting
- Payment – for setting payment methods
- Account & Privacy – how you want to let the customer register an account and place order, as well as the privacy policy to customer
- Emails – It is about the emails when you get new orders, ship goods and any notice of orders, you can choose which email address to send and receive the emails.
- Integration – some 3rd-party add-ons if you need
- Advance – you can set some default pages of the store, and something for development, if you don’t understand, you don’t change the setting in this option.
Complete the settings step by step according to your actual business information, then you can add products and start selling.
Edit Store Pages in the Bluehost website builder
Some people may have a question, it seems all things for the store are finished on the WordPress dashboard, then what the Bluehost website builder can do for the store?
**Yes, absolutely, you can be done all for the store on the WordPress dashboard, that’s why I suggest the experienced WordPress users purchase the Basic plan.
However, if you purchased the Pro or Online Store plan of Bluehost website builder, you can design the store pages very easier and faster, there are many templates you can use for any page, which is very friendly to the newbies and can save much time for you to design the store pages.
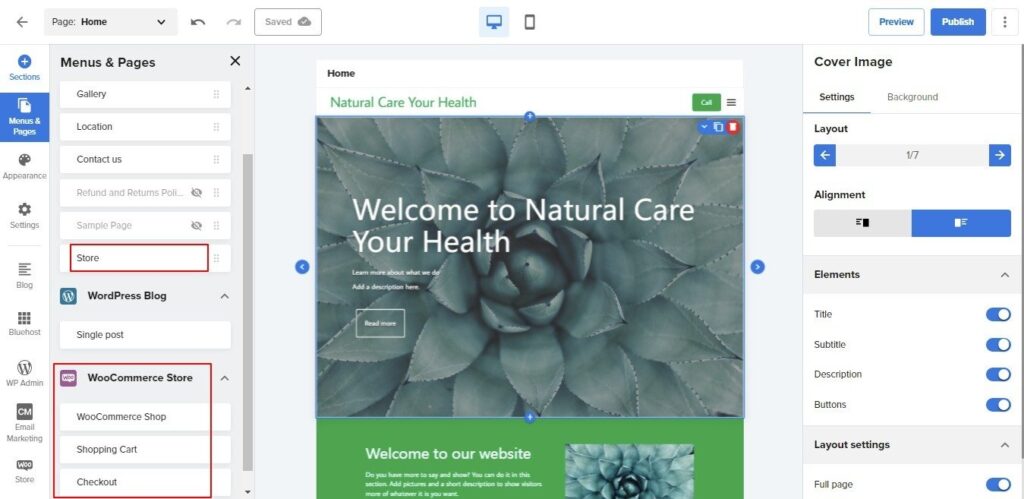
When you click the Store menu on the left navigation in the builder, you add the store pages to the builder, after that, You will find some new store pages and a Woocommerce page list in the Menu & Pages as in the above screenshot. select the store/shop page, you can edit your shop home page.
Click the Sections menu of left navigation, and choose some sections (not limited to Woocommerce sections) drag and drop into the Shop page.
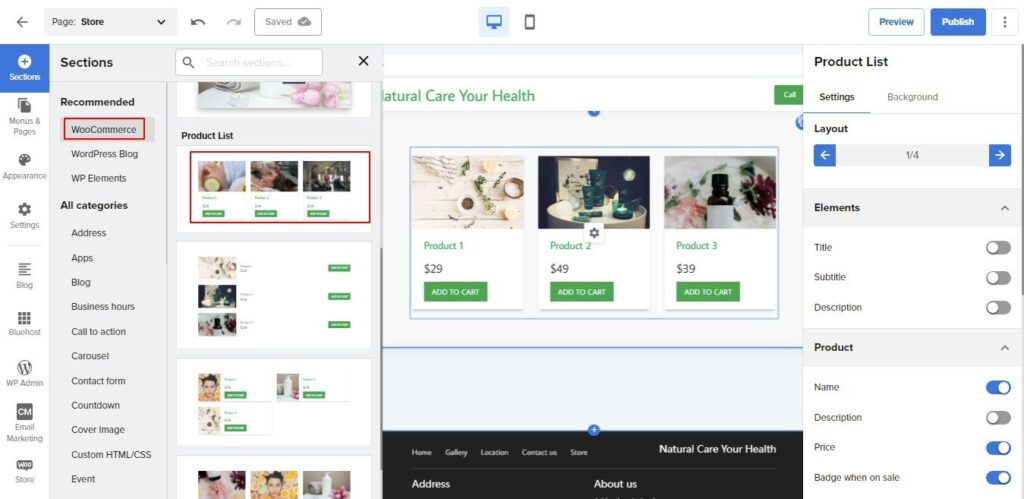
You can also edit cart and checkout pages in the Bluehost website builder.
Step 6. Add Products
The final step to sell online is adding products, you also need to go to the WordPress dashboard, head over the left navigation and select the menu Products, click Add New Product. the below screenshot is shown the product editor.
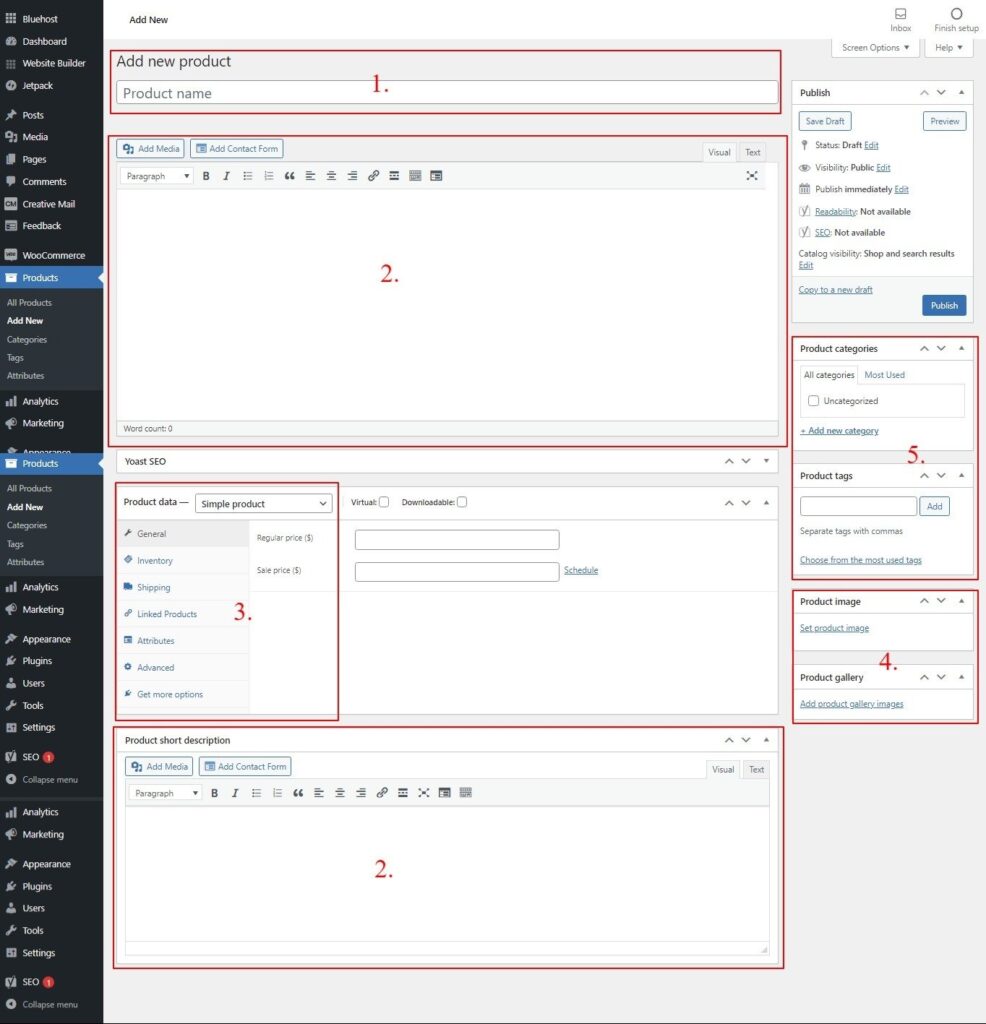
Here Let me show you each number stand for what in the above screenshot:
- Product Name, this is the title of the product, you edit the product name with some keywords
- Description, there’re 2 position, the top one is main description of product and the bottom one you can set a short description to attract the visitors
- Product parameters data that including product types, product attributes, prices, shipping, inventory, sku, etc.
- Photos for Product, the part of Product Image can be added one primary photo, besides, you can add mulitple photos to the Gallery
- Product categories and tags, you can sort the products with these features.
You will see a Yoast SEO section too, you can do some SEO setting with it with the Yoast Plugin. Once you make all the information done, you can publish the product by clicking on the right top button. You may publish the products immediately or set a scheduled date to publish them.
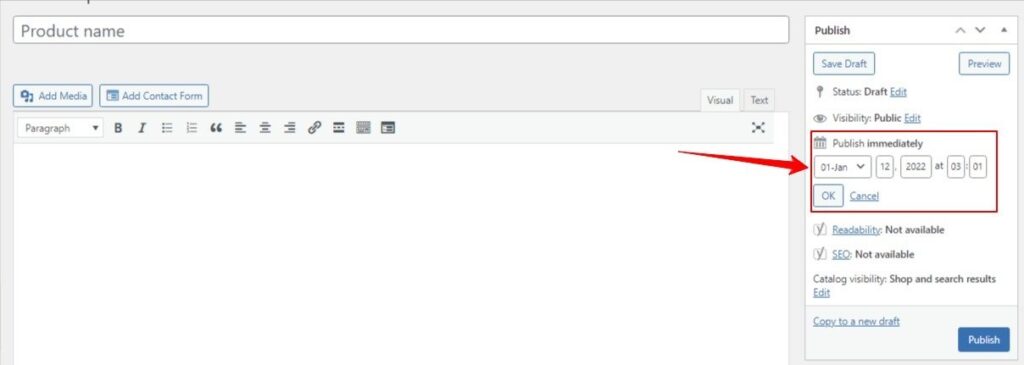
That’s it, you almost build an ecommerce website with Bluehost website builder. you can edit the store pages in the builder again to see how they are with the new published products too.
Step 7. Install SSL and Publish Your Website
The last step to get your website online is publishing you website, but before you publish it, you need to install SSL to your domain, it can secure the data and information between your hosting and the visitors,
Google will consider any site without SSL to be unsafe, which will impact the ranking of your website in the Google Search engine.
Go to your Bluehost account dashboard > click My Sites > choose the website > click on Manage site > select the Security tab, you will see the setting as below.

The SSL Certificate was installed automatically in the Bluehost dashboard, but you still need to turn on the Enforce HTTPS, so wherever your site opened, it should be secured.
You can also see many other options for you to manage the website, you can check and set them as your demanding.

Finally, Go to the Bluehost website builder dashboard to publish your e-commerce website.
The tutorial to build a website with Bluehost website builder is the end now, You can have your own website or even an e-commerce online store.
Final Thoughts
The Bluehost website builder is a totally new tool for people create a website, I prefer say it is a page builder ot a website builder, since for now what much this tool can do is design and edit the pages of wordpress website.
However, I don’t think the current Bluehost website builder is the final version, more and more features are being added. And actually, it can really help the people totally newbies to WordPress, they can create and build a website with bluehost webiste builder far more faster than the tranditional way.
You can also read our Bluehost website builder review to learn more about it, hope both the Tutorial and review can help you to achieve your desired website!


