Many people used to think of hiring a web development company when they wanted to create an e-commerce website. However, building your eCommerce website has become very common nowadays. With the advancement of technology, regular individuals don’t need to know code knowledge or master web design to create a fully functional eCommerce site. Even if you’re fifty years old or even older, you may do this.
This isn’t an exaggeration, so I plan to share a complete step-by-step guide on how to Build an eCommerce Website with WordPress + WooCommerce in this article, the tutorial will be processed on cPanel hosting. The content of this article might be lengthy, but I’ll aim to make it as detailed as possible. I hope you’ll patiently read through it so you can also create your eCommerce website and sell online afterward.
As long as the hosting you’re considering purchasing uses the cPanel control panel, this tutorial is generally applicable and not limited to the hosting provider you choose.
Why Build an eCommerce Website with WordPress?
When we talk WordPress here, we’re referring to wordpress.org, not wordpress.com. WordPress.com is an online website-building platform based on wordpress.org. It can also be used to create websites, but it comes with slightly higher costs. To avoid any confusion, please pay attention to this distinction.
WordPress itself is a CMS (Content Management System) originally designed for blogging. There are at least 5 reasons why you should consider using WordPress for building your website:
- Free: WordPress is an open-source website building system.
- User-Friendly: It’s beginner-friendly and easy to get started with.
- Lightweight: It doesn’t require excessive hosting resources, which means low cost for starting.
- Scalability: You can create any type of website using plugins, whether it’s an eCommerce site like the one we’re building in this article, a portfolio, a forum, a news magazine, and more.
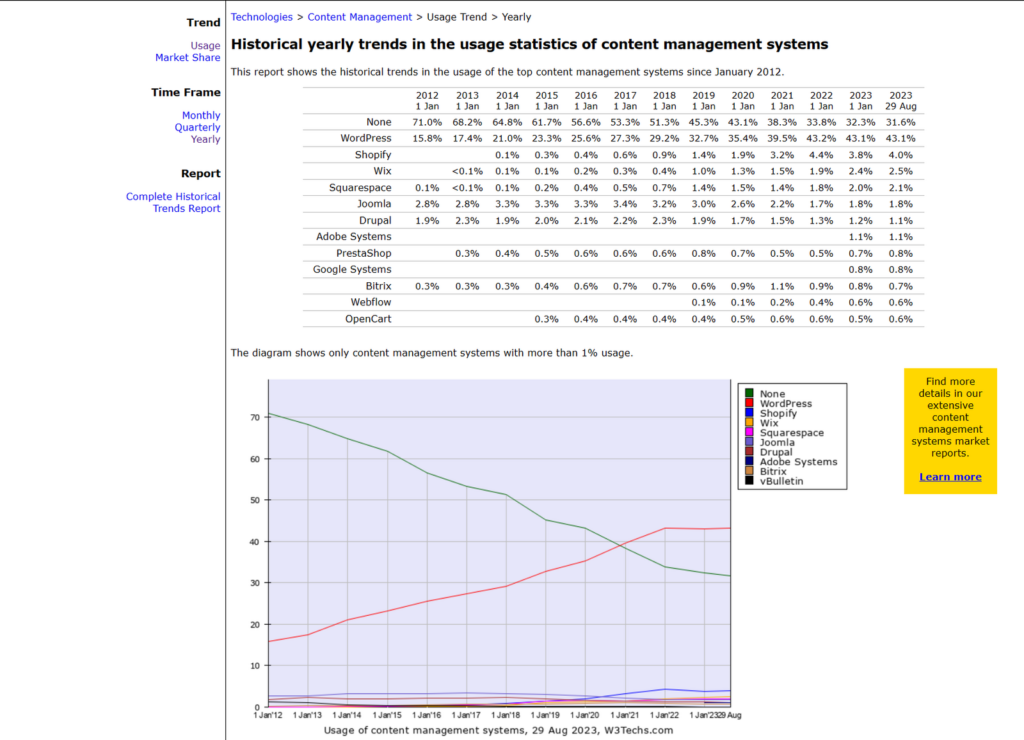
- Largest Global User Base: WordPress has the highest number of users globally. It’s supported by numerous hosting providers, and there’s a vast array of plugins and themes available. The fact that it’s widely used also indicates that there are plenty of online solutions available for any issues you might encounter. You won’t be left with concerns because you’re not alone.
Many more advantages aren’t listed here. Building an eCommerce website with WordPress isn’t difficult. If you follow along with my step-by-step instructions, you’ll be able to do it yourself without needing to hire a web development company.
What do you need to start?
Using WordPress and WooCommerce to build your eCommerce website is quite straightforward, You can simply check the below list:
- A Web Hosting, typically starts at around $3 to $5 per month.
- A Domain Name, You’ll need a top-level domain (TLD), costing approximately $10 per year. You can purchase a domain name from specialized domain registrars or through your hosting provider.
- A Credit Card or PayPal Account, You’ll need either a credit card or a personal PayPal account to purchase hosting and a domain.
- WordPress System: WordPress itself is a free and open-source system.
- A WordPress Theme: You can start with a free theme.
- WooCommerce and Other Essential Plugins: You’ll need WooCommerce for eCommerce functionality, along with other necessary plugins.
The above list outlines the basic requirements and approximate cost references for getting started with building an eCommerce website with WordPress and Woocommerce.
Step 1. Purchase Hosting and Domain Name
A web hosting is a remote server used to store your website data and files, It’s like the backstage powerhouse for your site. And when we’re talking about building websites with WordPress, you’ve got to install that whole WordPress system onto your host. If you’re curious for more info on hosting, you can click here to dive in.
1. Choose a Web Hosting provider
Now, there’s this whole bunch of hosting providers out there, but if you’re starting and stepping into the website-building world, a web hosting plan, often called “web hosting,” is usually enough to get you rolling. But what’s the deal with web hosting, you ask? Well, let me give you the scoop:
- Affordable Pricing for Everyone: The pricing is budget-friendly and accessible to anyone. And sure, a lot of these deals might ask you to pay upfront for a whole year, but building a website is like a long-term kind of thing anyway, right?
- User-Friendly Operation: No need to wrap your head around all those techy hosting details. These hosting plans come stacked with pretty much everything you need to get your site up and running.
- No Need for User Maintenance: These hosting providers have turbocharged your website’s speed and performance, so you don’t have to worry about that. They’ve got your global back too, and most of the hosting services make sure your site loads up snappy for users all around the world.
Alright, now for this tutorial, we’re all about cPanel hosting, I’m gonna spill the beans on a few cPanel hosting options you might wanna check out:
- Chemicloud – Overall, it’s a great choice. They use the Litespeed web server for high performance, offer a free domain for the first year, and the pricing is quite competitive. The first tier plan costs between $3 – $5 per month, and the renewal rate is $9.95/month. the customer service? They’re on it. Got a question? They’ve got an answer, and they’re fast.
- Inmotion Hosting – Their basic plan allows you to create 2 websites. They use the Nginx web server, which is quite rare among hosting providers. They also utilize cPanel as the hosting control panel. Like Interserver, they have data centers exclusively in the United States. Overall, they excel in various aspects.
- Interserver cPanel Hosting – They offer only one premium subscription plan, which is consistently priced at $2.50 per month, making it very affordable. It also uses cPanel as the hosting control panel, allowing you to create numerous websites. However, it only provides weekly automated backups and operates solely from data centers in the United States. Other than that, it’s a solid choice.
For more cPanel hosting providers, you can click another article on our website: Top 6 Most Popular And Best CPanel Web Hosting Providers.
The upcoming steps will mainly use Chemicloud as an example. If you’re using cPanel hosting from another provider, aside from differences in the purchasing process, the subsequent steps in the tutorial are generally similar.
2. Select a Web Hosting Plan
Let’s head over to the Chemicloud website and take a look at their web hosting plans.
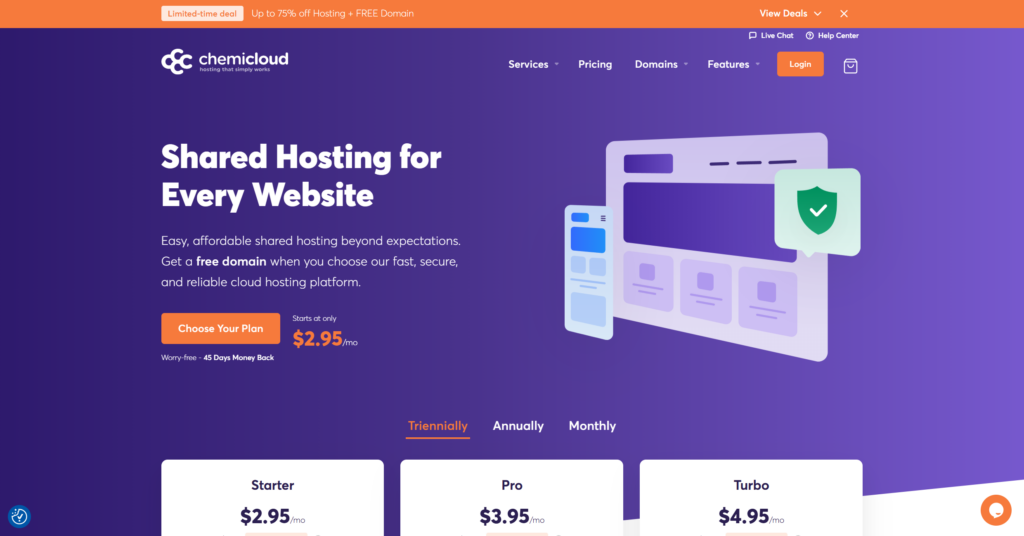
The image above shows the prices for first-time purchasing, you can see the three tiers they’ve got: Starter, Pro, and Turbo. If you’re just starting to build a website, I’d say the Starter plan is the way to go. It’s usually $2.95/month for a triennial price, but during the sales and deal season, the prices might be lower, and the renewal rate is $9.95/month.
I know you might think this 3-year upfront payment thing seems a bit… well, tricky, but Most other hosting providers do it this way too, so don’t stress too much about it.
Click on the button Order Now to the next…
If down the road, the Starter plan isn’t cutting it for your website’s needs, you can always upgrade to one of the other plans.
3. Register Your Domain Name
Once you select a plan(like Starter) and click Order Now, you need to enter your domain name into the next page on Chemicloud.
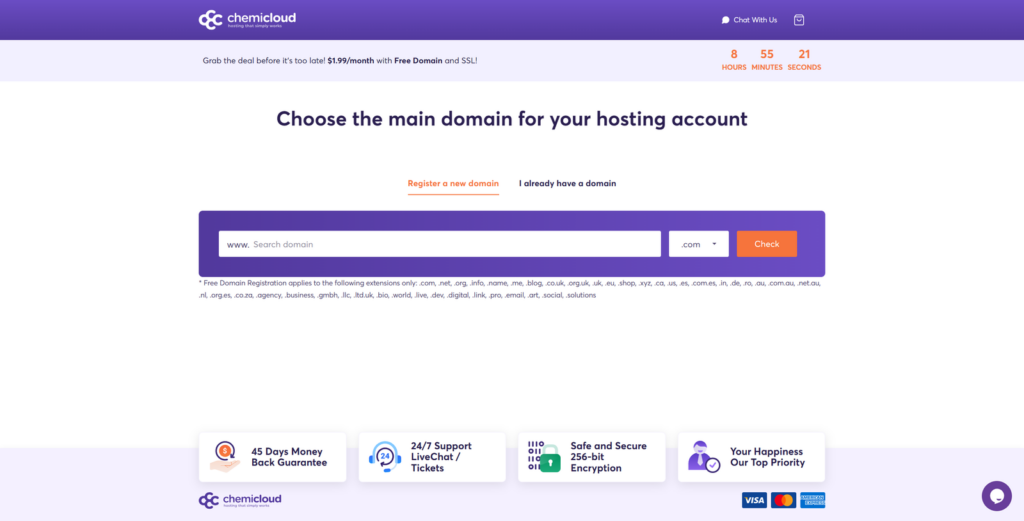
You will have 2 options:
- Register a new domain on Chemicloud, and then your domain will be pointed to chemicloud hosting directly, this option is recommended for beginners.
- Use an existing domain, you can register your domain name with third parties, Wherever you buy it, you can use it here, but you need to know how to connect the domain and hosting.
Normally, registering a domain at a third-party place might save you a few bucks, but if you’re new to this whole website thing, I’ve got a strong suggestion: Just register your domain right on Chemicloud. Yup, it might cost a tiny bit more, but trust me, it’s like saving heaps of time and brainpower.
Go ahead and Choose “Register a new domain” right there on Chemicloud, the first year’s domain fee is free! Cool, right? Toss in your desired domain name and give it a quick “Check.”
The next page will pop up with an option for WHOIS privacy protection. I’d say go for it. It’s just $3.95/year. Otherwise, brace yourself for a daily stream of promotional emails and telemarketing calls. Trust me, not a fun time. And then continue to the next.
4. Configure Hosting Plan
Next up, we’ve got the Configure page, where you get to set up some key info about your hosting and some extra options.
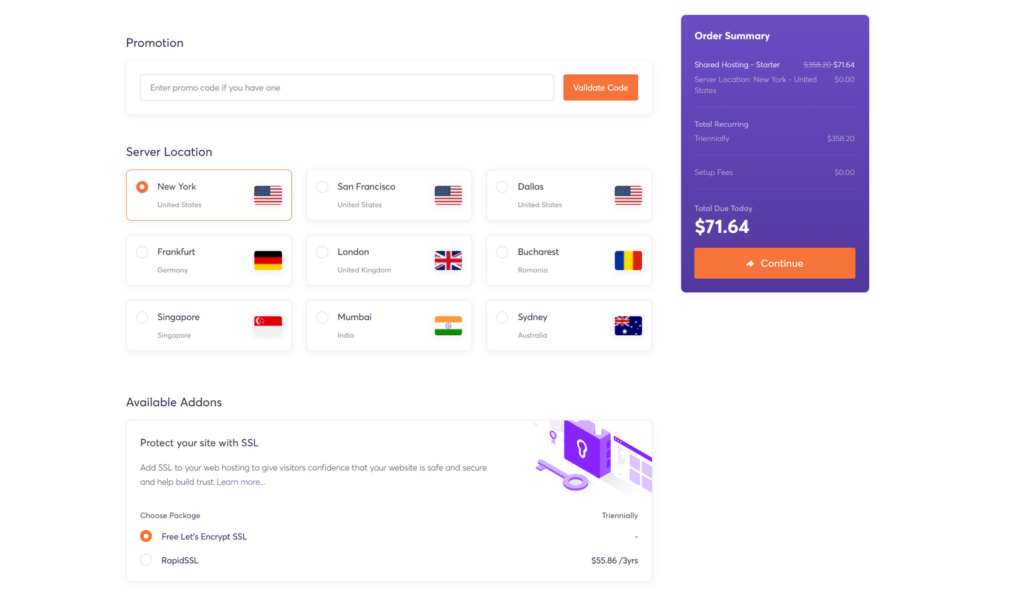
There are two main spots here that need your attention. First off, choose your billing cycle. Snagging the 3-year deal is like the ultimate money-saver. Seriously, when you’re kickstarting a venture, 3 years isn’t all that long. Even if you’re looking at a 2-year option, the price difference isn’t that much. Plus, the renewal cost for a 3-year plan is gonna be cheaper.
Considering the current anniversary deal price, the total cost is just under 100 bucks. And that’s for three whole years, think about it, weigh the pros and cons, and decide if it’s worth it for your gig.
Second, Pick a data center. Keep it simple, go with the one that’s closest to where your business buzzes and leave the rest option on the default settings. Once you’ve got your info in place, hit that “Continue” button.
5. Create an Account and Checkout
Now, Chemicloud will prompt you to create an account. Once you’ve got your registration info squared away, you can pick a payment method. Chemicloud supports both PayPal and Stripe (credit card), so just go with what suits you best. Don’t forget to check the box saying you’ve read and agreed to the terms.
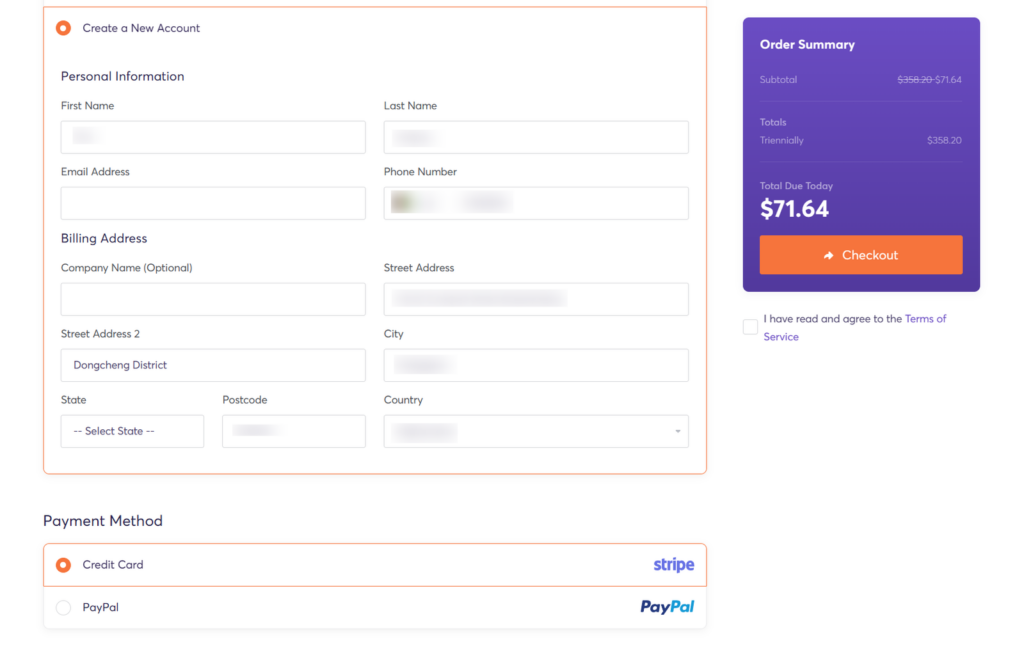
When everything’s good to go, hit that “Checkout” button to make your payment. After that, you’ll get a few emails in your inbox, including one confirming your account registration, another confirming your payment success and the related details about your hosting setup.
Login to your account to check your hosting dashboard:
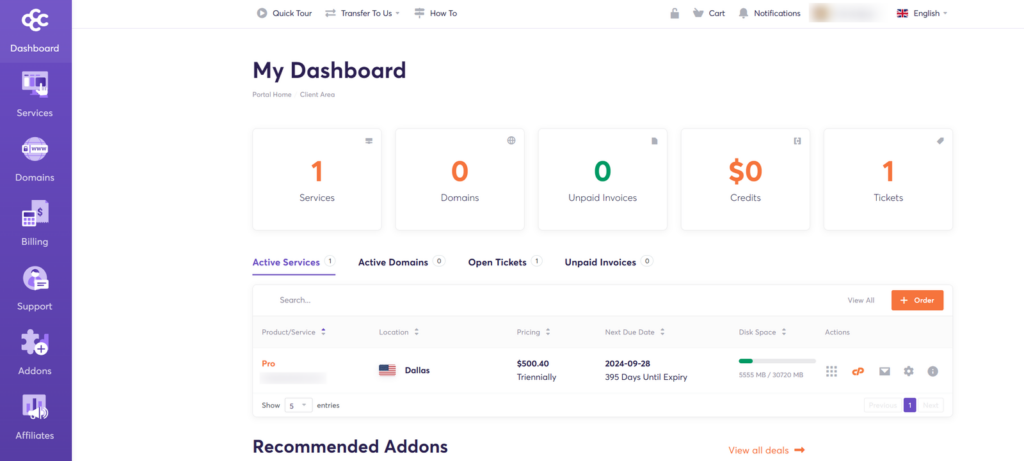
In the Active Service tab, you will see the details of the hosting you just bought, and you can use the hosting now.
Step 2. Install SSL certificate
*If you’ve registered the domain directly from the hosting provider (such as Chemicloud), you can go into the cPanel dashboard and get that SSL certificate installed.
**However, if you’ve bought your domain from a third party, you’ll need to point your domain to your hosting before you can get your SSL certificate rolling.
This is another reason why I recommend newbies to just grab their domains straight from the hosting provider.
What is an SSL certificate?
SSL stands for Secure Socket Layer protocol, and nowadays, it holds significant importance for Google’s search engine ranking algorithm. Websites without SSL certificates don’t receive favorable visibility and good ranking from Google. In essence, such websites remain practically invisible on the Google platform.
The purpose of the SSL protocol is to ensure the security of sensitive data transmission between users and website hosts.
Chemicloud offers a one-click installation for free Let’s Encrypt SSL certificates, which is particularly user-friendly and convenient for beginners.
Accessing cPanel and Install SSL
To begin, you need to access the cPanel dashboard to obtain an SSL certificate. Log in to your Chemicloud account and click on the cPanel icon under “Active Service” (as shown below) to enter the cPanel interface.

Below is the latest cPanel interface from Chemicloud. If you’ve purchased cPanel hosting from other providers, the interface might look a bit different due to varying themes. However, the functions and operations remain the same.
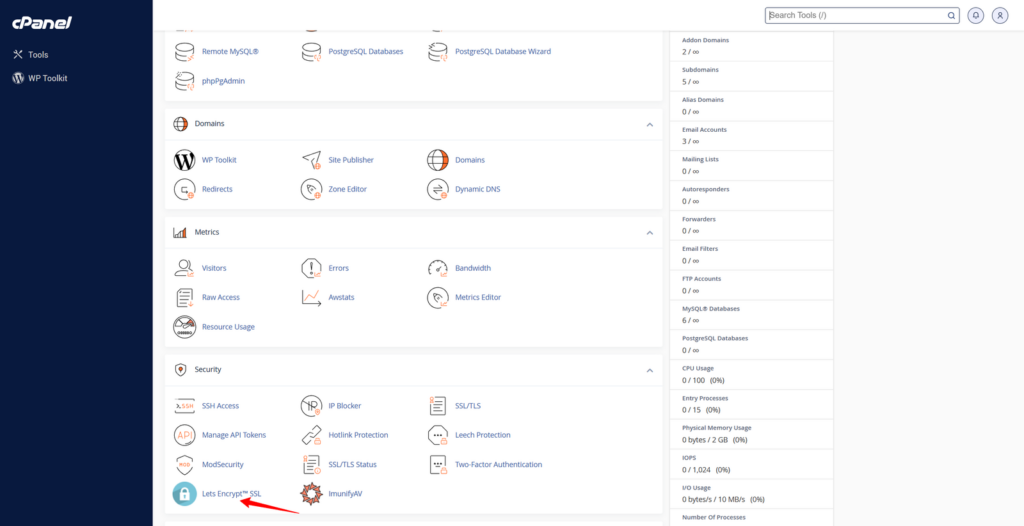
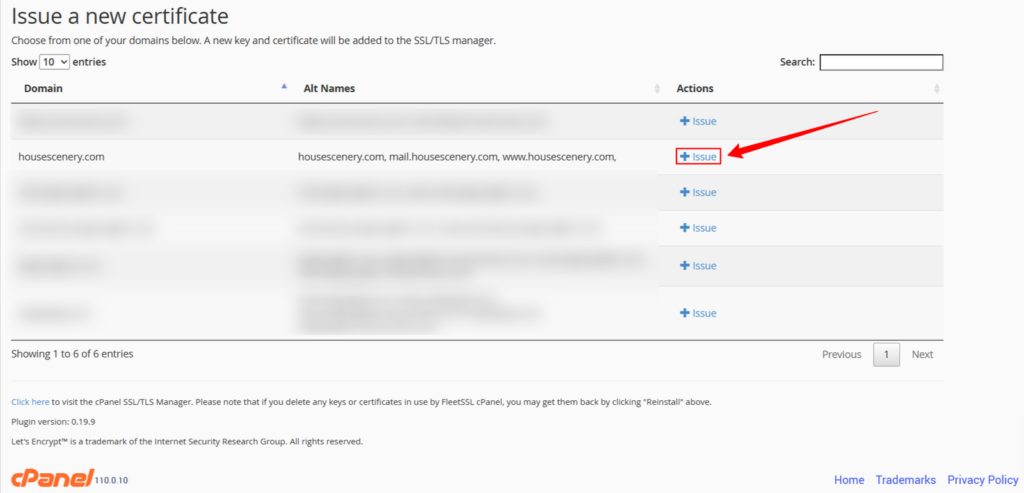
Then, click through cPanel > SECURITY > Let’s Encrypt™ SSL > Issue a new certificate, to get yourself the newest SSL certificate. Click on “+Issue” for the domain you want to obtain an SSL certificate.
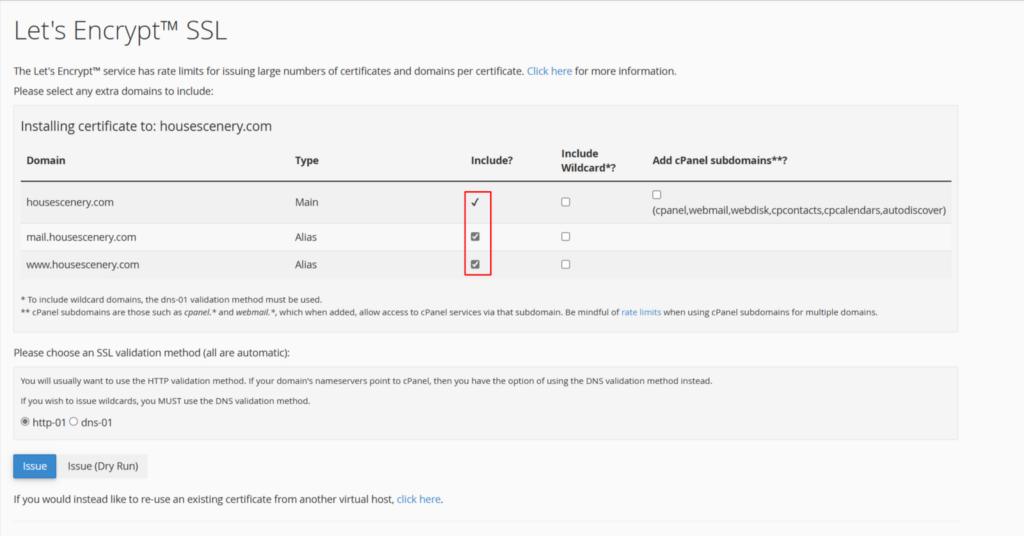
On the subsequent page, under the “include?” section, you can check the boxes for the domains you need. It’s recommended to select all three, including “mail,” which represents your business email domain. If your domain is from third-party registrars, ensure it’s successfully pointed to your hosting before attempting to issue the certificate. After that, hit the blue “Issue” button at the bottom.
Once the certificate is successfully issued, the page will return a success message. At this point, your SSL certificate installation is complete.
Now, you can open your domain in a browser to check. Look at the left side of the address bar and see if there’s a small lock icon. If you don’t see it, try clearing your browser cache and refreshing the page, or opening the link in a new browser, or even giving it a shot in Chrome’s incognito mode. A successful installation will show that lock icon, which means your website’s data transmission is encrypted.

From here on out, cPanel will take care of renewing your domain automatically. This one-time installation is like a forever deal – think of it as a permanent SSL certificate setup.
Step 3. Install WordPress
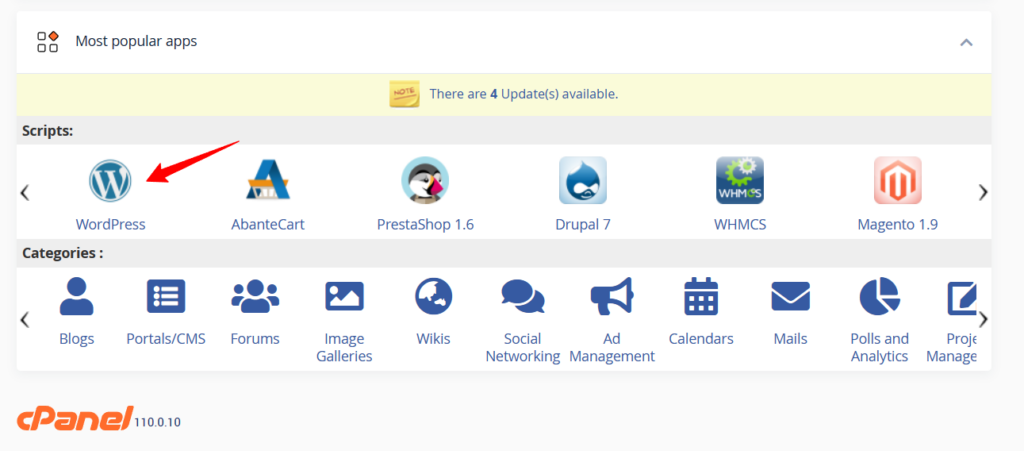
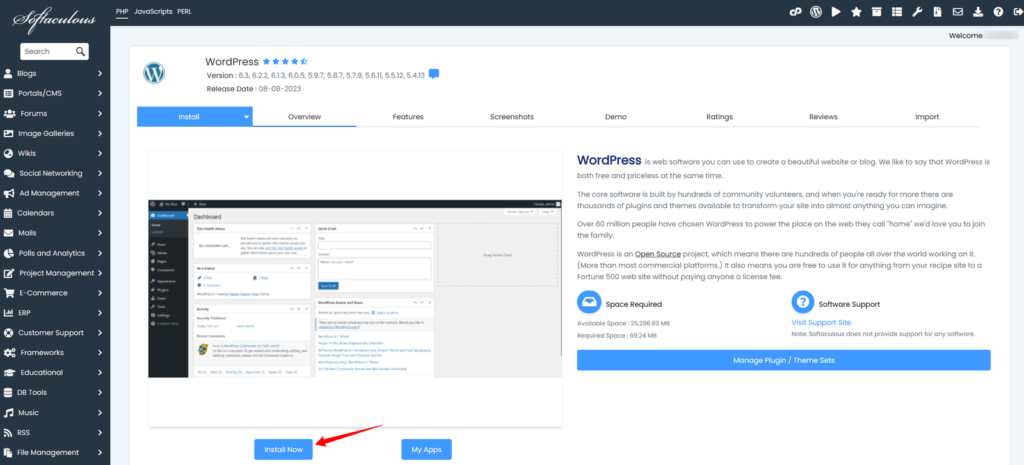
Let’s start to install WordPress on your hosting after installing the SSL certificate. Installing WordPress in cPanel is actually quite straightforward. Just scroll down to the bottom of the cPanel interface, and you’ll see a section titled “Most Popular Apps.” Inside there, you’ll find a variety of different software, with WordPress right at the top. Click on it, and you’ll be taken to a panel called “Softaculous.”
Here, you’ll get a rundown of what WordPress is all about. To get things rolling, hit the blue button “Install Now“.
Before the installation, you’ll be required to set up some WordPress-specific details – these will shape the future of your website.
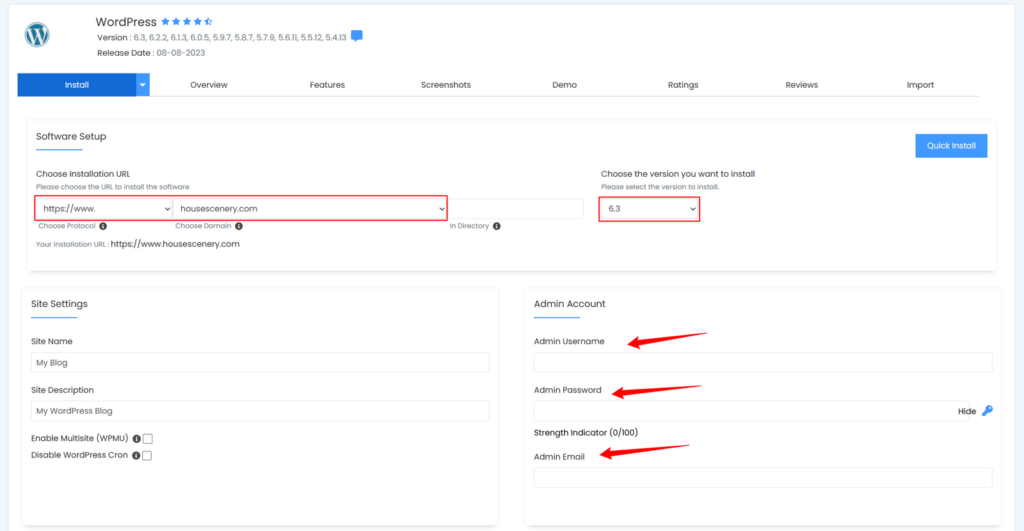
Here are a few things you need to set on this page:
- Version – Just go for the latest version.
- Choose Installation URL – If your SSL certificate’s all set up, pick “https://” for Protocol, as for the rest of the URL, whether you throw in the “www” or not, it won’t really make a difference, as you like.
- Admin Username – This will be the username you use to log into WordPress after installation. Make sure it’s something you’ll remember.
- Admin Password – Yep, that’s your login password. Remember this one well too.
- Admin Email – This is the email connected to the admin account, you can use this email to log into your WordPress dashboard too. remember or record it too.
Everything else, you can sort out later within your WordPress site’s dashboard, the settings here aren’t all that meaningful for now. Once you’re good to go, hit “Install” down at the bottom. The installation process is lightning quick, probably taking less than a minute.
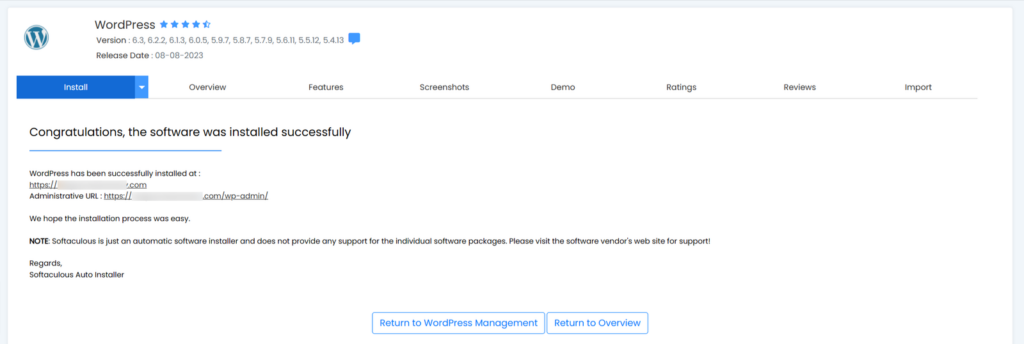
Once it’s done, you’ll land on a success page. Inside, you’ll find two links – one for your website’s homepage, and the other for the admin backend. You can check how is your website by clicking the URL of your website’s homepage.
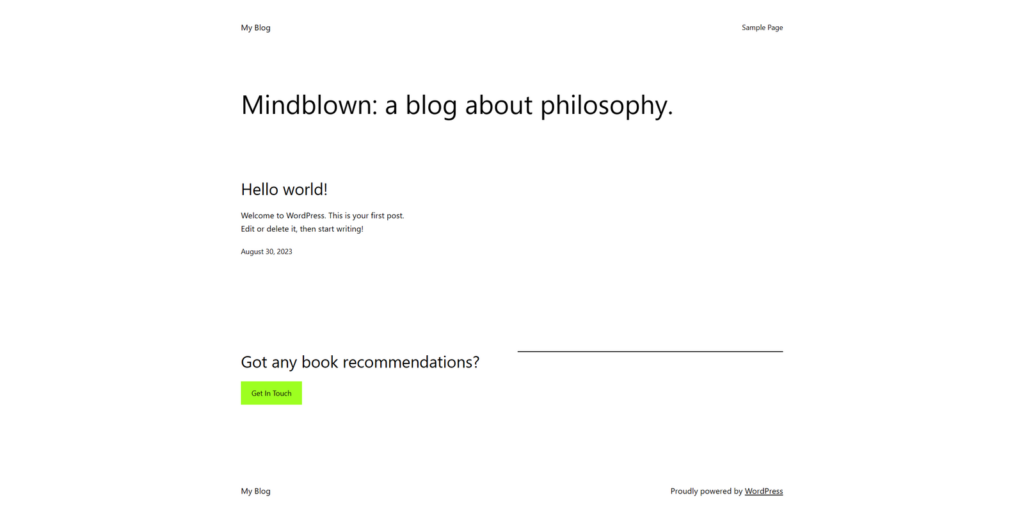
The above is the homepage of your website you will see if you installed WordPress in version 6.3.
You can also log in to your WordPress dashboard with the Admin Account information now, Your WordPress Administrative URL is https://yourdomain/wp-admin as mentioned above, You can use this link in the future directly, and then you can start to set up your WordPress website, The first thing you need to do is installing a feature-rich theme.
Step 4. Install A Theme
WordPress, being the world’s biggest website-building platform, offers a plethora of sources for themes. There’s a wide range of themes available for eCommerce websites, and quite a few of them are free while being incredibly powerful.
The first place you can get and install WordPress themes is the WordPress Dashboard of your website, there are thousands of free and premium themes you can choose and install.
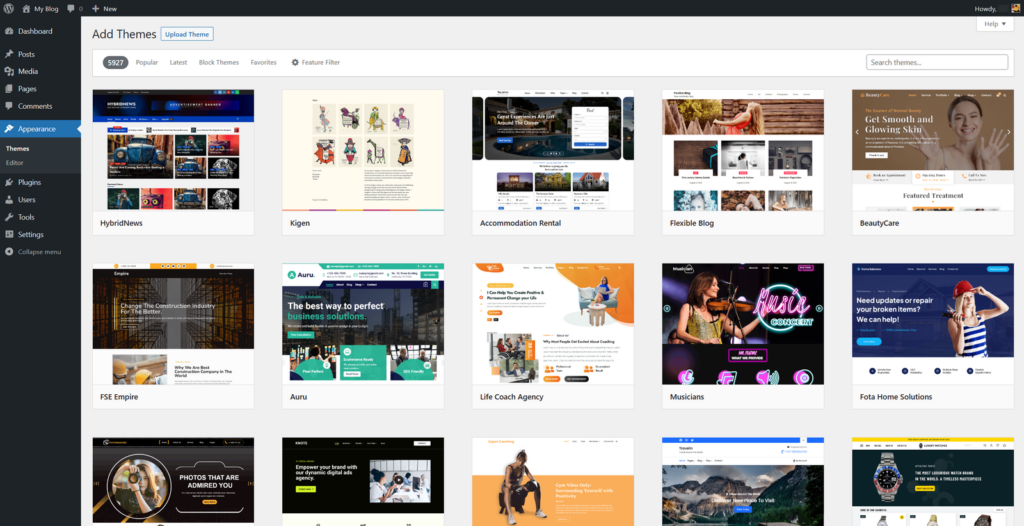
Below I’ll also recommend a few third-party WordPress theme marketplaces:
For those just starting out with a new site, I suggest considering some professional and feature-packed free themes like Kadence and Astra, etc. These themes are developed by teams of WordPress experts and their free versions are remarkably capable for starters.
Plus, you can always upgrade to their premium versions down the line. I truly believe this is a smart move. It can save you quite a bit of budget while still offering impressive theme functionalities.
On this site, We are using the Kadence theme. To save time, I’ll use Kadence as an example to walk you through how to install a WordPress theme next.
To get a Free Kadence theme, you can install it on your WordPress dashboard or go to the Kadence website download the theme and install it, I think the first method is good for everyone, so let’s login to the WordPress dashboard.
To access the dashboard of the WordPress website, follow these steps: Appearance > Themes > Add New. Then, search for “Kadence”. WordPress will display a list of related themes. The first one on the list is the Kadence theme.
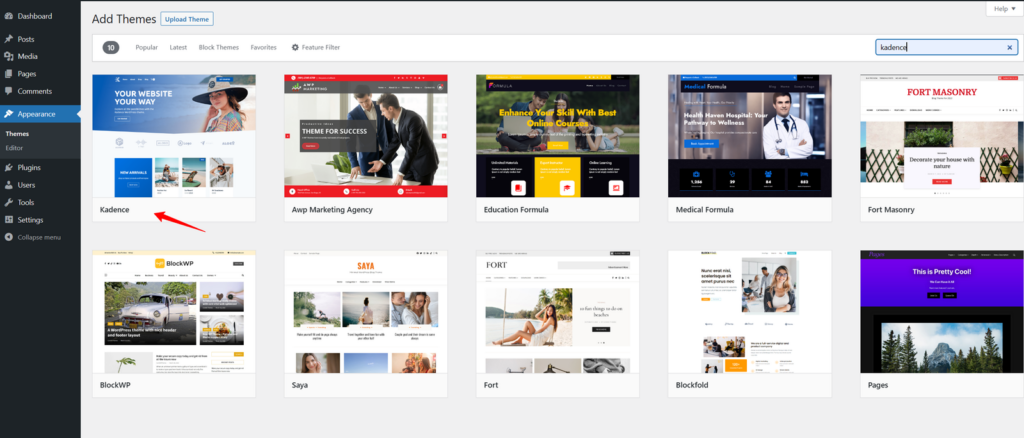
Hover over it, and you’ll see the “Install” and “Preview” buttons. Just hit “Install,” and the theme will be installed swiftly. However, you’ll also need to click Activate to finalize the installation of the Kadence theme onto your site. Now you can open your website’s homepage and see if it has changed.
Step 5. Install Woocommerce and Necessary Plugins
After the theme is installed, it usually comes with some essential plugins.
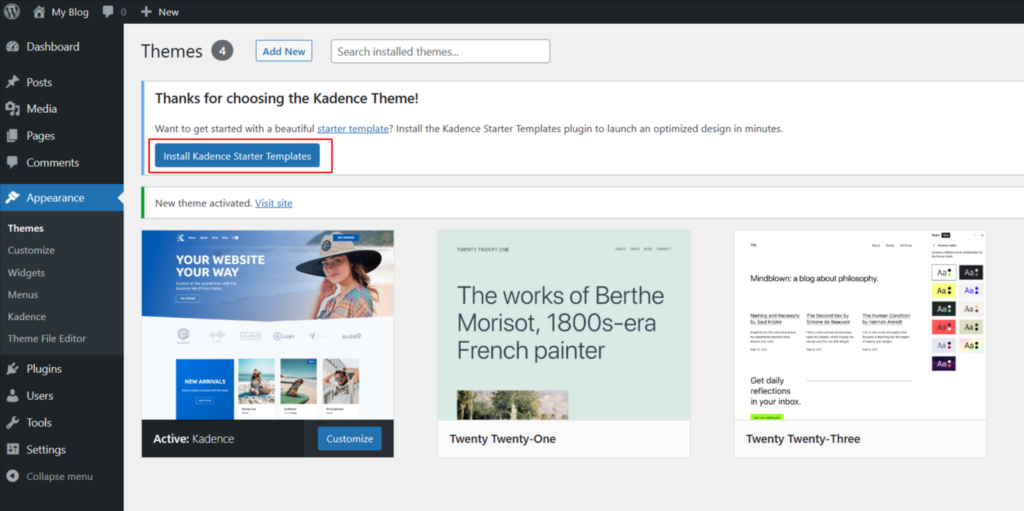
For instance, with Kadence, it’s gonna prompt you to install the “Kadence Starter Templates.” Go ahead and install it. You’ll also notice that the “Appearance” menu now has a new item called “Kadence>Starter Templates.” Then it will ask you to choose a website page editor, Gutenberg or Elementor,
- Gutenberg – WordPress’s in-built block editor.
- Elementor – One of the most popular third-party page editors for WordPress before Gutenberg.
My suggestion is choosing Gutenberg, over the last couple of years, it has gained significant support and development. Thanks to Gutenberg, countless third-party high-quality block plugins have sprung up. Some of these functionalities used to be accessible only through paid options.
You’ll get different templates depending on the editor you choose.
Click on “Gutenberg,” and you’ll be prompted to pick a template. Kadence offers quite a few beginner templates, and many of them are free. There are even a couple of eCommerce templates. Choose one of the eCommerce templates, like Outdoor Shop:
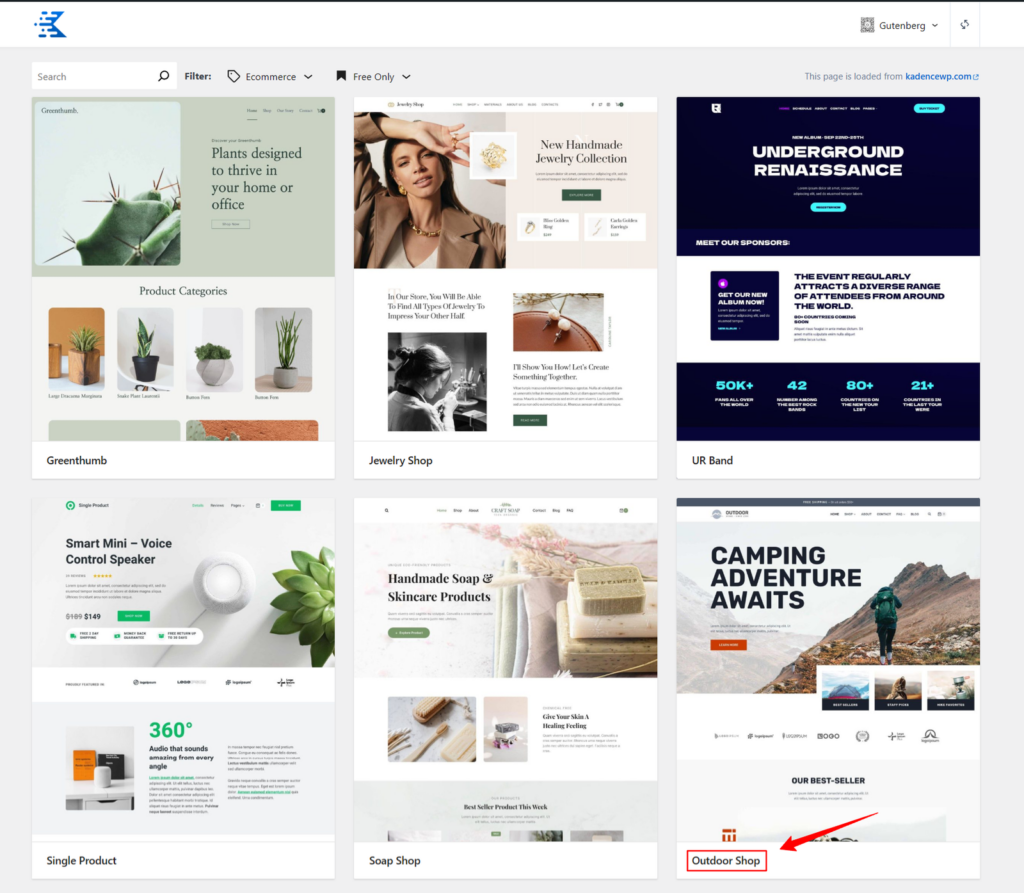
Click on the Outdoor Shop Templates to get ready for importing, On the right, you can preview the template, and on the left sidebar, you’ll find settings options like colors and fonts.
When you’re importing the template, all the necessary plugins will be installed. For Kadence, you won’t need too many plugins – just two: WooCommerce and Kadence Block. The template supports importing either a single page or the full site. I’d recommend going for the full site import, especially if you’re a beginner. It’ll make building your site a breeze since you’ll only need to replace the template’s content and make some layout tweaks before your site goes live.
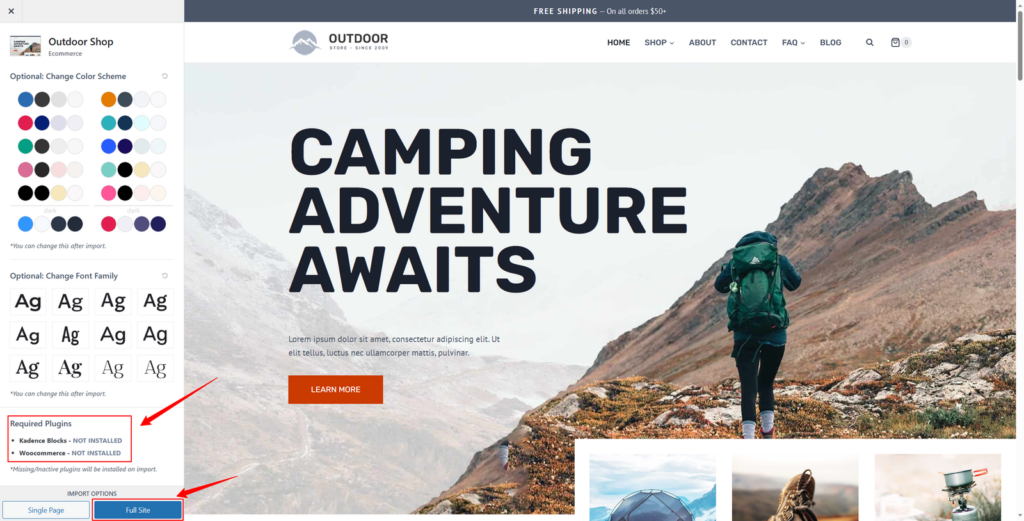
Click “Full site” to start importing the template. This process might take a bit, and it includes importing the template’s images too, Please refrain from closing the webpage during this process. Once the import is done, you’ll get a notification. You can then take a stroll through your website and see if the template matches what you expected.
If you still need to install other plugins, you can go to your WordPress dashboard, according to “Plugins>Add new.” You can either search for the plugins or upload plugins and install them manually.
Step 6. Setting and Customizing Website
You can start setting and customizing your website after the theme and plugins are installed. This process mainly involves four parts:
- Setting for your WordPress website on the dashboard
- Customizing the Website’s Appearance and Layout
- Website Menu and Sidebar Settings
- WooCommerce Shop Setting
Setting for your WordPress website
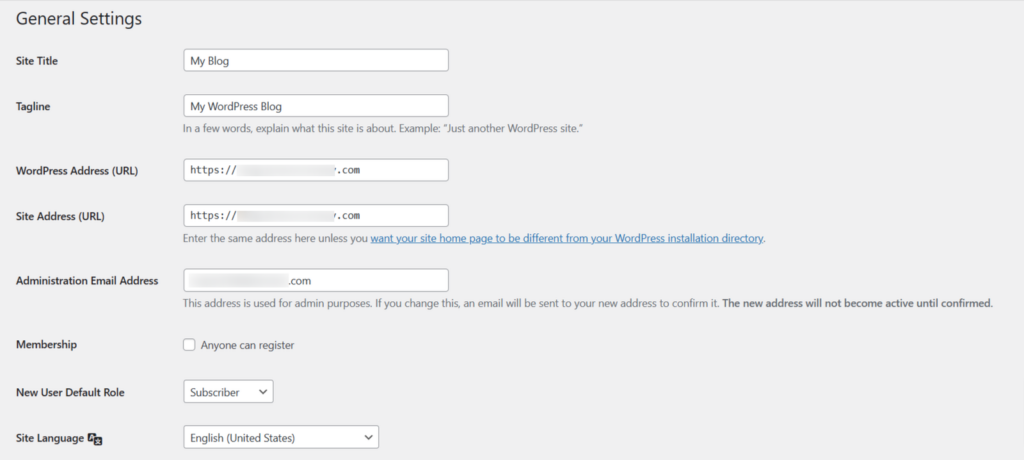
First, you’ll need to make some basic settings for your WordPress website. These could be considered backend configurations. Go to the “Settings” menu from the WordPress dashboard’s sidebar:
- General Settings – This covers fundamental business information about your website, including the site title and tagline. Fill in the details based on your industry and products. Once you’ve settled on a site name, try not to make too many changes. Then there’s the WordPress Address (URL) and Site Address (URL). It’s preferable for them to be the same, and whether you include “www.” or not is up to your preference. As for the rest items, You can leave them as is.
- Writing – This setting mainly concerns your blog post writing. You can leave it unchanged.
- Reading – Here is for setting your website’s homepage and blog page. At the bottom, there’s “Search Engine Visibility.” It might be a good idea to check this for now. “Checking it” means asking search engines not to crawl your pages temporarily.
Many tutorials recommend checking this initially, and their suggestion does make sense, because some pages are template pages, meaning they’re the same as everyone else’s pages. Not modifying them might impact your search ranking. - Discussion – These settings are related to blog post comments. You can leave it unchanged.
- Media – These are settings for media files. Keep it unchanged.
- Permalink – This is for permanent or custom URLs, also known as permalinks. Choose “Custom Structure” and then input %postname%, or simply select “Post name,” and then save.

- Privacy – You can add your website’s privacy policy page here. It’s highly recommended for any eCommerce website to include a Privacy Policy page. It’s crucial across the board. Check out some well-done e-commerce websites for reference if you don’t know how to create a privacy policy page.
Additionally, there might be other options, like the settings for the Kadence Block I’ve installed. Some plugin settings might also appear here, depending on the theme and plugins you’ve installed.
Customizing Website
Moving forward, let’s dive into the appearance settings, these can be considered as the frontend settings. This is where you can make how your site looks on the internet. In the Kadence theme, the primary aspect of appearance settings is customization.
**Please note that the content of any single page cannot be edited here. For page contents, you can navigate to the specific page within the dashboard under “Pages“!
Different themes might have slight differences, but as long as you go through each setting step by step, you’ll be fine. Take a look at what each setting does.
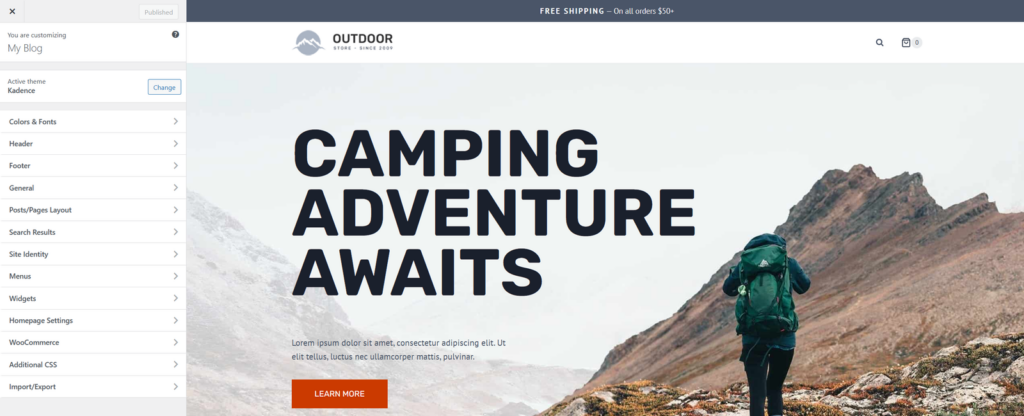
- General – the settings you can find in every theme. It includes defaults for webpage layout, colors, fonts, sidebar display, buttons, and more. You can change these settings while seeing the effects in real time or leave them as is. For the Breadcrumbs and Performance options, my suggestion is to check all.
- Header and Footer – The Kadence theme’s header and footer settings are advanced yet user-friendly, even for beginners. Both the header and footer settings are divided into three rows, where you can drag and drop the widgets they provide. Unlike other themes, the layout of headers and footers in Kadence isn’t fixed. In the latest versions, Kadence’s footer can also utilize Gutenberg blocks, giving you more creative freedom to build the header and footer you want.
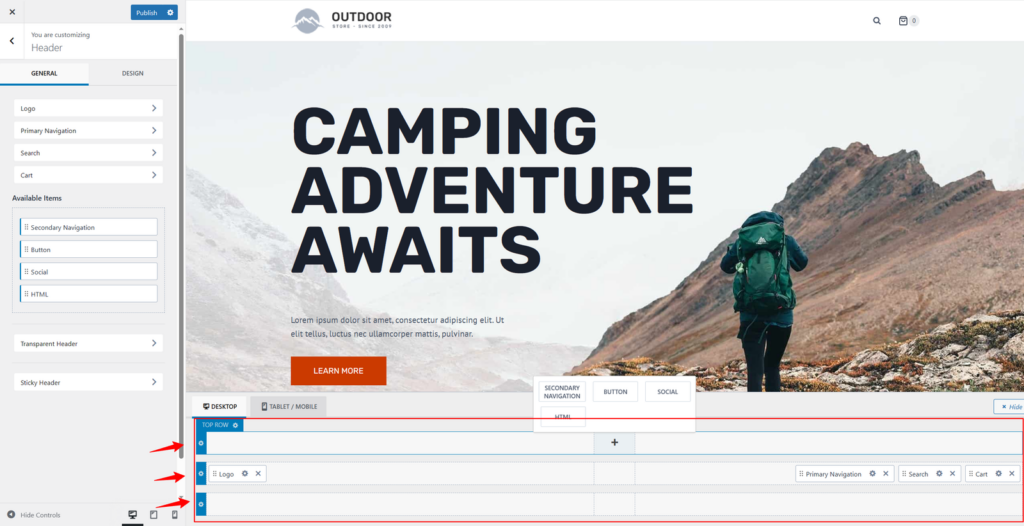
- Page Layout, Blog Posts, and Search Results – These are the layouts for web pages, blog posts, and search results. When adjusting these settings, it’s best to open the corresponding pages to see the instant effects.
- Site Identity, Homepage Settings – Site Identity allows you to add your website’s logo and icon. Homepage Settings are equivalent to the “Reading” under Settings on the WordPress dashboard.
- WooCommerce – The appearance settings for your WooCommerce store. You can adjust layouts for various shop pages, including catalog, single product page, checkout page, and my account page. You can keep these settings as is or modify them according to your preferences.

- Additional CSS – Cascading Style Sheets (CSS) allow you to modify webpage layout and appearance using a static webpage styling language. This requires a basic understanding of coding; skip if unfamiliar.
- Import/Export – This feature lets you back up your entire customization setup by exporting and importing. Once you’ve set everything up, exporting safeguards against having to reset everything manually in case of future issues.
Additionally, there are the Menu and Widget settings. These don’t require settings here; you can find separate settings for them in the “Appearance” section of your WordPress dashboard. Next, let’s talk about these two settings.
Menu and Widget Settings
Menus is the navigation system for the website, guiding visitors to different pages and sections. This is quite pivotal.
Menu setting
In WordPress, with the Kadence theme, menu settings can be found under “Appearance.” To access them, navigate to Appearance -> Menus, here, you can edit your menus. The process is quite straightforward as shown in the below screenshot. Whatever theme you installed, there are a few pre-set menus, You can directly edit, add, or remove items.
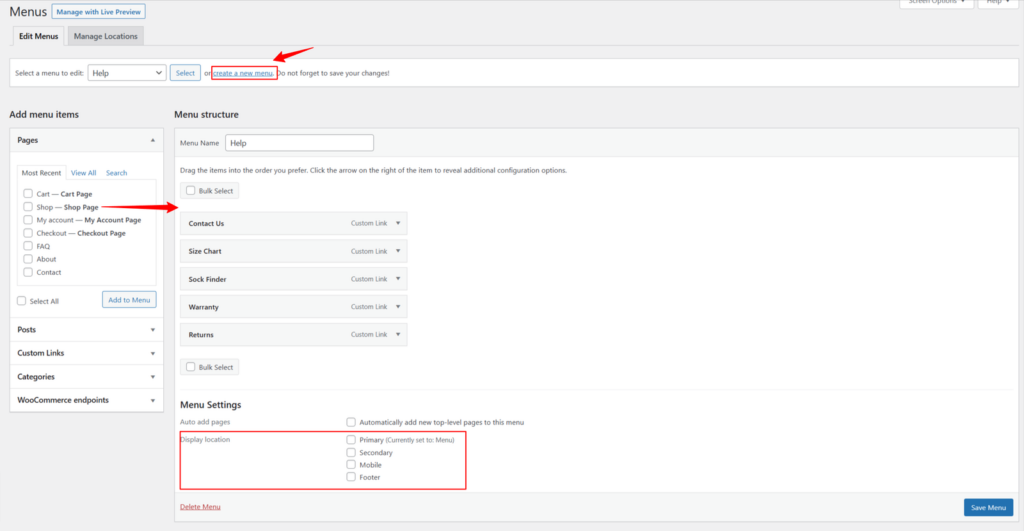
- Edit Menus, Let’s take the default “Primary Menu” as an example. You can click the small downward arrow on the right side of each menu item to edit or delete a link. You can select the desired items from the “Add menu items” section on the left to add new links to the menu. This section includes virtually any individual link from your website. You can even add custom outbound links. Any menu item can be dragged around to change its position and even be dragged to become a sub-menu.
- Create a new menu, click “Create a new menu” in the red box in the above image. Enter a name for future reference and proceed to edit the menu.
- Remove a menu, simply select it from “Select a menu to edit,” scroll to the bottom, and click “Delete Menu.” Then, add your menu.
- Menu location on your website, You can use the section “Display Location” to specify where it should appear. You can also change menu locations by using the “Manage Locations” option at the top.
Once everything is set, hit “Save” to preserve your changes. Then, go to your website to see how it is. For some intricate menus like mega menus, you need to install plugins.
Widget for Sidebar
Widgets are a standout feature in WordPress. Generally, you can use widgets to set up sidebars and footers, and some themes even offer additional spots like the header.
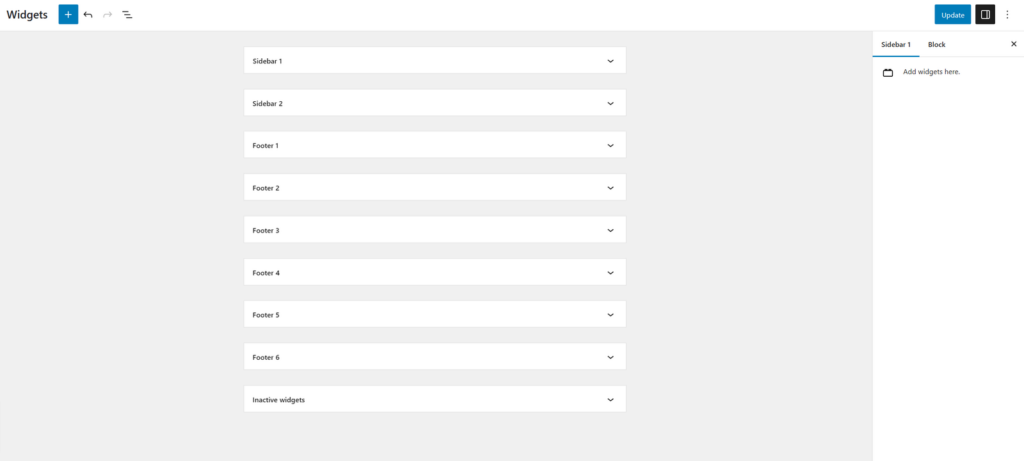
However, starting from WordPress version 5.8, widgets are primarily used for page sidebars. The widget editor and the page editor both now utilize Gutenberg. You simply need to add block elements and then edit the content within these blocks. This transition to using blocks is especially user-friendly for beginners.
WooCommerce Shop Setting
Yup, you may see a Woocommerce setting under Customize above, but that is mainly for the appearance of your woocommerce store, The setting here is all the information about your eCommerce shop.
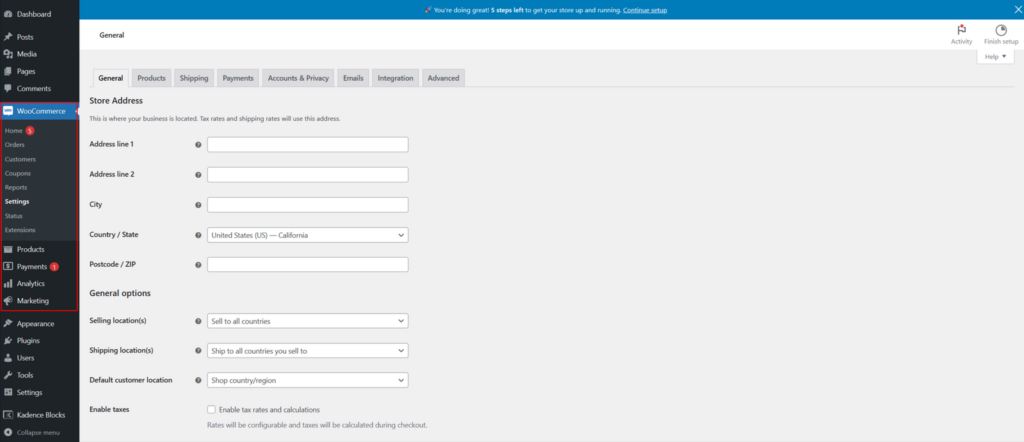
Once you’ve installed the WooCommerce plugin in WordPress, you’ll notice a few additional WooCommerce menu options in the left navigation of your dashboard, Navigate to WooCommerce > Settings, you can start setting now.
Here, the main things you need to do are your online store information, shipping details, payment methods, and other business-related info. WooCommerce itself will guide you through this setup process, Simply follow the steps and fill in the necessary details according to your actual information.
The settings and customization for WordPress + WooCommerce eCommerce website are mostly covered by the points mentioned above. There are other settings in the WordPress dashboard, but unless necessary, it’s best not to modify them. However, if you’re looking to get familiar with WordPress, you can gradually explore each of those settings at your own pace.
Step 7. Add Contents (Pages and Products)
If building a website is compared to constructing a house, then the previous steps could be seen as completing the basic interior decoration of the house. This step is like adding furniture and furnishings. For a website, the furnishings are essentially the addition of pages and content. For an eCommerce website, these furnishings are the products. Therefore, this step involves adding pages and products to your eCommerce website.
Add Pages
Some pages have been automatically imported once you import the Kadence template. If you need any of these pages, you can retain and edit them. If not, you can access the Pages of the dashboard and delete them.
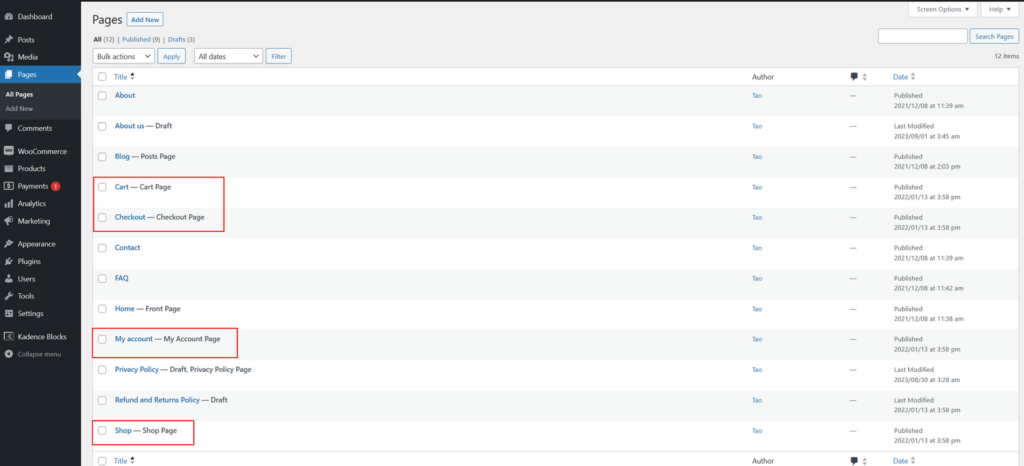
Aside from the default WooCommerce pages, you can edit, modify, or delete any other pages. For an eCommerce site, it’s important to add pages that enrich the site and help customers easily understand your brand and products.
Let me show you how you can add or edit a page simply, for example, an “About Us” page:
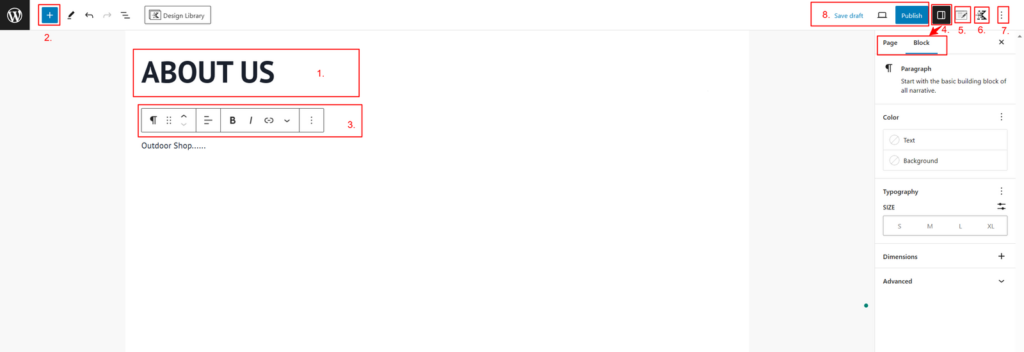
Follow the numbered points in the image to understand the function of each item in the editor:
- Page Title
- Add Block – Use the ➕ button as shown in the image. To find specific blocks, click on the button and open the module panel to add the required blocks to the page. In addition to the default WordPress blocks, Kadence Blocks include many blocks too. You can also search for and install other block plugins.
- Text/Paragraph settings – Change font color, add links, underlines, and more.
- Page & Block settings
- Page Settings – Includes publishing time, feature image, permalink structure, comments, etc.
- Block settings – Adjust settings for the selected block. For example, if you added an image block, this setting is for customizing that image.
- Page layout settings (specific to the Kadence theme) – This depends on the actual theme you’ve installed.
- Kadence Blocks settings
- Gutenberg settings – Settings for the Gutenberg editor.
- Draft, Preview, Publish
Additional settings might appear in the page editor depending on the plugins you’ve installed. For example, SEO plugins might introduce specific settings.
The page content is usually saved automatically as you create it. However, if you encounter some urgent situations, remember to save manually to prevent losing any newly added content. After creating the content, you can preview it before hitting the “Publish” button if everything looks good.
Add Products
No doubt about it, products are at the heart of an eCommerce website. Likewise, the Kadence theme will automatically add some sample products when you import the template, Don’t delete them right away. You can use them as references. Later, when your products go live, you’ll need to remove these sample products, that’s because these products are generally incomplete and not your own and the prices are also randomly filled.
The Woocommerce product editor still uses the classic WordPress editor.
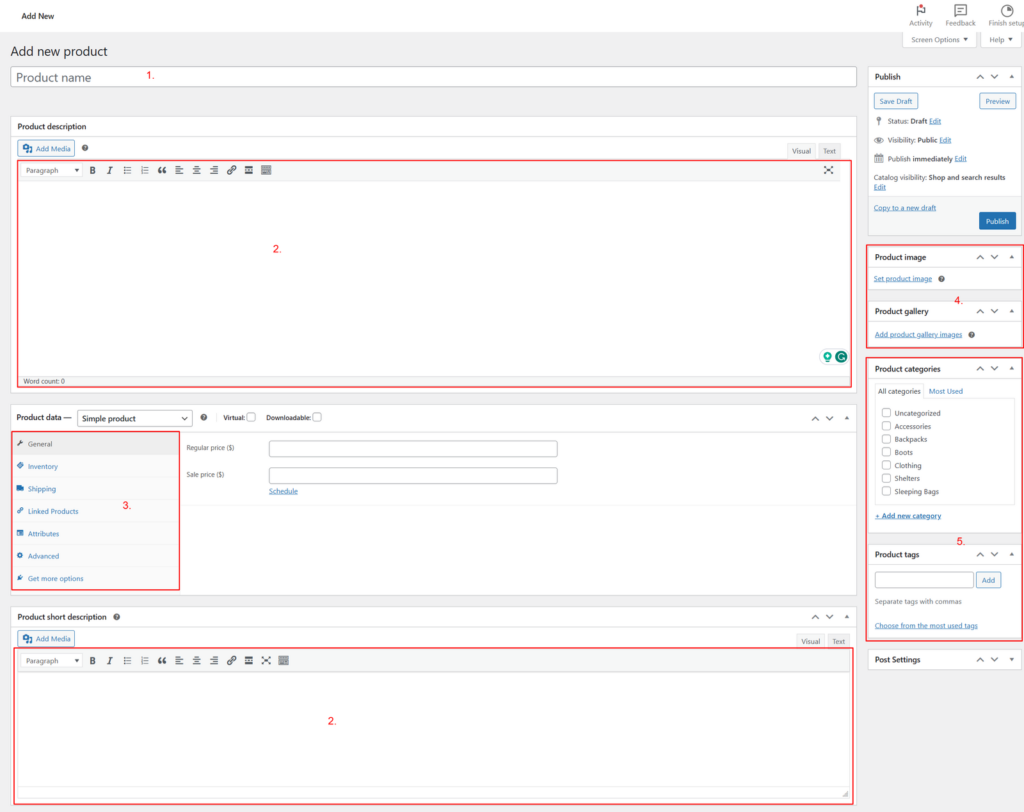
Here’s what each numbered item does shown in the above image:
- Product Title/Product Name
- Product Description/Short Description – Besides, You can also add images, links, and more.
- Product Data – Product type, price, inventory, shipping, related products, attributes (like color, size), and other settings. For variable products (with different options), you can add variations like different colors and sizes.
- Simple Product – A single product with one color, size, or model. You can also add virtual products like subscriptions or downloads.
- Grouped – Combined products, like a clothing set with multiple items.
- External/Affiliate – External or affiliate products. You can link to other sites like Amazon to promote your products or earn commissions by promoting others’ products.
- Variable – Most common type. For products with different options.
- Product Images
- Product Image – Primary product image.
- Product Gallery – Additional images for a gallery or carousel.
- Product Categories – Two types:
- Product Categories – Organize products in directories.
- Product Tags – Add tags to products for better organization.
I tried editing a variable product as shown in the image below, just for reference.
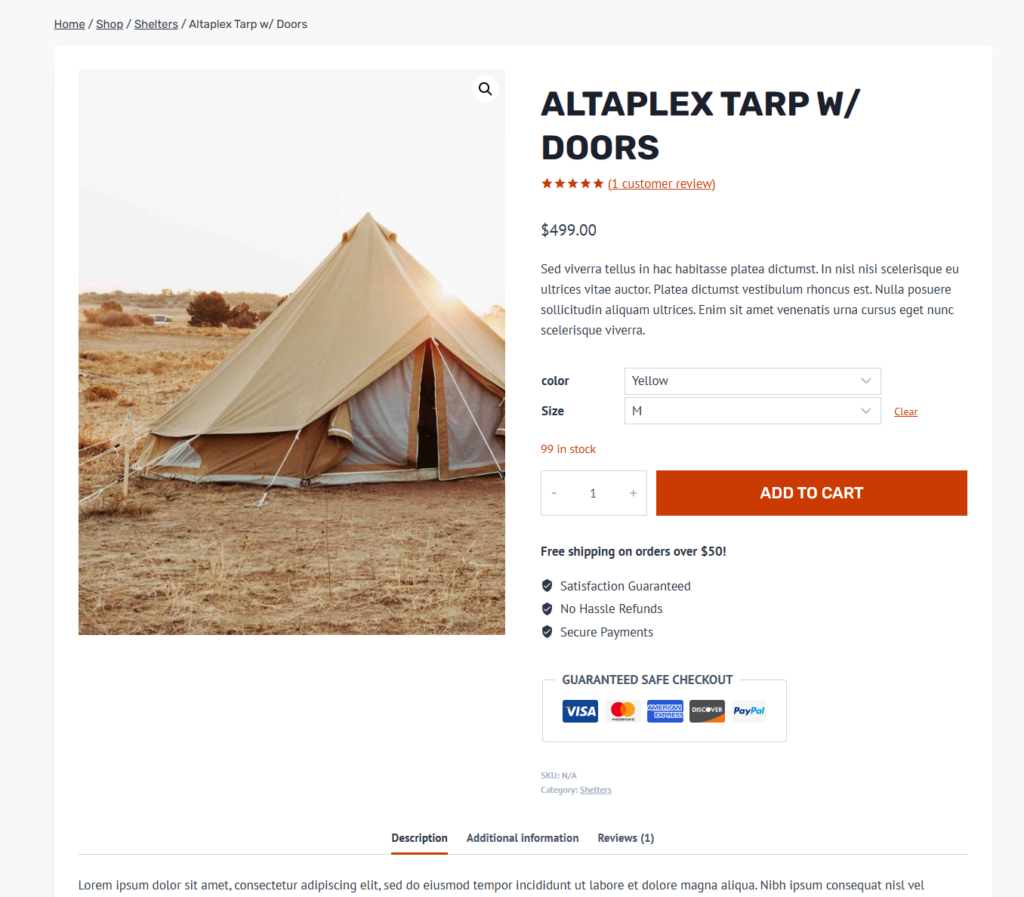
Besides pages and products, you can also write blog posts for the content of the website. In the WordPress dashboard, go to “Posts” to add articles. Writing posts about products or industry-related topics can help attract traffic through search engines. Adding posts is similar to adding pages.
“Posts” is the main part of WordPress since it’s originally a blog CMS platform, so adding some posts is highly recommended for your eCommerce website.
Step 8. Publish Your Website
Once you’ve got all your pages set up and around 5 products added, you can head over to the Settings on the dashboard, Uncheck the box for “Search Engine Visibility” under the Reading section, and then make sure to add your website to search engines, let them crawl your pages, and from there, keep updating your products regularly.
After you’ve launched your site, pay attention to a few things:
- Avoid changing fundamental stuff like site name or description without careful consideration.
- Don’t switch themes on a whim.
- Keep your page and product links reasonably short.
- Optimize your site using an SEO plugin.
- Keep updating your site — add new content about 2-3 times a week, which can simply involve adding products. In the future, you can write some articles in the Posts too.
So, How to build an eCommerce website with WordPress +woocommerce is it, there you have it — the eCommerce website is pretty much up and running. Now, you can start selling online and earning income.
Conclusion
I know this article might seem a bit lengthy, but the goal was to provide as much detail as possible, I really wanted to walk you through it step by step. This way, we cover all aspects, especially for beginners. One of the main challenges for beginners is how to start and the settings aren’t always easy to find. That’s the primary purpose of this article — to make it easier and more detailed for you to set up your site and save you some brainpower.
I’ve heard from friends who found WordPress a bit complex, especially when they first started. It’s true that it can be a bit overwhelming for newcomers. However, if you’ve used other CMS platforms for building websites, you’ll notice that everything I’ve mentioned here has equivalents. In the end, you’ll discover that WordPress is the most user-friendly option.
Lastly, the advantages of using WordPress + WooCommerce for eCommerce: are true autonomy, flexibility, lower initial costs, and user-friendliness.

