Shopify, a prominent name in the e-commerce field, was once as popular as Amazon during its peak. Shopify is arguably the most famous SaaS (Software as a Service) online e-commerce website-building platform globally. SaaS refers to providing software services over the internet, and Shopify is exactly that kind of platform that offers online store-building services.
Founded in 2006, Shopify started as an online snowboard shop in Canada, but it gradually developed into a full-fledged website-building system.
Simply put, Shopify is an e-commerce platform that allows you to build a website and link it to your custom domain, offering various templates for site design. You can sell products directly from this website, but the platform doesn’t provide any internal traffic. Formally speaking, each user has an independent website, but in reality, everyone is sharing Shopify’s platform services.
For those who have no knowledge of coding or IT skills, this is indeed a great easy way to build an online store. As more and more businesses use Shopify to set up their e-commerce websites, various Shopify tutorials have sprung up. Today, I’m joining the fun to give you a detailed explanation of how to build an online store with Shopify for beginners.
Requirements for Building a Shopify Website
What exactly do you need to build an online store with Shopify?
- A top-level domain, preferably one with a .com extension.
- Payment accounts, such as Shopify Payments or PayPal. Having a registered company will make this process easier, and in some regions, PayPal requires a business account. Note that Shopify Payments is only available in select countries and regions.
- A credit card.
- A theme: Although Shopify offers free themes, their functionality is limited. It’s recommended to purchase a paid theme. You can find more affordable options on Themeforest, while Shopify’s official paid themes start at $160.
- Products and suppliers.
With these basics prepared, you can start building your website.
Shopify 3-Day Free Trial + $1 for the First Month
For any new account, Shopify offers a 3-day free trial, and then the first month costs just $1. If the platform isn’t a good fit for you, you can cancel anytime after the first month. For a long time, Shopify offered a 14-day free trial without the $1 first-month discount.
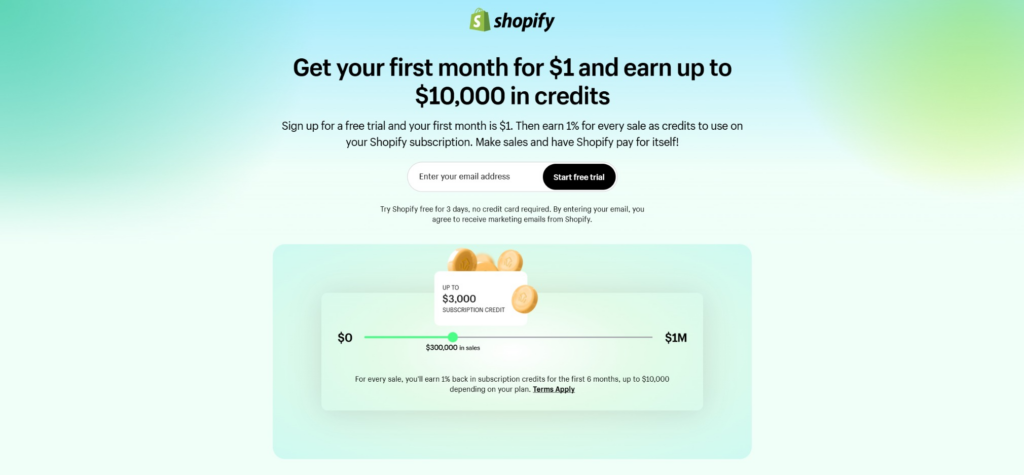

This trial period is very user-friendly because the $1 plan includes full functionality. Unlike other platforms that offer free plans with limited features, Shopify’s one-month and three-day trial provides access to almost all features, giving users enough time to decide whether it’s suitable. If it’s not, you can cancel anytime. Now, let’s look at the steps to building your website on Shopify.
*Please note that the trial period and pricing may change. The price you see could be lower or higher than what’s mentioned here, so don’t be surprised as Shopify may adjust these offers at any time. Additionally, subscription prices may vary slightly depending on your region.
Step 1. Create an Account
Enter into Shopify official website, typically, Shopify will automatically redirect you to the appropriate regional site based on your IP address. However, I will focus on building a site in English. If you’re having difficulty with the language, you can switch to one you’re more comfortable with.
On the homepage, either add your email or click “Start Free Trial” in the top right corner.

Next, there are roughly two steps. These steps may vary slightly as Shopify frequently updates its process, but this won’t affect the overall website-building steps. Essentially, this is just the process of creating an account:
- Shopify will ask about your current online business. You can either provide accurate information or skip this step.
- Then, you’ll be asked to confirm your store’s region. The features you get may vary depending on the region, with North America generally offering more functionalities. For example, it’s easier to integrate with certain social media platforms.

After that, you’ll need to create an account by entering a username and password. Make sure to record your password, and then click the “Create your Store” button. Next, you’ll be prompted to fill in your contact information and store address. This step is mandatory, so please enter the details accurately. Once done, click “Enter my Store.”
The registration process is straightforward, and you can modify many details in the backend later. So, just follow Shopify’s step-by-step guide and complete the process accordingly.
Step 2. Start the Trial
Accessing the Shopify Store dashboard, the interface is very clear, and on the left is dashboard navigation, Since you haven’t subscribed to a plan yet, you might still see messages related to the 3-day trial period.
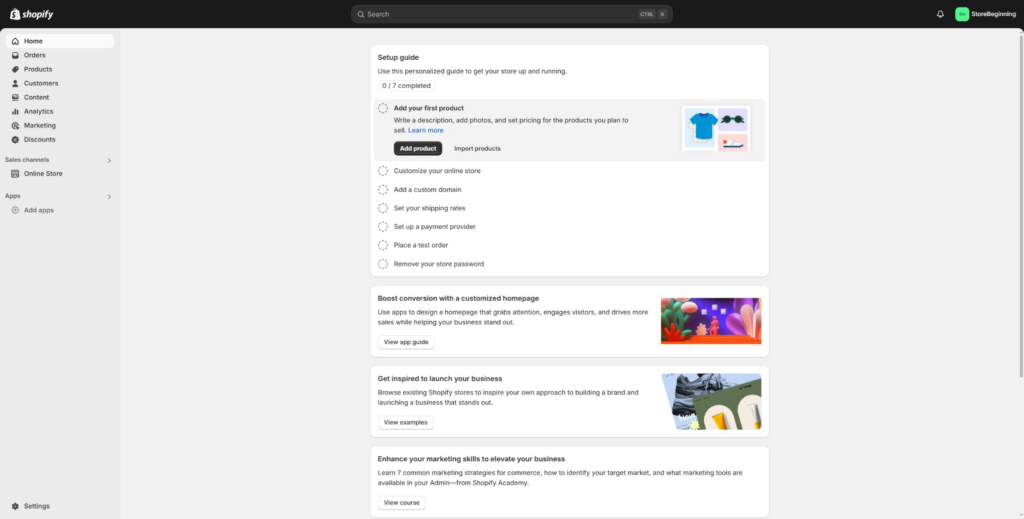
On the backend homepage, you’ll find several guides outlining the steps needed to publish your site. However, the first step is not to configure the website, but rather to set up your account, specifically verifying your email. This step is essential because many tasks later on will require your email. You can access the account settings from the top left or right corners of the screen.
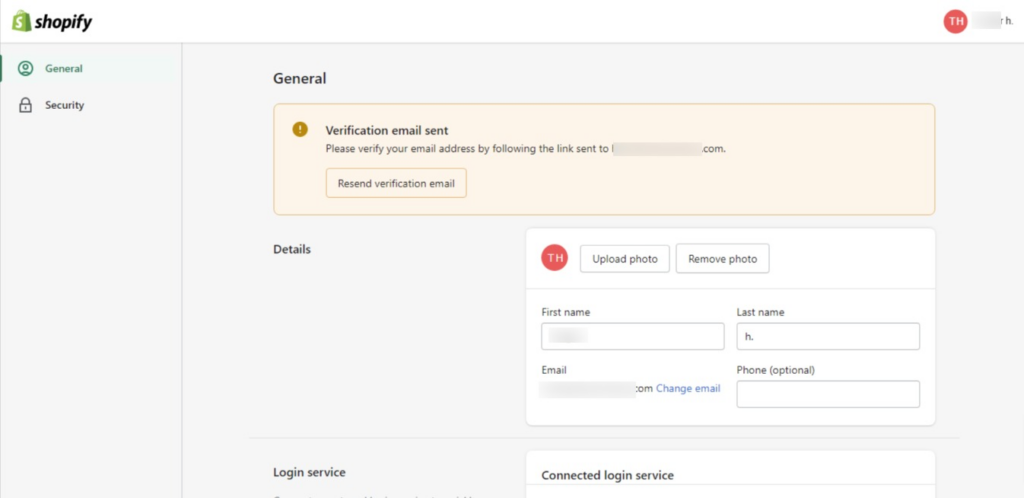
There are two main sections:
- General – General settings, where the main task is to send a verification email to your registered address. Once verified, you can modify other settings.
- Security – Here, you can change your password, enable two-factor authentication, and add a backup email. Configure these based on your needs.
Once your email is verified, you can truly start exploring Shopify. Back on the store’s backend homepage, there are four basic steps to get your website online: adding products, customizing your theme, setting up payment methods, and configuring shipping rates. Let’s start by customizing the theme—head to “Customize Theme” to begin.
Step 3. Install Theme and Customize Online Store
To use your Shopify store, you need to install a theme or a template. You can do this by navigating from the homepage’s beginner guide: Customize Theme, or through the left-side menu by going to Online Store > Themes.
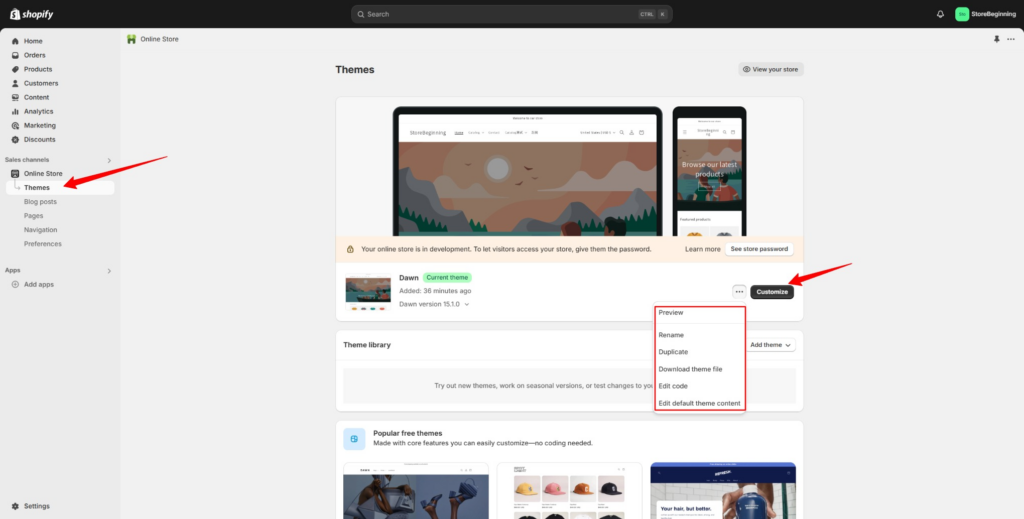
Here is the theme page. Since I haven’t chosen a plan yet, the trial stage is password-protected. This means you can’t publish your site online, but all other features are available.
1. Selecting a Theme: The default theme is called Dawn (previously Debut). You can use the Actions dropdown to rename, duplicate, download theme files, edit the code, modify the language, and preview the theme. The most important feature is the Customize option, which allows you to configure the layout and design of the theme to your liking.
2. Is there only one theme? Of course not. As you scroll down, you’ll find both free and paid themes. Paid themes might be more expensive, but you can start with a free one. While free themes may have limited functionality, they are sufficient for basic sales. If you need a theme with richer features, I recommend purchasing a premium theme from a third-party platform.
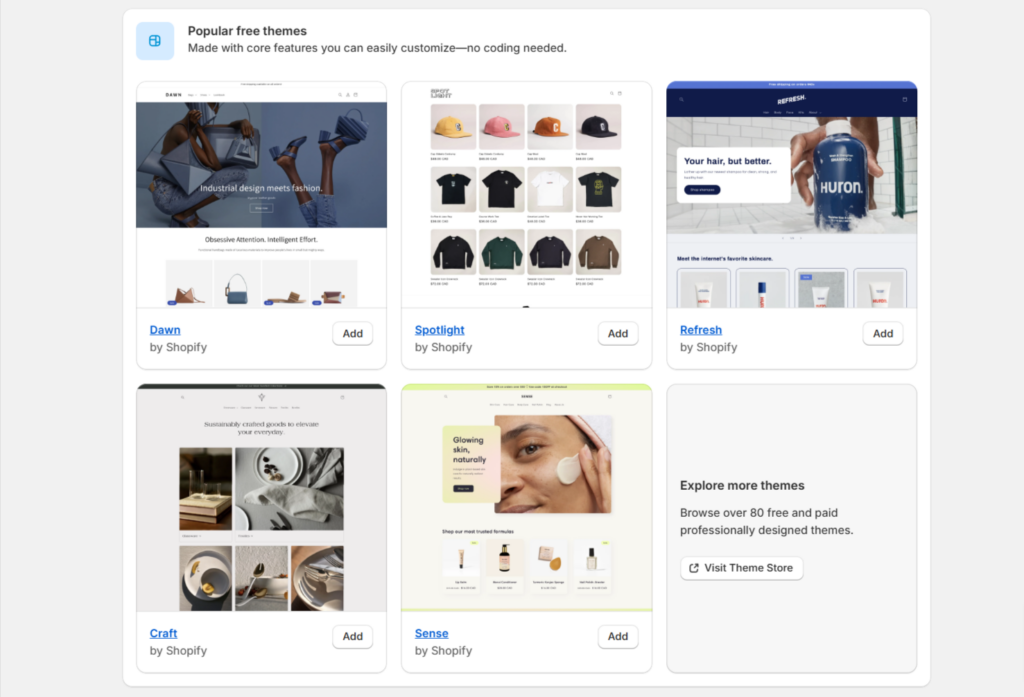
3. Where to Buy Themes: Here are two places to buy third-party themes:
- Themeforest: The world’s largest theme marketplace, offering templates and plugins for almost all website platforms and every type of website.
- Template Monster: Another well-known theme marketplace, also offering templates and plugins for all types of websites. It’s said that themes here are manually reviewed before being sold.
With so many themes to choose from, you might not know which one is best. In one of my previous stores, I used a theme called Ella, which is very popular and one of the best-selling themes on Themeforest.

This theme comes with over a dozen homepage styles and multiple sub-themes for different product categories, so you can find a template for almost any industry. Of course, feel free to explore other themes too, as there are plenty of excellent options out there!
4. After purchasing a theme, you’ll need to download it. Choose “All files & Documentation” to download. Some themes may require an activation code, which you can also find in this section under “purchase code.” However, Ella doesn’t need this, so you just need to download the theme files and documentation. The theme itself isn’t large, but since it includes multiple sub-themes and user documentation, the overall file size is bigger.

After downloading, you’ll need to extract the files. Inside the extracted folder, you’ll find several folders. Typically, Ella’s primary theme will be labeled something like “Ella Shopify + version number(like 6.6.2),” and there will also be a “child themes” folder containing sub-themes. These may change over time, but you should be able to locate the main theme files easily.
5. Uploading the Theme
In the theme library (as shown in the previous image), there’s a button labeled “Add theme.” Locate the main Ella theme zip file or select one of the sub-themes to upload. The file size is only a few MBs, but you must download the entire folder to extract the theme.

The upload process may take some time, so please be patient. Once uploaded, you’ll see something like the image shown above.
6. Publish the Theme and Click Customize, First, you need to click Publish to activate the theme. After that, you can begin customizing and editing the theme’s content:
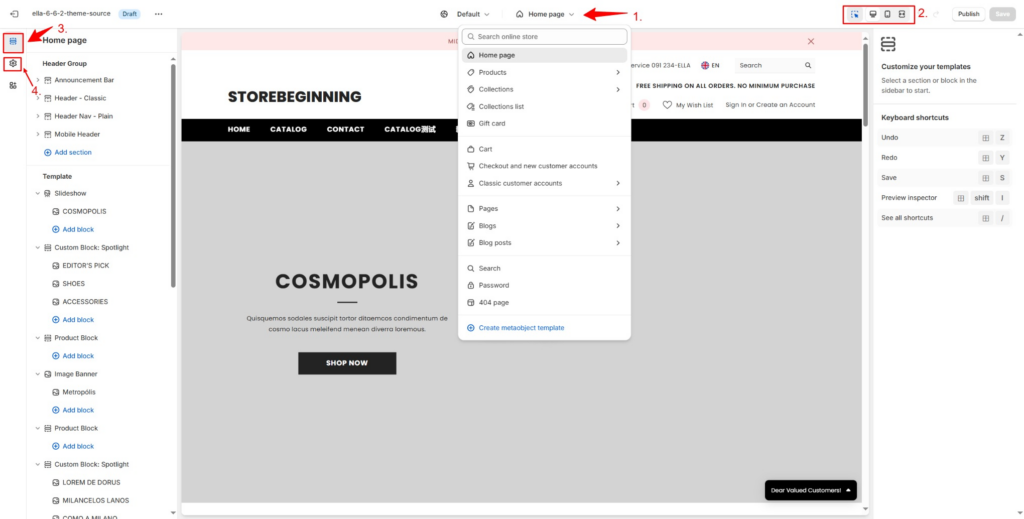
In this interface, you can adjust the layout and module positions, essentially controlling everything from the header to the footer:
- Besides the Homepage layout, you can set the layout for any other page.
- You can also change the device preview size, and then edit the theme for different screen sizes. Ella is a responsive theme, meaning it supports devices of various sizes, including PC, tablets, and phones.
- Configure the header, individual sections of the pages (the homepage includes many functional modules, around 10+ sections), and the footer.
- Theme Settings – This includes options for colors, fonts, currency, language, and more.
Customize the settings based on your needs. Each theme’s settings page might look slightly different. Once everything is set, save your changes and preview your site in Theme Action.
7. After setting up the theme, you may need to adjust it further once you start adding products. You can also create additional pages by going to Online Store > Pages from the left menu. Some pages can be customized further in the Customize section, where you can adjust their layout and appearance. Explore the other submenus under Online Store:

- Blog Posts – You can add blog posts.
- Pages – Add new Pages for your website.
- Navigation – Manage your store’s menu settings. This option can also be found in the header settings of the theme customization.
- Preferences – Set up the basics for your store, such as store name, secondary name, a brief description, Google Analytics, password protection, and more.
Step 4. Add Products
Now you can add a product and see how it looks with your theme, From the Homepage’s beginner guide, go to Add Products to add a new product, or, as shown below, go to Products > Add Product from the left-side menu. If you’ve migrated from another Shopify store, you can click Import to transfer products from your previous store.
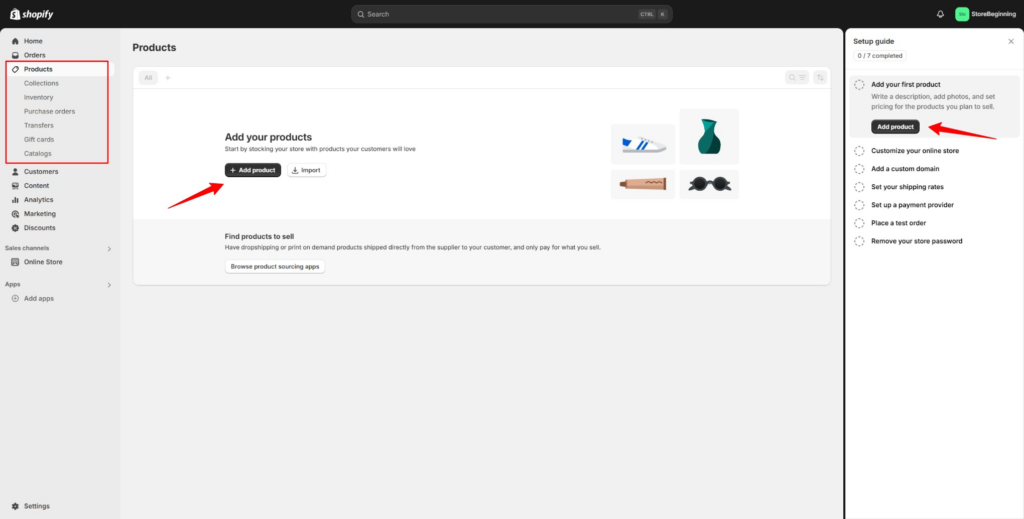
On the left-side Products menu, there are additional submenus for collections, catalogs, inventory, orders, and gift cards, among others.
Click on any Add Product button to enter the product creation page. There are several fields to fill in for a new product, as shown in the image below.
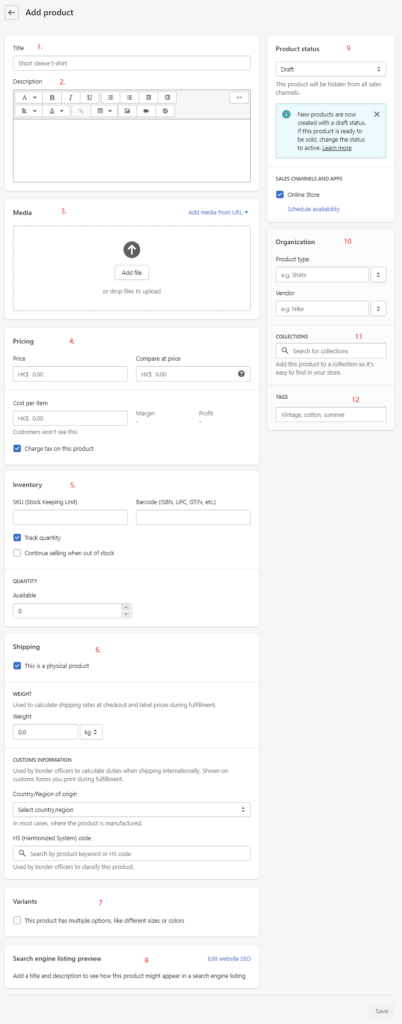
Follow the numbers marked in the image:
- Product Title
- Product Description
- Product Images
- Price – Includes both the sale price and “compare at price” (the original price, which can be set higher, making the sale price appear like a discount).
- Inventory – Set SKU, barcode, and stock quantity for each SKU.
- Shipping – Add product weight, origin, and customs code.
- Variants – If the product has different sizes or colors, add variants. Shopify’s variant creation is one of the most user-friendly among all e-commerce platforms (except AliExpress). Once variants are added, the price section will allow you to set individual prices for each variant, and you can also bulk upload variant-specific images.
- SEO Optimization – Preview how your product will appear in search engine results.
- Product Status – Choose between draft or active status. You can also add sales channels like Amazon, Facebook, etc. To add sales channels, go to the Sales Channels section on the left-side menu. Available channels vary by region.
- Product Organization – Specify product type, and whether it belongs to a particular brand.
- Product Categories – Manage categories under Product > Collections, and assign products to the relevant categories when adding them.
- Product Tags – Similar to categories, but tags can be added at any time.
After entering all the necessary details, click Save in the bottom right to save the product. To preview it, click Preview in the top right. If you have similar products, use the Duplicate button to easily copy the product and modify its details.
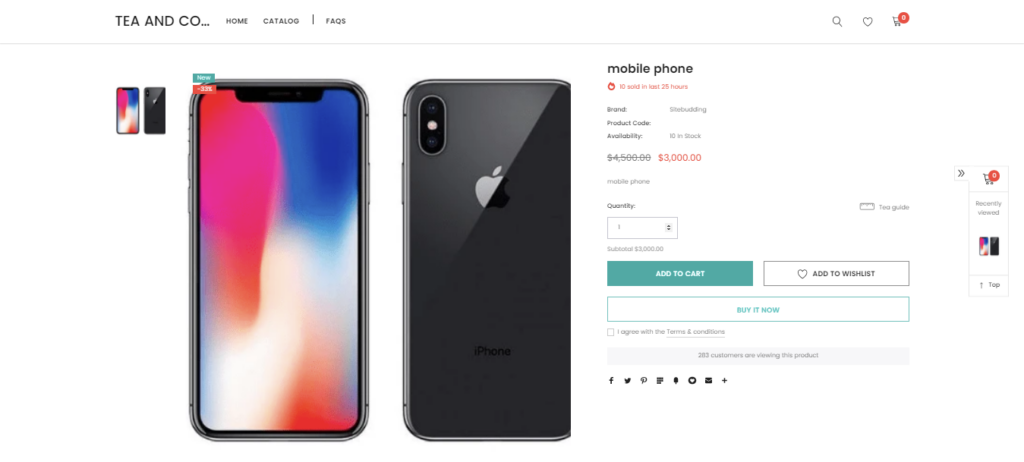
Above is an example of a detailed product page. You can add around 10 products and then check the website preview to see how it looks now.
Step 5. Setting of Shopify Online Store
Here are two very important settings: payment and shipping. These are crucial for anyone doing e-commerce. Shopify offers comprehensive features for both, and the settings are very beginner-friendly.
Payment Setting
Before setting up payment methods, you need to know that the available options vary by country and region. You can access the payment settings directly from the homepage by going to “Setup Guide > Set up Payments,” or through “Settings” in the lower left corner, then selecting “Payments.” This will show you the main payment methods supported in your country or region.
For example, in the United States, as shown in the below screenshot, the primary options are Shopify Payments and PayPal. I believe most major countries support PayPal, while only a few support Shopify Payments.
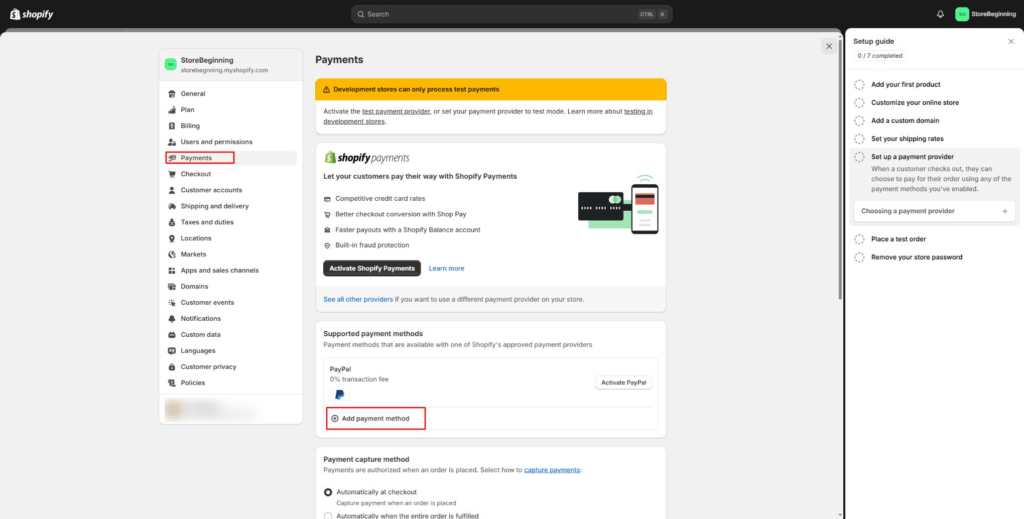
The payments section has multiple settings, but it’s actually quite simple. You just need to configure them based on your current conditions. Let’s go over what each option means:
- Shopify Payments: This is Shopify’s official credit card payment method, which is fast, convenient, and has low fees. If your country or region supports this, it should be your primary payment method.
- PayPal: PayPal is the largest third-party payment platform globally. It’s a wallet-style online payment method that also supports credit card payments. Almost everyone in e-commerce is familiar with it. The advantage of PayPal is its global reach, it’s available in almost every country. However, the downside is that it has higher fees than Shopify Payments, and there’s also a transaction fee on each order.
- Add Payment Method: Clicking here allows you to add more payment methods, such as Amazon Payments, 2Checkout, and other country-specific options like Alipay and WeChat Pay in China. Simply search for the payment method name when you open this section.
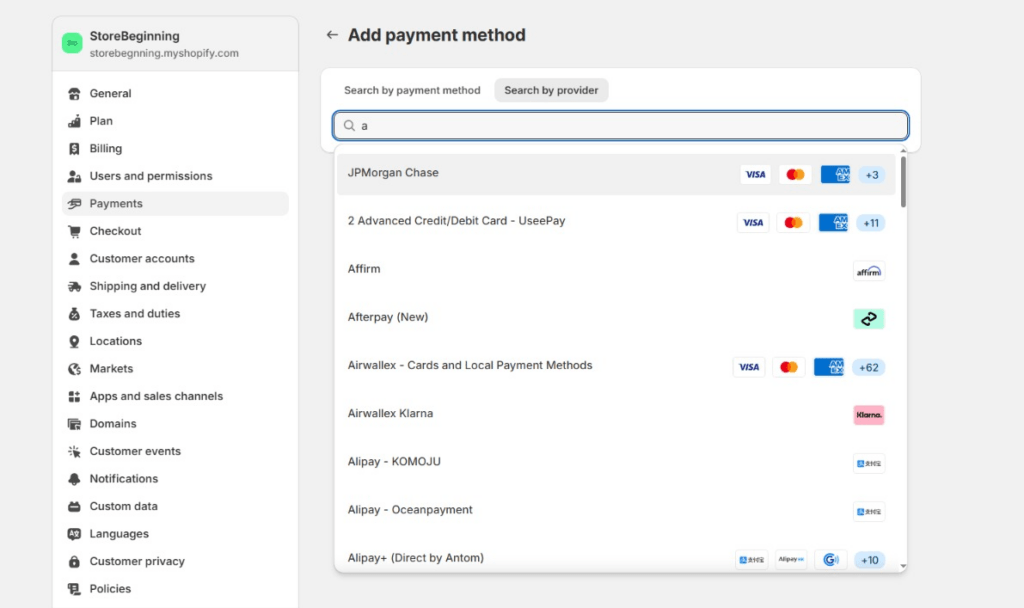
- Payment capture method: It’s recommended to choose “Automatically at checkout.”
- Manual payment methods include:
- Create custom payment method
- Bank Deposit
- Money Order
- Cash on Delivery (COD)
Other settings can be configured based on whether you need them.
Once you’ve set it all up, you’ll be ready to start receiving payments. Some payment methods allow sandbox testing to ensure everything works correctly.
Payment settings may sometimes change, so what you see might differ slightly from the screenshots here. However, it’s still easy, just configure it according to your specific needs.
Shipping Setting
Shipping settings involve several aspects. One is locations, which refers to the warehouse locations, and markets, where you can use Shopify for cross-border transactions. Then, of course, there’s the shipping methods, fees, and delivery times.
Before setting up shipping, first setup your warehouse location and markets.
Locations
Go to Settings > Locations to set up your warehouse location, then click Add Location. Please note that the warehouse address can be different from your store’s account address, and you can have multiple warehouse locations.
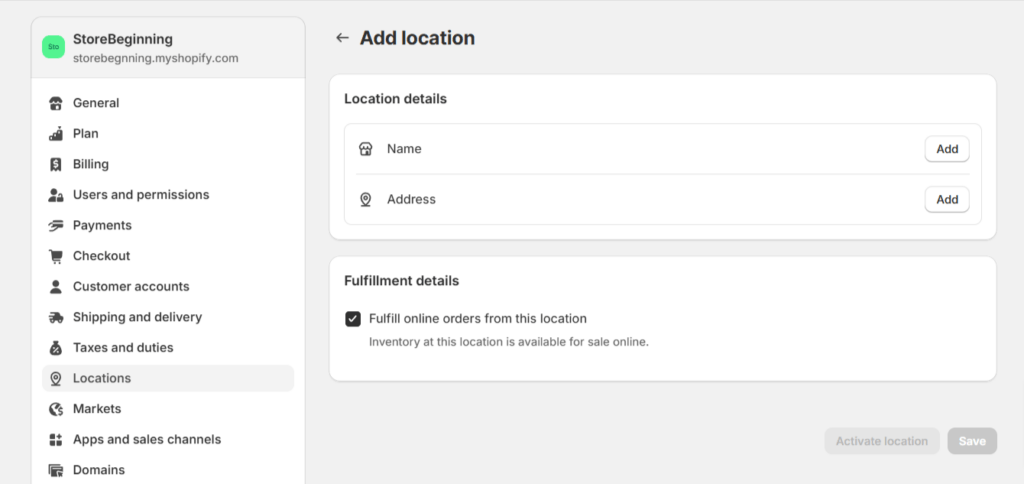
Once the address added, Click Save, and you can set one of the locations to be Default location.
Markets
Still from Settings, go to Markets to set up your target markets. Click Add Market in the top right corner. You can group countries or regions into one market, for example, setting Southeast Asian countries and regions as one market, since the culture, customs, shipping costs, and delivery times are quite similar across Southeast Asia.
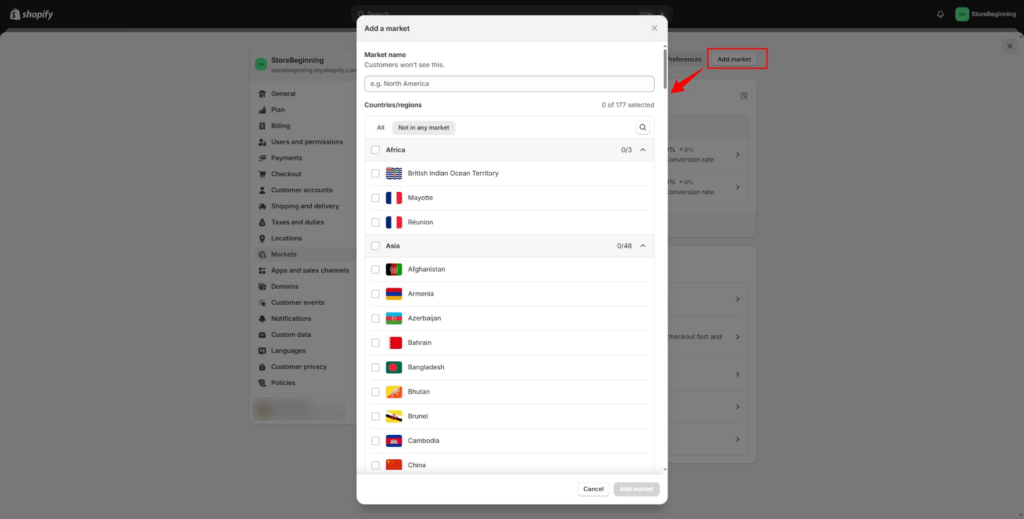
This can be customized based on your specific situation. Of course, if you’re only doing business in your own country, there’s no need to set up multiple markets. You can just configure domestic shipping rates and delivery times in the Shipping and Delivery section later.
Shipping and Delivery
From Settings > Shipping and Delivery, this is where you start configuring shipping rates and delivery times. You can create multiple shipping setups, referred to here as “profiles.” There’s a default profile called General Shipping Rates, which you can directly modify, or you can create a new profile for your shipping settings.
Let’s take General Shipping Rates as an example. Click on it, and you’ll see the options as shown in the image below:
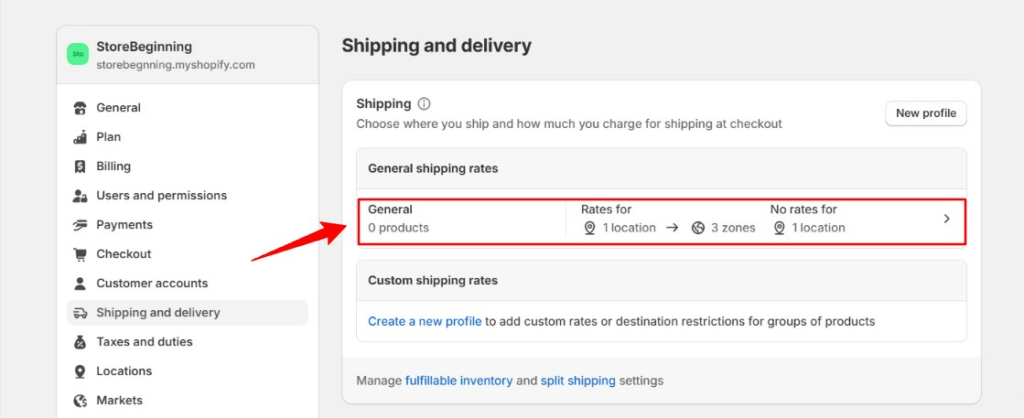
First, in this shipping profile, add the products. If your products can be shipped to any country, add them all. If some specific products are only available for certain countries, create a new profile and set up shipping rates for those products separately.
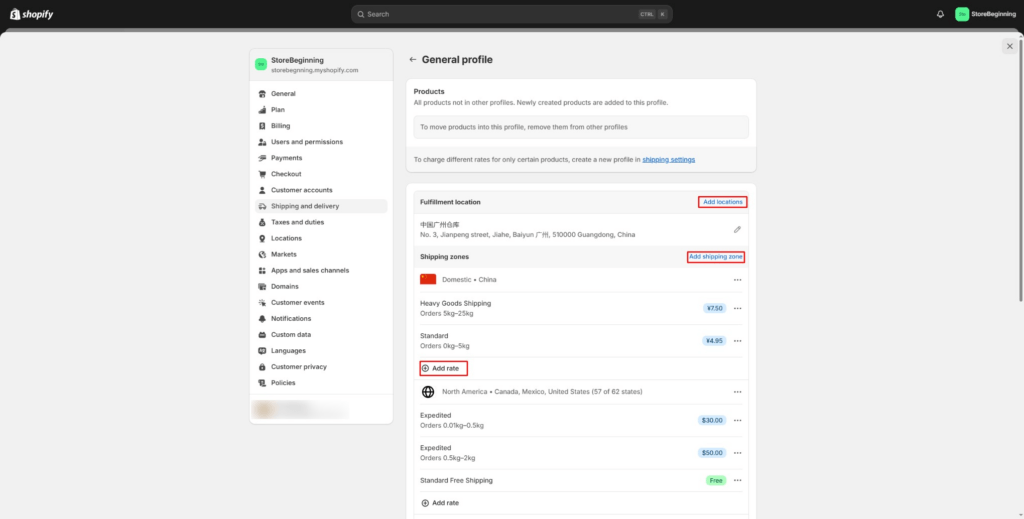
Next is the Fulfillment Location, which is based on the location of your warehouse. For example, here has a warehouse in Guangzhou, China, you can set the shipping rates, methods, and delivery times based on the market you just configured.
- The Add Shipping Zone option is for setting up the market,
- Add Rate is where you set up different shipping methods and rates,
- As for Add Location, this is where you add your warehouse.
The setup is generally straightforward. To determine your shipping costs, you will need to consult with local carriers for accurate rates and delivery times, then fill in the details accordingly. For multiple warehouses, repeat these steps.
Other Settings
There are many more settings in a Shopify store, but these don’t significantly impact getting your store online. You can explore each one and configure them based on your actual needs. Since they are fairly straightforward, I won’t go through them one by one. Please refer to the image below for details.
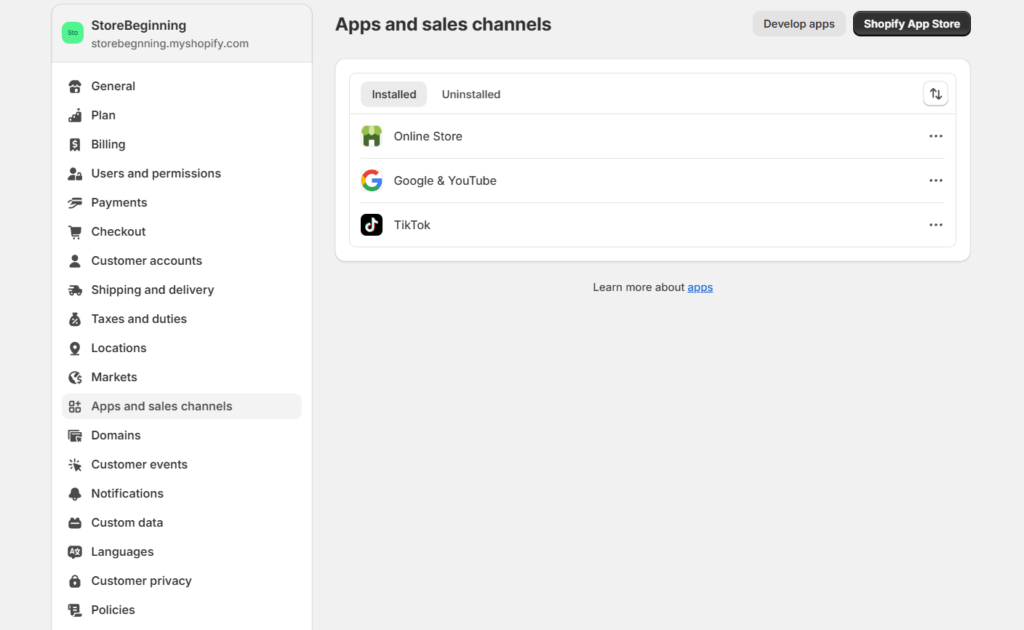
The Plan and domain sections needs to be explained separately. To connect your custom domain, you first need to subscribe to a plan. Only then can you properly configure it, allowing your website to be visible on the internet.
Step 6. Subscribe to a Plan
Once you’ve completed the basic store settings, you can choose a plan to subscribe to. Go to Settings > Plan and then navigate to the plan list page.
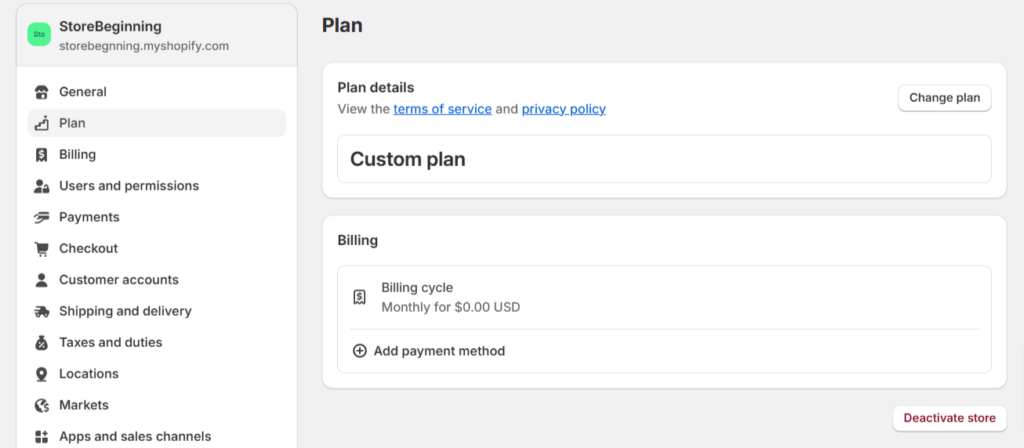
Select the plan that best suits your business size. For most small and medium businesses, the Basic plan, which costs $29 per month (when billed annually), should suffice. You can always upgrade later if needed.
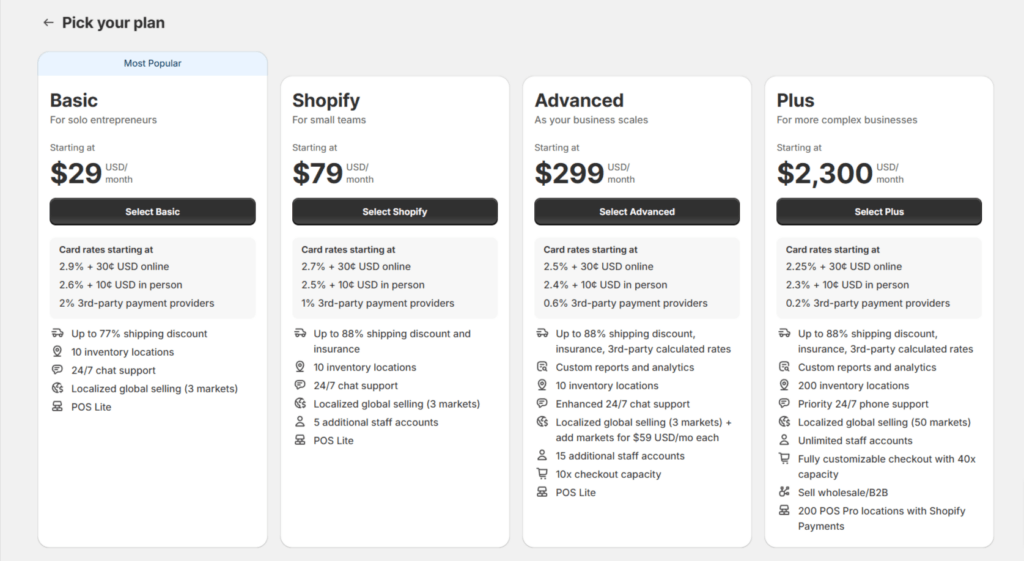
The first month’s cost is just $1.
Then proceed to the payment page, where you can pay via credit card or PayPal. Keep in mind that if you choose monthly billing, it will be $39 per month. If you opt for yearly billing, it’s $29 per month. After the first month, you can decide whether to continue monthly or switch to an annual plan.
Step 7. Connect your Domain Name to Shopify Store
Similarly, Go to Settings > Domains to connect your domain to your Shopify store.
If you don’t have a domain, you can purchase one directly through Shopify by clicking “Buy new domain.” Buying a domain on Shopify makes it very easy to connect, as it will automatically be linked to your Shopify store. However, the price of purchasing a domain on Shopify might be slightly higher, but it saves you the hassle of manually connecting the domain—making the process much simpler.

If you already have a domain or plan to purchase one from another domain providers, click on “Connect existing domain.” In this case, you’ll need to manually link your domain to your Shopify store. Here’s a key focus on how to manually connect your domain:
1. Click on Connect existing domain, then enter your domain name, for example, “sufabrics.com”, and click Next (though transferring your domain to Shopify is an option, I don’t recommend it).

2. you’ll need to verify your domain to complete the connection. Click Verify Connection.

Shopify will provide you with some DNS records, such as the IP address for the A Record and the domain for the CNAME Record.
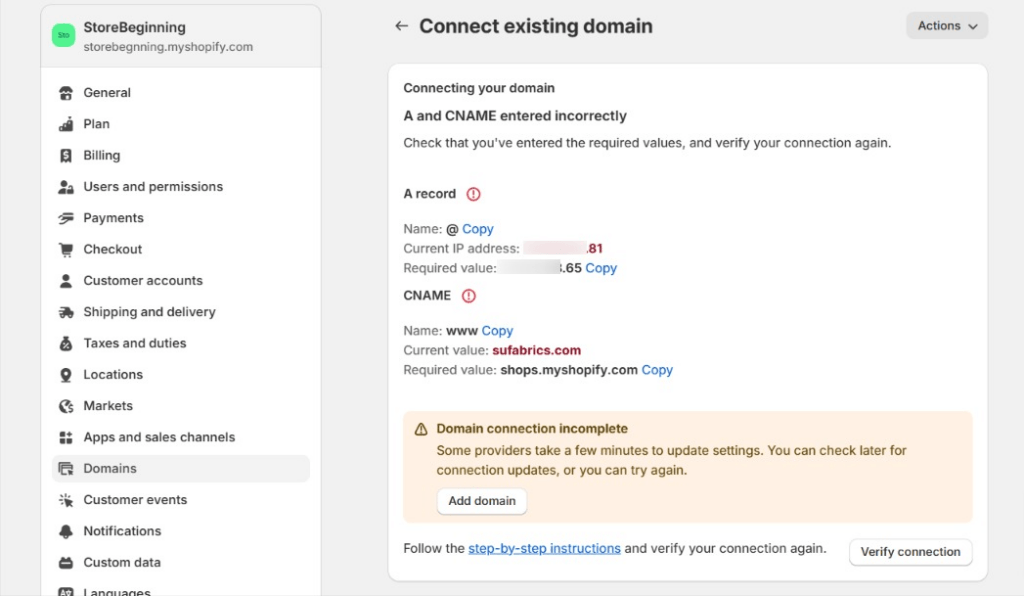
3. log into your domain provider’s website, go to the DNS settings for your domain, and add these records to complete the connection.
If you need detailed instructions on connecting a third-party domain, please refer to this guide,since it involves a bit of technical work, I generally don’t recommend beginners use third-party domain providers.
You can also refer to Shopify’s official instructions for connecting a third-party domain. To check if your domain connection is successful, simply enter your domain into your browser to see if it brings up your Shopify store, the connection was successful.
Step 8. Publish the website online
Once you’ve subscribed to a plan and have some content on your website, you can publish it online. However, you need to complete the following steps first:
- Disable the website password and publish the site through the theme settings by clicking “Publish.”
- Submit your website to search engines so they can index your pages, making them searchable by users.
After launching your website, pay attention to the following:
- Avoid changing fundamental elements like site name and description unnecessarily.
- Refrain from switching themes without careful consideration.
- improve SEO, you can optimize your website with the help of SEO plugins. However, Shopify’s built-in SEO features are already quite good.
- To avoid duplicate content from the internet.
- Regularly update your website by adding new content such as products and blog articles at least two to three times a week. This helps search engines view your site as active, which is beneficial for crawling and ranking purposes.
Costs to build an online store with Shopify
The approximate costs of building an online store with Shopify are as follows:
- Domain fees: $8.99 to $15 per year, depending on where you purchase it from.
- Plan fees: $29 per month, though slight regional differences may exist.
- Transaction/processing fees: Vary depending on the payment method you use.
- Transaction commission (waived if using Shopify Payments): 2% of the order amount or less, depending on the plan.
- Other fees: The cost will depend on the theme or plugin provider if you purchase a theme or plugin. For example, buying a theme from Themeforest costs around $60 for a full-featured theme with multiple templates.
Overall, for beginners, the yearly cost is roughly $400. This investment is manageable for most sellers and should be affordable. The platform is also very user-friendly for beginners. To run a business, you need to invest, and you can start with a one-year plan to see how it works out.
Shopify’s Cons and Pros
Pros
Cons
Sale: ✨ 3-Day Free Trial for shopify and $1 for the first Month
Conclusion
Shopify frequently adjusts its trial and discount policies, but the overall setup and operations remain largely consistent with what’s outlined here, with minimal core changes.
Times are changing, and so is every industry. Running a Shopify store isn’t as easy as it used to be—not just because more people know about it and more users are on the platform, but also due to global tensions and other factors. However, it still remains a good sales channel. Especially for small businesses, teams, or individuals without their own websites, Shopify is one of the easiest ways to build a site.
With its increasingly comprehensive features, it’s worth trying for small to medium-sized sellers looking to have their own website. At less than $30 a month, and with the option to cancel anytime, having a website gives your business and brand a great external presence.


