A WordPress Child Theme is a theme that inherits the functionality and styles of another theme, known as the parent theme. The child theme separates the customizations from the core functionality of the parent theme while retaining all the features of the parent theme.
Installing a child theme in WordPress has many benefits for both new and experienced WordPress users. This article will introduce the advantages of using a child theme and provide a guide on how to create a child theme on your WordPress website.

Why Child Theme
First, let’s take a look at the file structure of a child theme. For example, let’s consider a theme called Twenty-twenty-Four.
Parent Theme:
twentytwenty-four/
├── index.php
├── header.php
├── footer.php
├── style.css
├── functions.php
└── ...(other tempaltes files)
Child Themes:
twentytwenty-four-child/
├── style.css
├── functions.php
└── single.php(cover parent theme's single.php)
As mentioned earlier, a child theme primarily inherits the functionality and styles of the parent theme without affecting the core functions and code of the parent theme. It acts as an additional layer on top of the parent theme, ensuring that custom settings in the child theme remain unaffected when the parent theme is updated.
So, the main advantages of using a child theme are:
- Customization Security: As mentioned earlier, a child theme sits on top of the parent theme, ensuring that your custom styles and functions are not lost when the parent theme is updated.
- Update Security: With a child theme, you can freely update the parent theme without worrying about overwriting your custom code. Parent theme updates often include security patches and new features, which are crucial for keeping your site secure and up-to-date.
- Advantages for Developers:
- A child theme helps keep your code and file structure clear and organized, making it easier to maintain and manage.
- You can experiment and gradually learn how to modify and extend WordPress functionality without affecting the parent theme.
- Using a child theme is one of the best practices recommended by the WordPress community. It’s not only a common practice among developers but also an effective way to improve workflow and reduce potential issues.
For many beginners and regular users, it’s simple: when you install a theme, you often need to make some settings. If you have a child theme, you won’t have to worry about losing these settings when the theme is updated. This means you won’t need to redo your settings.
Typically, WordPress themes have various settings, including custom layout designs, styles, and possibly adding external verifications like Google Analytics codes or search engine verification codes.
As for the advantages for developers, regular users don’t need to worry too much about that.
In short, using a child theme ensures that your theme settings are preserved, enhances update security, and doesn’t add extra management work. This is beneficial for both novice and experienced users alike.
1. Install Child Theme Generate Plugin
If you are very familiar with the structure of WordPress themes, you can manually create a child theme. However, since this article is aimed at beginners and regular users, I recommend using a plugin to create a child theme as it is simpler and more convenient.
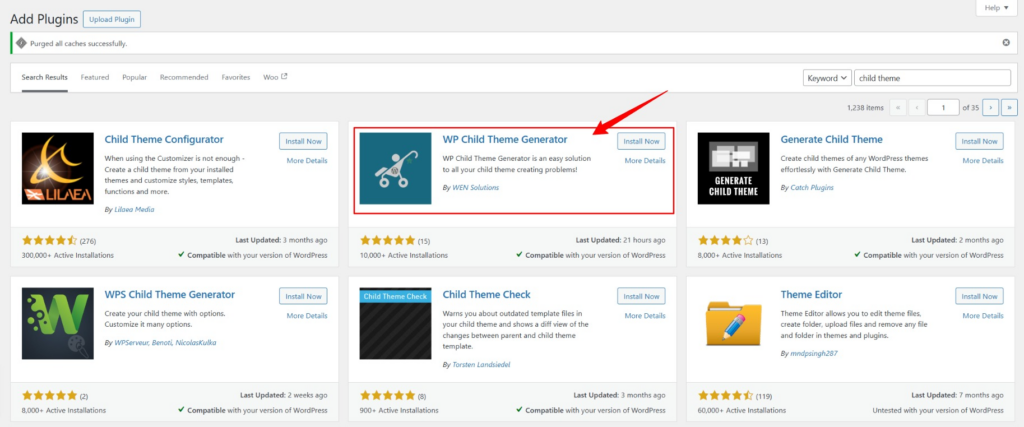
Head over to the admin dashboard, go to Plugins -> Add New, and search for “child theme”. You should find several related plugins available, such as the WP Child Theme Generator.

Click on “Install Now“, wait for the installation to complete, and then click “Activate”. Now you can use this plugin.
2. Create a Child Theme
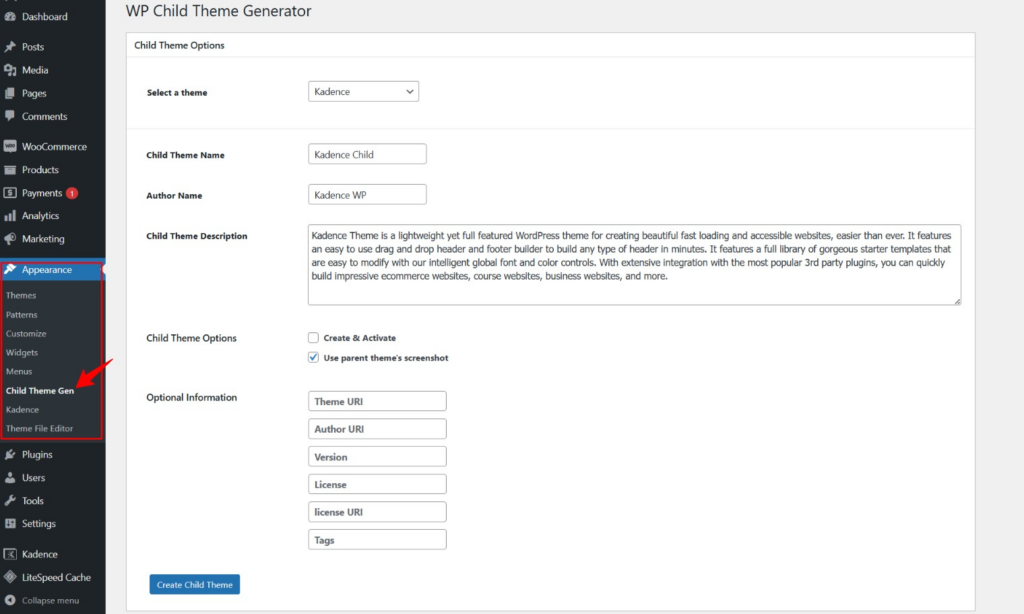
Once the plugin is activated, you can find a menu item labeled “Child Theme Gen” under Appearance. Click on it to create a child theme.
First, you need to select a theme, typically the one you are currently using. For example, if I’m using the Kadence theme, I would select that theme.

Next, the plugin will prompt you to set some parameters for the child theme. You have the freedom to customize these settings as you like, or you can choose to leave them as default and proceed to generate the child theme.
For example, you can use a custom screenshot for the child theme:

However, checking “Create & Activate” is not recommended to prevent losing your settings. Once you’ve set everything up, simply click on “Create Child Theme“. The process of creating the child theme is very quick—it happens in the blink of an eye.
Now you can navigate to Appearance > Themes to view the newly created child theme.
3. Activating and Using the Child Theme
Before activating the child theme, please note: First, export your customized settings of the currently used theme. Go to Appearance -> Customize. Scroll down to the bottom of the left-hand navigation and you’ll find an Import/Export section. Click on it and then hit the Export button to save this exported file.
After activating the child theme, you can import this file to retain your previous settings intact. It’s crucial to remember this step; otherwise, you may need to reconfigure some settings.
If your theme doesn’t have a Customize option, you can skip this step.
Some plugins create child themes without affecting your original settings, while others might. Performing this step ensures you’re covered just in case. This is why I advised against activating the child theme immediately after creation.

Once everything is set up, hover over “Kadence Child” and click “Activate“. The theme will then be activated. From now on, when you update the Kadence theme, you won’t have to worry about losing settings that affect your website’s operation.
Conclusion
I’ve already mentioned a lot above, but for regular users, creating a child theme is about safeguarding against data and settings loss during theme updates. For Beginners building a website with WordPress, creating a child theme is highly recommended.


