Many people use WordPress to build a website, when your domain name and the hosting are not purchased from the same provider, you must connect domain to hosting so that your website can run properly online. it will be the same if you build your website on some online website building platform like WordPress.com, Shopify or Ecwid but the domain is from other registrars.
Most of the time, you can consult the customer support of the domain name registrar and the hosting company if you are struggling to connect a domain to hosting, they will help you resolve that. But if you can master one more skill, that’s really awesome, I think, you don’t need to wait for others to help you to figure out things, and the ways to connect a domain to hosting are not as difficult as you imagine. Why not follow us and learn today?

Before you Connect Domain to Hosting
To connect a domain to a hosting plan, of course, it requires:
- Domain Name – if you don’t know where is the best place to register a domain, check here.
- Web Hosting – Read Top 10 Best Web Hostings, you may find a good hosting provider.
Connecting your domain name to the hosting involves working with configuring or settings called DNS records(Domain Name System). There are usually two ways to connect domain to hosting or an online website building platform.
Method 1: Add ‘A’ Record to DNS Configuration
I will take NameSilo as an example, since I registered my domain names on Namesilo, it is cheap and has no additional fees, the renewal price same as the first purchase for .com TLD, and I have more than 1 domain, it is convenient to use only one domain registrar manage my domains.
Step 1. Register A Domain name – Connect Domain to Hosting
If you have registered a domain name, skip this step.
Go to Namesilo, Enter the domain name you want to register in the search box on their homepage, and click SEARCH DOMAIN. If the domain name you are searching for is not registered, congratulations, you can add it to the shopping cart directly, click Checkout, and the page will jump to the shopping cart details ( See below). Here is a coupon NS01OFF, you will get 1 dollar off when you use it in the first purchase.
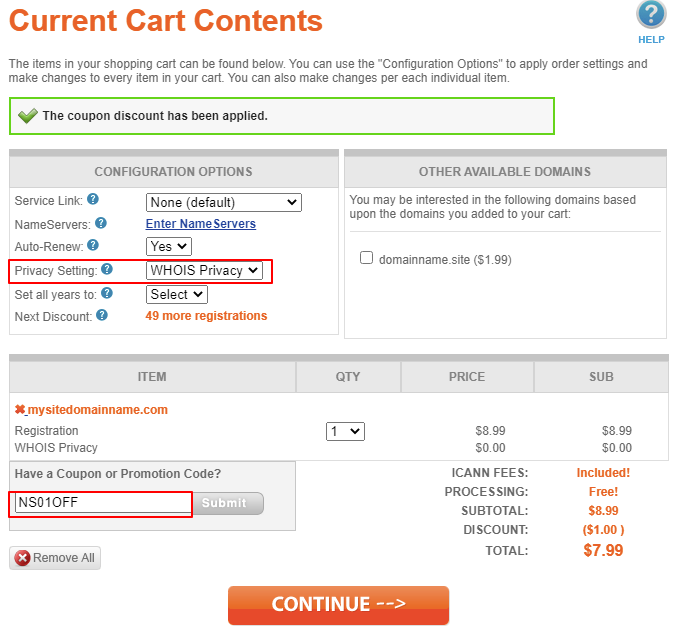
Click on Continue to go for payment, Namesilo offers many payment methods including credit cards, PayPal, bitcoin…etc, you can choose the most convenient one to make payment. Once you paid the order, you registered the domain.
Step 2. Go to DNS configuration- Connect Domain to Hosting
After purchasing the domain name, log in to your NameSilo account, find the domain manager in the right sidebar, and click Enter. You can see the domain name you just purchased, click on it, find DNS Records (see that in the below screenshot), and click on Update.
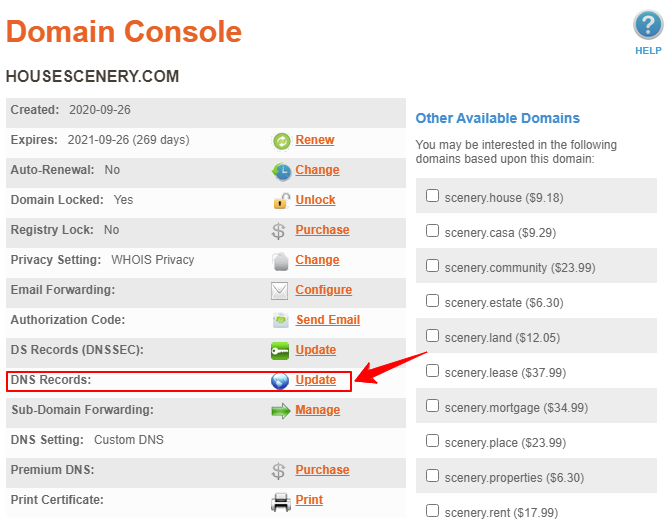
the next page you will enter is the DNS settings manage page, where you can add some records. No matter where you buy the domain name, you need to find this DNS setting.
Step 3. Create Records and connect domain to hosting
On the DNS zone setting page as in the below screenshot, there’re some default records about Namesilo nameserver already exist, you can add or edit records in the Add/Edit a Resource Record section, but I suggest you delete all the default records to avoid conflict, then add new records.
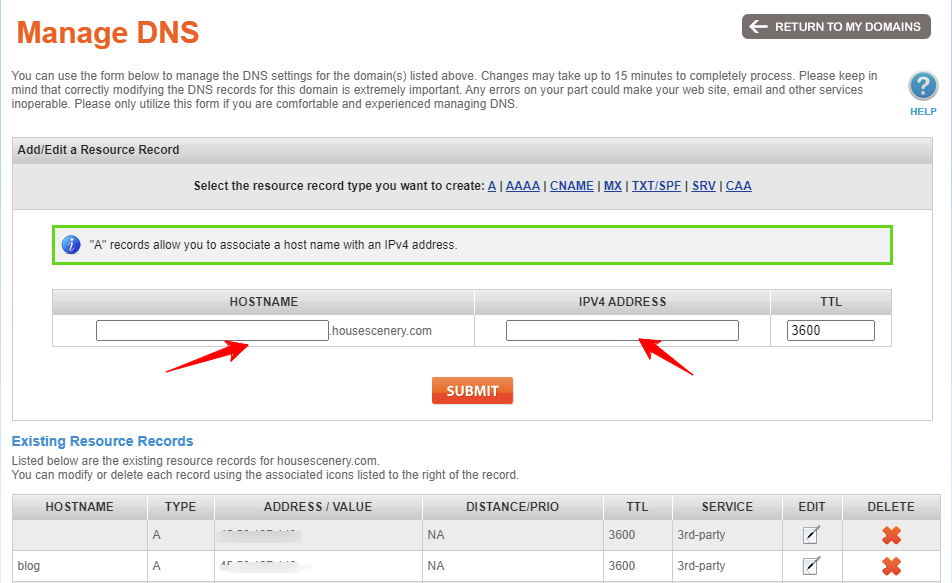
The way to connect a domain to hosting is to add an A record to the DNS, you can click the blue A in the record type list, and it will show you the form as in the above screenshot:
- HOSTNAME (name, generally refers to the name of the domain name or subdomain name) → Leave this field blank or add @, if you also want your website with www for the URL, you can add another A record, enter www in this field.
- IPV4 ADDRESS (hosting public IP address) → fill in the public IPv4 address of your hosting in this field. This address can be found on the control panel of the hosting you purchased. Most hosts use cPanel as the control panel. see the IP address in the picture below, the hosting I am using is ChemiCloud, they use cPanel too.
For other hosting companies that have their own control panel like GreenGeeks, Siteground, Hostinger, etc, you can find it on the control panel or contact their customer support directly.
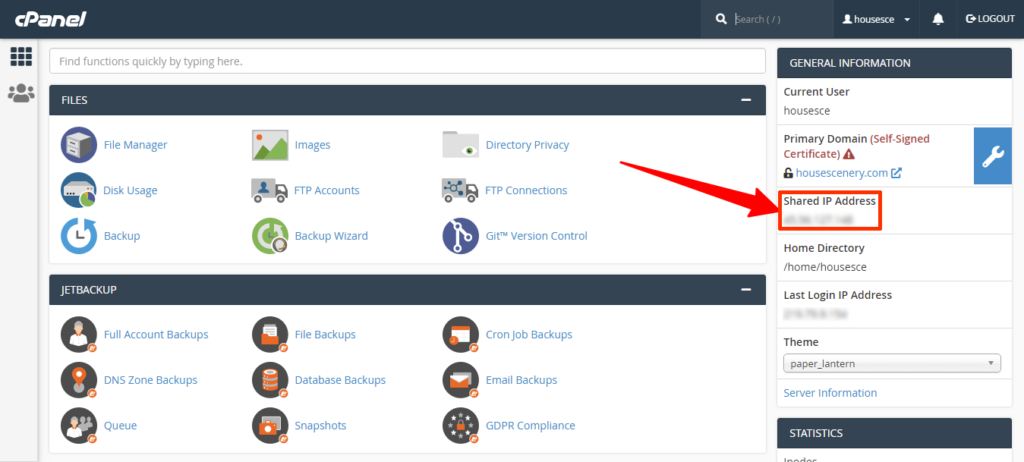
As you see, the Shared IP Address is the public IP address you need, copy it and paste it into the field of IPV4 ADDRESS.
- TTL (Short for Time to live)- Here you can set it to 3600, which means 3600 seconds = 1 hour, Namesilo only allows a small number of 3600 in this field.
Generally, TTL is the minimum time that the domain is propagated to hosting, which means you need to wait so long to connect domain to hosting successfully. In most cases, this time is 1 hour to 4 hours, sometimes even longer, and sometimes very fast. Different domain registrars may have varying minimum TTL (Time to Live) settings, but regardless of which registrar you use, you cannot fully control this aspect because it is regulated by ICANN.
Filled in all values, Click on Submit, what you need to do is wait for the DNS propagation to finish, Want to know if the domain is connected with your hosting?
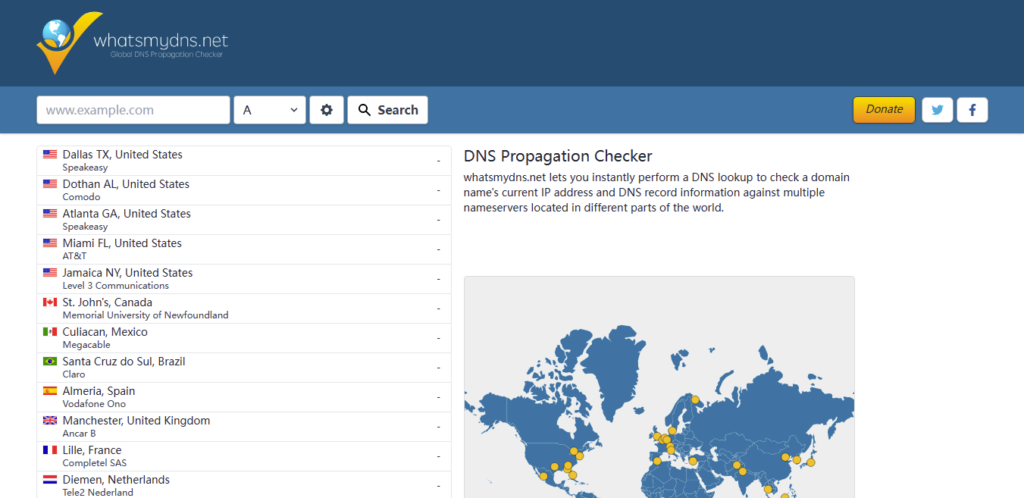
- Go to the website: DNS Propagation Checker(whatsmydns.net) enter your domain and check the record type, it will let you know if the domain is connected hosting, please note all areas ok is really ok.
- you can enter ping yourdomain.com in the CMD of Windows or macOS’s terminal, if it gets back the IP address of your hosting, it means connecting the domain to hosting is successful.
Connect Sub-domain to Hosting
1. Add A record
Suppose you have some subdomains based on your Top Level domain, For example, shop.example.com or blog.example.com. In that case, you can also add an A record into the DNS zone like connect domain to hosting as above, but fill in the subdomain name(such as shop or blog or other prefixes you want to use) in the HOSTNAME field, and IPV4 ADDRESS is same as the public IP of your hosting.
However, if you want to host your website with a subdomain in a different hosting, you just change the IPV4 ADDRESS to a different one.
Once the subdomain-connected hosting succeeds, you can create a new website as you do with your top-level domain, but the root directory of the subdomain should be different. If you are using cPanel to create a website, it will create a new directory to associate with the subdomain when you add a subdomain, otherwise, you need to create a new root directory and point your subdomain to this directory in the webserver configuration.
2. Add CNAME Record
You can also connect the subdomain to hosting by adding CNAME records. CNAME records are also known as canonical or alias records.
The CNAME resolution process is first pointing an alias to the top-level domain name(example.com), and then the top domain has an A record which points to an IP address, the alias finally points to the IP. CNAME records must always point to another domain name, never directly to an IP address.
example.com      |     A Record   |   Production Server IP
test.example.com |     CNAME      |   example.com
For example, if your domain name is example.com, it has a CNAME record test.example.com point to example.com, then you can also directly use test.example.com redirect to example.com, if you want to create another folder through test.example.com and associate it with the subdomain, and put in a separate website file, then test.example.com will jump to this new website. that’s how to use CNAME to connect subdomains to hosting.
The convenience of CNAME is that if you change the hosting provider, you only need to change one A record of the top-level domain, you don’t need to change records one by one. But it is said that some search engines are more friendly to A records, that’s because CNAME has to perform 2 DNS lookups, which will affect performance.
Method 2: Change NS for your domain (Name Servers)
Like Hosting is managed on its server, a domain is also managed on Name Server(NS). You can also connect domain to hosting by changing Name Servers. Most of the time, you change NS for your domain, you don’t need to add the records to the DNS zone one by one.
For example, if you change the NS from domain registrar to hosting provider, the hosting provider’s NS will add all necessary records for your DNS.
That’s why some hosting providers suggest you use their Name Server? as your DNS zone will automatically be configured to match the hosting’s IP Address once you use the hosting’s name server, and the speed for DNS propagation is faster when you add some new records. It is also convenient for some people to manage the domain and hosting together.
How to change NS for a domain? – Connect domain to hosting
- 1. still take NameSilo as an example, login to the Namesilo account, go to domain manager – > choose domain name -> Name Servers, Click on Changes, then copy the new name servers and replace the default ones, each line in one row.
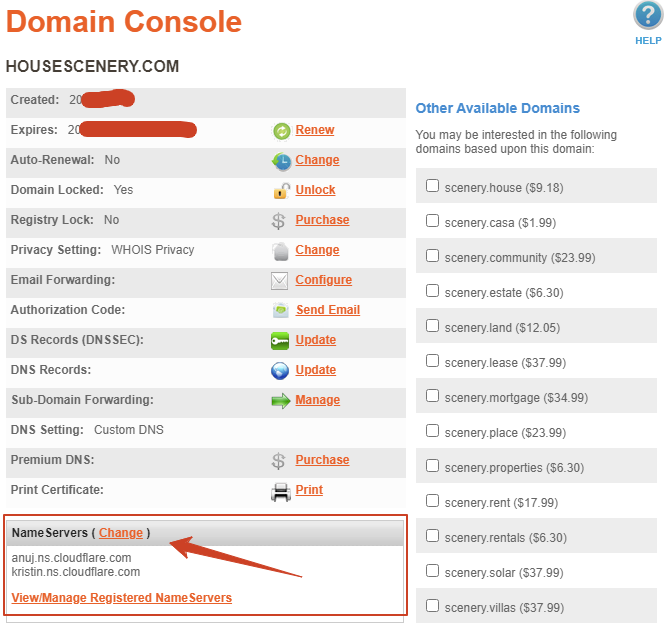
- 2. If your domain registrar allows an NS record type in the DNS records zone, you don’t need to change the Name Servers, you can go to the DNS zone manage page, and add NS records to point to the hosting Name Servers. For example, you can check here to know this method to connect domain to hosting on GreenGeeks.
In another case, you may need to change NS when you use CDN for your website, such as Cloudflare. Once you changed your domain’s NS to Cloudflare, it will transfer all records to Cloudflare DNS configuration, you can also add or edit the records on Cloudflare too.
Connect domain to hosting of Mail service(MX records)
If you buy some email services separately, such as Google Workspace(G-suite), office365, Zoho email, etc., you can point your domain name to their email server to create an email like [email protected]. you can follow the email services instruction to get the email server details. The picture below is the records of Zoho I used for our e-commerce business. The servers in different regions of Zoho are different.
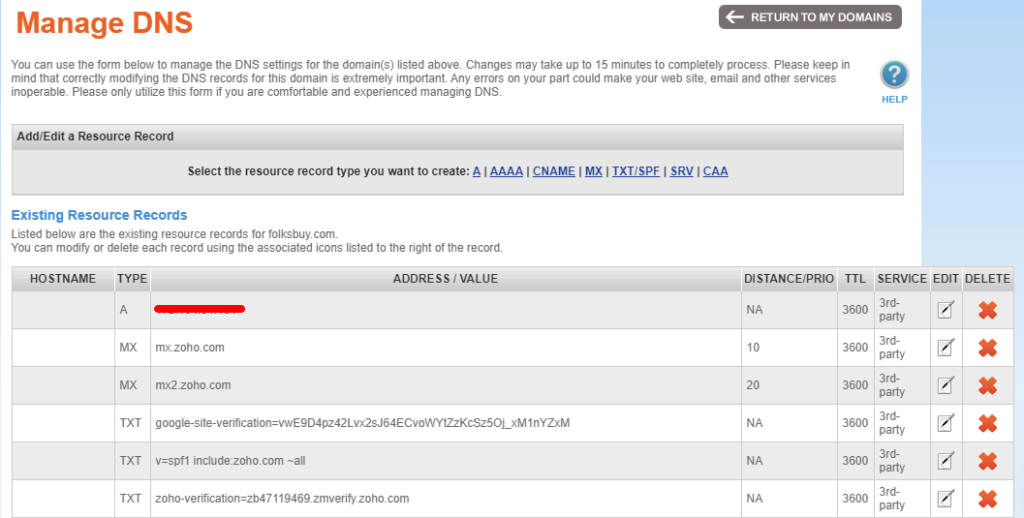
- HOSTNAME – Leave this field blank or add @susia
- ADDRESS/VALUE/TARGET HOSTNAME – There are two files in this column, enter the mail server which provided by the email serivice company
- DISTANCE / PRIORITY – it commonly has two levels, 10 and 20, and some have three levels plus one to 50.
Each email service is roughly the same, (I can’t explain all of them here, please follow the specific instructions of your mailbox provider), and then add these records to the DNS zone of the domain name registrar. you need to wait like that to connect domain to hosting.
More Record Types for DNS
There’re many other record types in the DNS zone setting:
- AAAA – Same function as A record, except that the domain is pointed to IPv6 (Internet Protocol version 6), A record is for IPv4, xxx.xxx.xxx.xxx is version 4
- TXT/SPF – “TXT” records allow you to associate free text data with hostnames. TXT records are usually used to verify your domain name. For example, if you want to link your website to the Google search engine, google will Add a specific TXT record to your domain’s DNS zone, and then they will search it on your website to identify your domain name;
TXT is also commonly used to create SPF records. SPF is generally an anti-spam record, which will prevent the emails you sent out including in Spam email. - SRV – The “SRV” record allows you to associate the server’s hostname and port number with a specific service. This is usually used for VOIP/SIP applications.
- CAA – “CAA” records allow you to specify which certification authorities (CA) are allowed to issue domain certificates.
When you use Cloudflare CDN for your website, you will find other record types, but most of those you don’t need to use.
Conclusion
Connecting domain to hosting is actually very easy, for many beginners or small websites, you only need to know to add A record to make your website online. This means method 1 is enough for most people to connect domain to hosting. I just wanted to write down some commonly used methods as much as possible, as well as some situations you may encounter.
Actually, changing NS is easier than adding A records, but if you need to connect the new providers to give you their NS if you really don’t know how to add records, just contact the hosting support.
This article seems only for connecting domain to hosting, actually, if you use some online website builder as I said in the beginning, the methods are almost the same, the difference is that you need to find the IP address for the different builders. Hope this article will help you.


