Shopify as a SaaS website builder for e-commerce allows users to add a custom domain to the Shopify website, meaning anyone can have a website with their domain.
But how to connect domain to Shopify website? it depends on where the users registered their domain. You don’t need to do anything if you register or purchase a domain name on Shopify directly. Still, if you get your domain name from other registrars, you need to know how to connect your domain to the Shopify website, Let me show you how to do that in this article.
Where can you purchase domain names?
If you want to know where you can obtain domain names, first of all, Shopify does offer domain name registration, but it’s a bit more expensive. So, in most cases, people usually purchase domain names from other specialized domain registrars, such as these places:
Of course, there are other well-known domain registrars in the market. You can check out this article: “Top 5 best domain name registrars comparison.” Once you’ve purchased the domain name, set it aside for later use.
The following will refer to the tutorial on how to connect domain to Shopify step by step.
Step 1. Access Shopify Admin and Go to Domain Settings
You will see the below interface once you log in to your Shopify admin, this is the dashboard of the Shopify store.
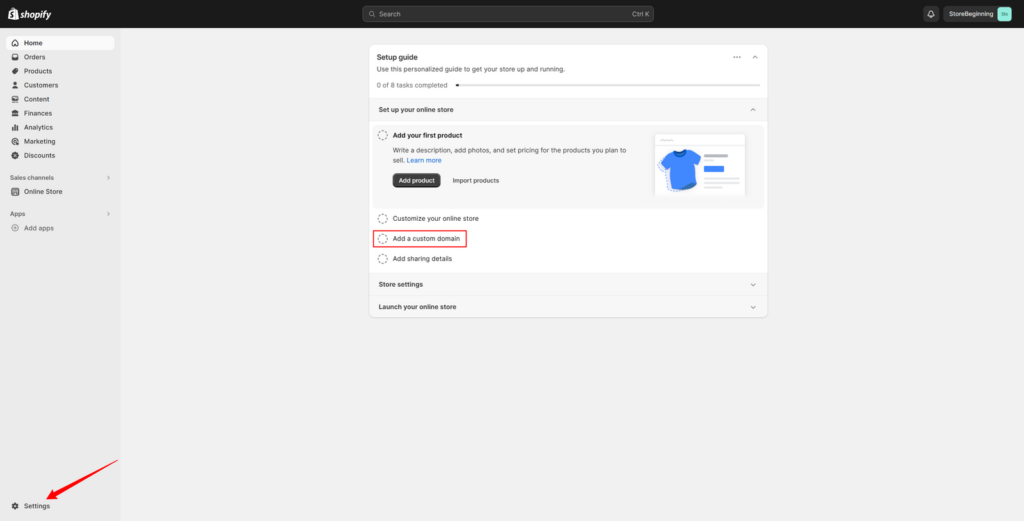
Normally, you can find a link or section for “Add a Custom Domain” to connect a domain name to Shopify in the admin dashboard for new stores, as shown in the screenshot, it is under Set up your online stores under “Setup guide“.
If your store has already closed the Setup guide, then go to the “Settings” in the lower-left corner and access the Domain settings.
The exact location may vary depending on the version of Shopify you’re using.
Step 2. Enter your Domain Name
You can add the domain purchased from a third party in the domain settings. And you can also purchase a new domain directly on Shopify. As mentioned earlier, buying a new domain on Shopify is slightly more expensive, but not by much. It depends on your preference.
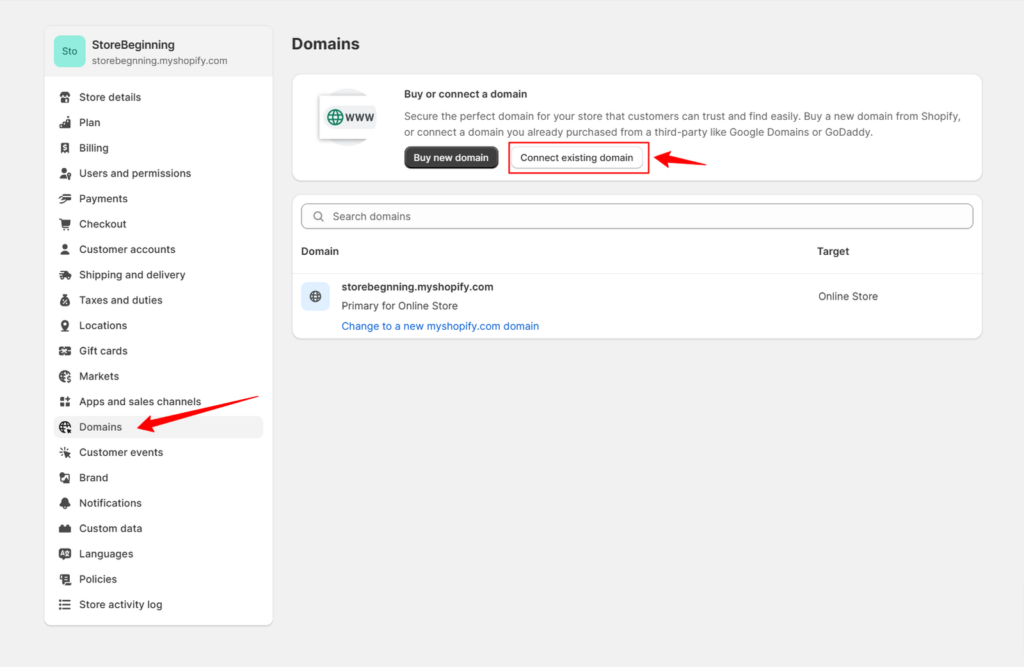
However, this article primarily discusses how to connect third-party domains to Shopify websites, so purchasing a domain directly on Shopify can be ignored for now.
So click on “Connect existing domain“, you can enter your domain on the next page.

You’ll be prompted to enter the domain name you purchased from the third-party registrar. Enter it and click “Next.” The next page will be shown in the below screenshot.

what you need to do on this page, is to configure DNS settings, you can check the details by clicking Follow setting instructions to learn how to do next, or just read my following steps.
Step 3a. Configure DNS Automatically with some domain registrars
Configure DNS settings may be done automatically if you purchase the domain from some registrars like Google Domains, although you might need to log in during the process, it will automatically configure your DNS for you. You just click the button Verify connection to check if your registrars support that.
Step 3b. Manually Configure DNS Settings.
If your domain registrar doesn’t automatically connect the domain, then you’ll need to manually connect the domain. First, you need to obtain your Shopify store’s IP address and other values like CNAME.
1. Obtain an IP address from your Shopify Store
If your domain registrar doesn’t support configuring DNS for your Shopify store automatically, Shopify will provide you with the relevant information for manual setting once you click the button Verify connection, such as your Shopify store’s IP and CNAME:

You will see a string of IP addresses behind the Required values; you can copy this IP address and add an A record in the DNS setting on your domain registrar’s account dashboard.
2. Log in to your domain registrar’s account and Navigate to DNS settings.
Go to your domain registrar and login to the account dashboard to set up DNS.
For example, if you purchased the domain name from NameSilo, you just log in to my NameSilo account, find the Domain Manager on the left sidebar, click on the domain you purchased, go to DNS Records (see the image below), click Update next to it, and you’ll be taken to the DNS settings page where you can add or edit the DNS records.
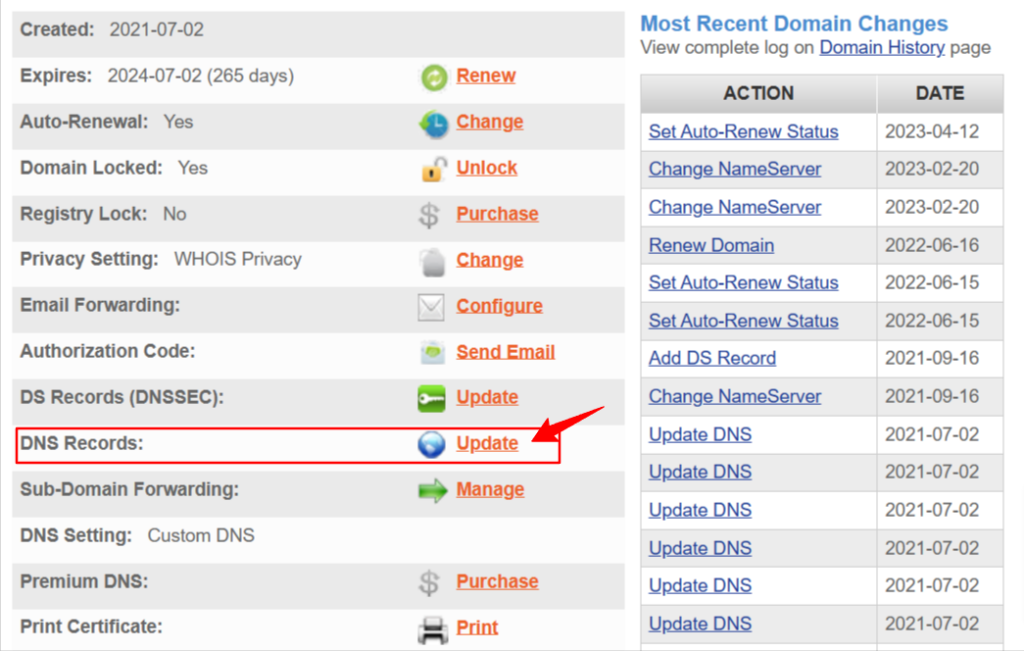
No matter where you purchased your domain, to connect domain to Shopify store, you simply need to find the DNS settings in the account dashboard and update the DNS records. Each domain registrar’s control panel is different, but the method is the same.
3. Modify DNS records and add A/CNAME records
You can add or edit records in the “Add/Edit a Resource Record” section as shown below on the Manage DNS page, new domains have several default records that point to NameSilo, and these records should be deleted to avoid unnecessary issues.
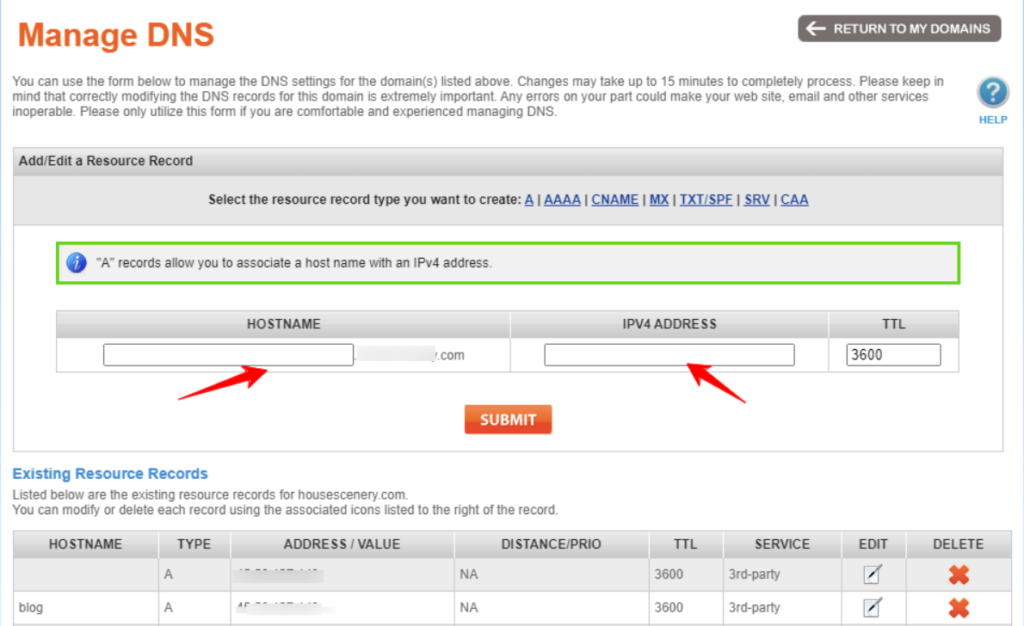
To connect the domain to Shopify, we typically add an A record. Just click on the blue letter “A,” and you’ll see an input box as shown in the above image.
- HOSTNAME (Name, generally the name of the domain or subdomain) → Leave this field blank or use “@”.
- IPV4 ADDRESS (Public IP address of the host) → Enter the IP address you obtained from your Shopify store.
If you want your URL to have “www” at the beginning, you can add a new CNAME record. For the CNAME record, enter “www” in the HOSTNAME field, and the value should be “shops.myshopify.com” which you can copy from your Shopify store like that for IP.

Please note that having “www” in front of the domain is considered a subdomain. After completing, click ‘submit‘ to save
Step 4. Verify and Finish
Go back to the Shopify domain settings, and click ‘Verify connection’ again. It’s highly likely that it still won’t be connected, but don’t worry because the IP address takes some time to propagate across the entire network, with some durations as long as 2 days.
However, in most cases, it will propagate within 1 hour. So, you don’t need to worry about it at this point. Focus on other settings for your Shopify store, and leave the domain connection for later. Check back after some time.
You can also search for your domain at this website: whatismydns.net. Check if the A record pointing to Shopify’s IP address is green in all regions, and then go back to verify the connection.
Once everything is done, you can use your domain to access the Shopify store website.
Conclusion for “Connect domain to Shopify”
In conclusion, connecting your domain to Shopify is a crucial step in establishing your online presence and ensuring a seamless shopping experience for your customers. While the process may seem complex at first, it becomes more manageable when broken down into clear steps. By following the instructions provided in this guide, you can successfully link your domain to your Shopify store.
Remember to be patient during the propagation period, as it can take some time for the changes to take effect. Once your domain is connected, you’re one step closer to building a thriving e-commerce business. We hope this article has been a valuable resource in helping you navigate the domain connection process and set you on the path to e-commerce success.
Because the Shopify dashboard occasionally gets updated, the tutorial you’re looking at might have slight differences. However, the overall steps remain the same; it’s just that the location of settings may vary.


