You might not know where and how to start a website as a beginner, We will show you how to create a website with WordPress from scratch step by step, which is the most popular way to build websites without the skill of coding for people nowadays.
Free for Beginners
step by step for beginners, easy and free of charge
Fast Setup
make your website online successfully within 1 hour
Multiple Site Types
guide to blog, online store and information websites
More Related Reading:
Why Create a Website with WordPress
What the “WordPress” we say is wordpress.org, not wordpress.com. You need to know that before starting to avoid mistakes and unnecessary costs.
WordPress.com is an online website builder provider based on wordpress.org, although you can also create websites on wordpress.com, that’s not the most popular WordPress in the world.
let’s see below some statistics report from W3Techs :

We can see the percentage that people who create a website with WordPress increased many years by year, almost 40% of the websites in the world are using WordPress. The Percentage will reach 50% in time, that is to say, half of the websites in the world would be created with WordPress.
WordPress was started as a blog creation tool in 2003, it is not only for that nowadays, you can find it is also used to create more types of websites like News, Magazines, Company websites, online stores, and more. Even many famous brands like BBC, Walt Disney, Sony… etc., we can’t list all, also create a website with WordPress.
We don’t need to list more reasons anymore although there are some more indeed, you should know why so many people choose WordPress to build their website, you just gonna have a trial, and you will love it.
What you need to create a website with WordPress
➤ You need to get a custom domain name;
➤ Buy valuable web hosting at an affordable price;
➤ Of course, you need WordPress.
Step 1. Get a Custom Domain Name
What is a domain name?
The domain name is an (internet) address of a website, from which the visitors can find your website, it is something like xxx.com, xxx.net, xxx.org, … and more TLDs, we suggest you get a domain name with .com TLD in priority for creating a website with WordPress.
Many web hosting companies offer a free domain name for the first year if you purchase their web hosting, But Chemicloud offers a free domain name for free time if you order their web hosting. We recommend that you buy domain names from a professional domain name registrar for easy management.
➤ If you hope to use the domain name offered by web hosting providers, you can ignore this step, and jump to Step 2 directly.
NameSilo
You can read our comparison to find a domain name registrar to buy a domain name, to save your time, you can go for NameSilo directly, we use NameSilo too, it is one of the cheapest domain name registrars, with no hidden fees.
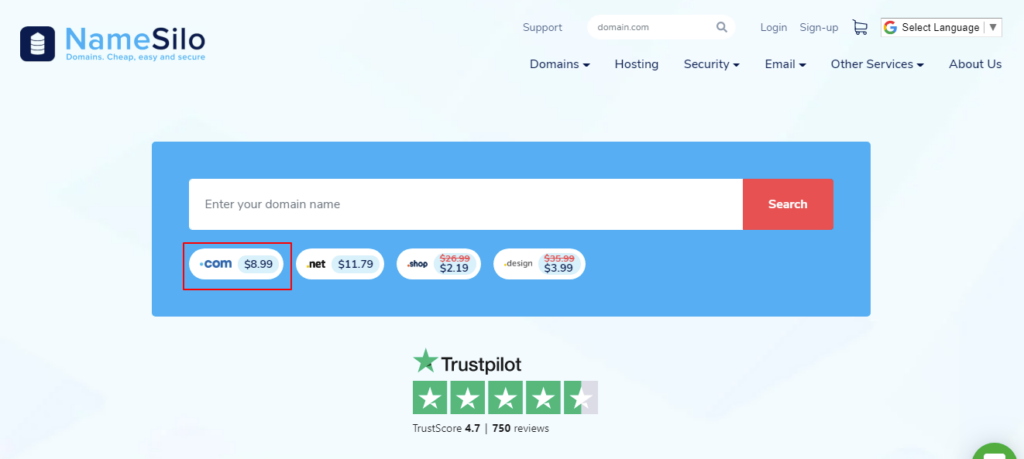
A domain name with .com TLD is USD9.99/year, as well as the renewal price, apply below coupon code below when purchasing, and you will get $1 off for the domain name in the first year.
Apply NameSilo coupon: NS01OFF to get USD$1 off Today!
Put your custom domain name in the search form, if the name is not registered, congratulations, you just add it to the cart and go to Checkout, you will see the price including all other fees, that’s to say how much you see and how much you pay.
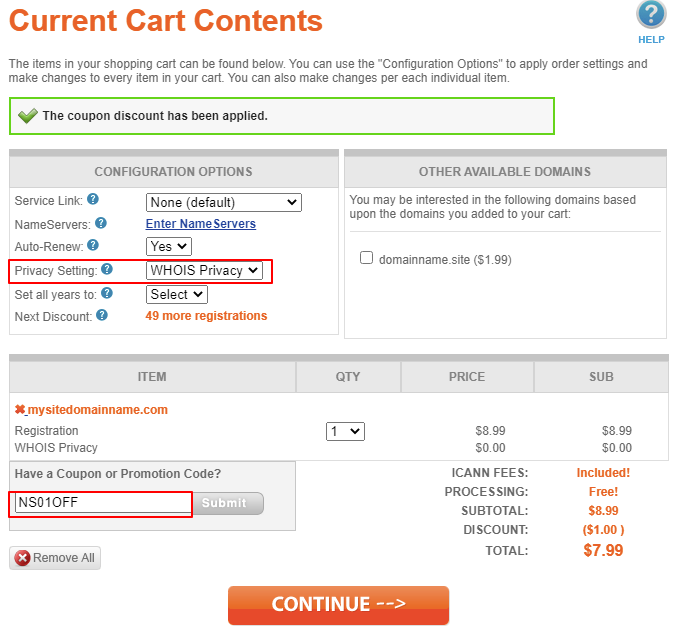
The coupon is applied for an example “mysitedomainname.com”, and you can select some options in the board “CONFIGURATION OPTIONS”, NameSilo gives a further discount if the number of domains that customers register up to 50.
Finally, click CONTINUE and create an account then make payment, you will get the domain name you want. We’d like to tell you that NameSilo offers multiple methods for payment, Including some regional payment methods and Bitcoin.
Step 2. Purchase a Web Hosting
Web hosting is like a house or home of any website, the WordPress or other CMS website’s data and files will be stored on web hosting. Excellent web hosting is very important for a WordPress website since it directly affects the performance of websites and also the cost of the website you are going to build.
There are some types of web hosting, please check our comparison and reviews for the web hosting to learn more details.
You can see which type is most suitable for beginners since this article is for creating a website with WordPress. As a beginner, you just need a small web hosting with essential features and it has an affordable price, we don’t recommend some other web hosting but shared hosting.
Many providers offer many features for their shared web hosting to enable websites to run properly, you can upgrade the web hosting once your website grows.
We selected 10 web hosting providers to compare, and absolutely all of them are excellent providers. However, to save you time, we recommend Chemicloud as the web hosting provider for beginners.
ChemiCloud
The shared web hosting on Chemicloud should have the best performance with affordable prices around the providers. It is one of the best web hosting for beginners to build a website with WordPress. here are some advantages of Chemicloud:
➤ Free 1st year Domain name;
➤ Litespeed server with LiteSpeed cache to ensure high performance for web hosting;
➤ Very quick response from the support team, they will send you a first reply in 10 minutes if you open a ticket, and you will talk to the last support person if you chat with them the second time.
Please go and find all details in the review, It will be very similar if you still want to start with other providers
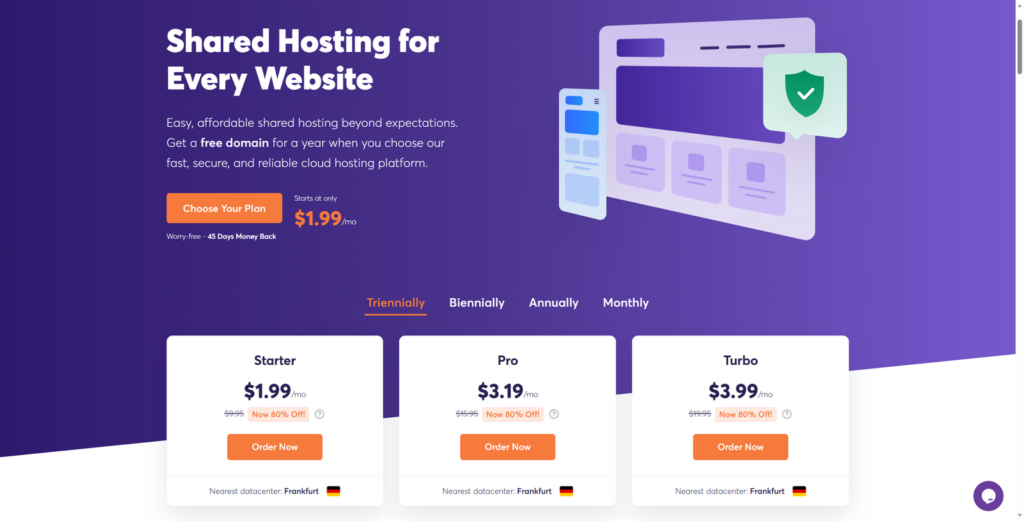
if the special deal ends, don’t worry, you can use the promo code below to score a sweet 70% discount,
Get started with ChemiCloud Web Hosting
Select the right web hosting type, ChemiCloud has 2 types for beginners to create a website with WordPress, Shared web hosting and WordPress hosting, actually, both are almost the same, we used shared web hosting, so let’s start with that, it only says “web hosting” on Chemicloud website.
1. Choose a plan for starting, we recommend the plan “Web Hosting Starter” for your first website, it includes plenty of features for performance, security, and reliability, is easy to use, is $4.48/month, and is affordable to most of people.
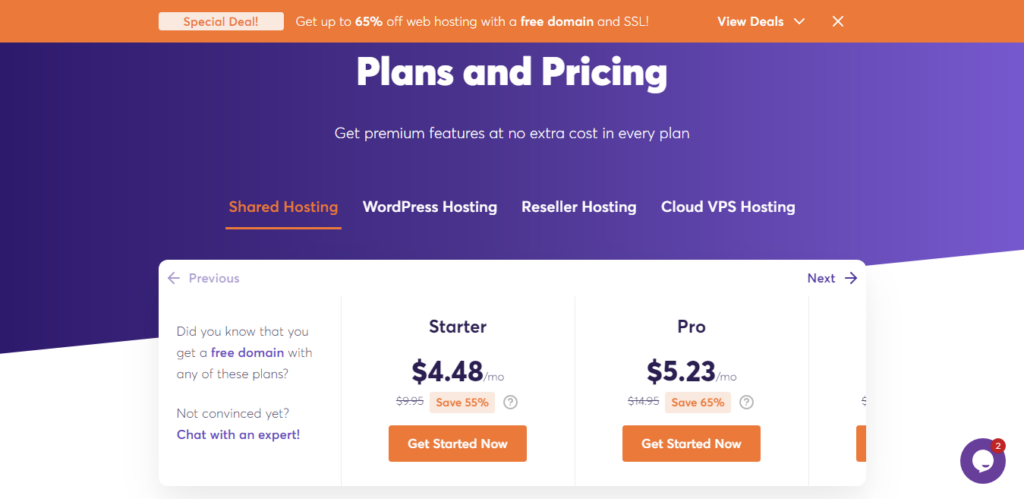
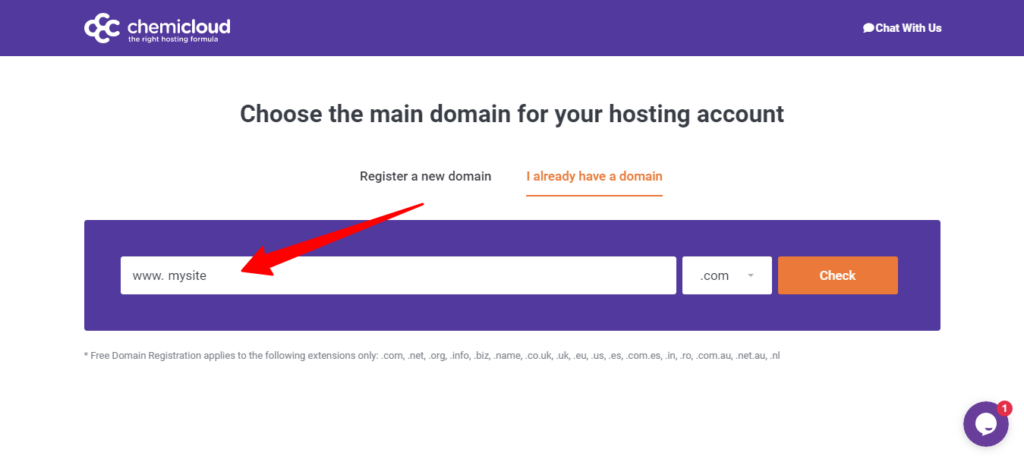
2. Click Order Now, it will turn to the page that asks for a domain name, you can register a new domain name or use your existing domain name.
- Register a new domain – If you didn’t do the 1st step or you still don’t have any other domain name, you can put your brand name or a new name for your business in the form, this domain is free for 1st year.
- Existed domain name – you can just write the domain name you ordered from Step 1 or another existing domain in the form.
3. Chemicloud will take you to the cart page once the domain name is available for use, you can choose billing cycle and server location and other additional add-on features:
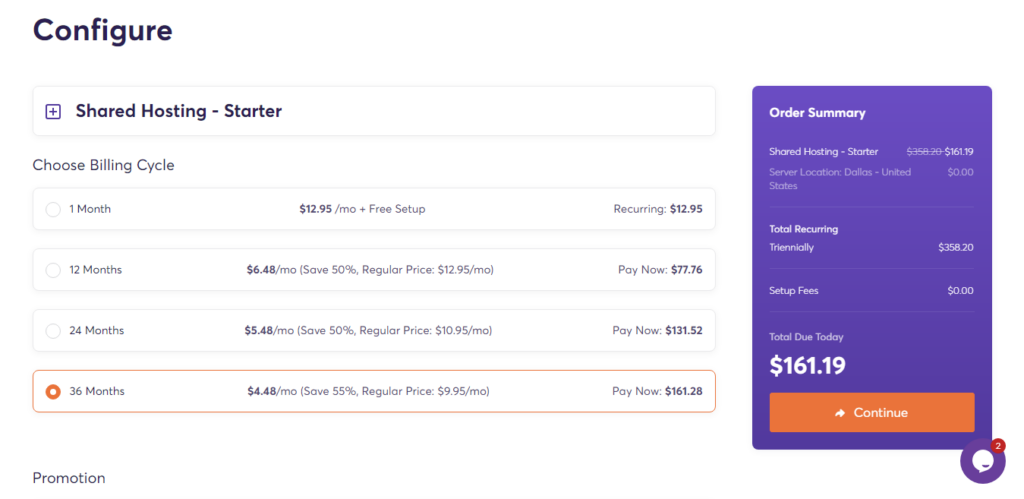
We suggest you choose 36 months, this is the lowest pricing option, you probably thought it is cheating people, but when you check other providers, you will find that they also do this, you need to buy at least 1 year at a time.
and you tens of dollars more, you can get the web hosting service for one year more, anyway, it depends on you. Then you can choose a server location that is nearest you or your visitors.
For other additional add-ons, you just choose none or a free version, which is enough for you to run a website as a beginner.
4. You can apply the discount coupon code on the checkout page we offered, but we don’t know when the code will expire, so you should speed up if you have a plan to order web hosting.
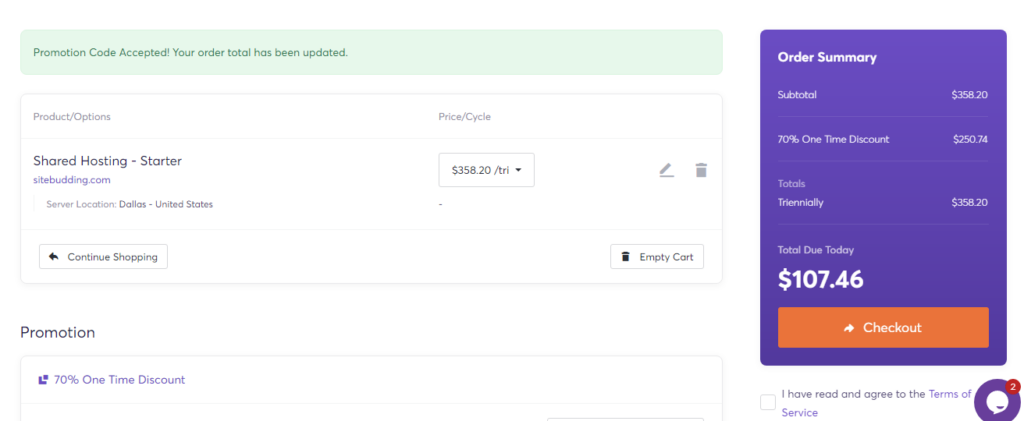
Before you make a payment you need to create an account. Chemicloud will send an email with all details of the web hosting to your mailbox which you just registered.
When you login to the dashboard of Chemicloud and the cPanel, the system of chemicloud will show you their server is DDos protected by Cloudflare.
5. Chemicloud offers a very easy and friendly panel for you to manage your account, what you can do on this panel is manage your domain, addon, service you subscribed to, support, and billing.
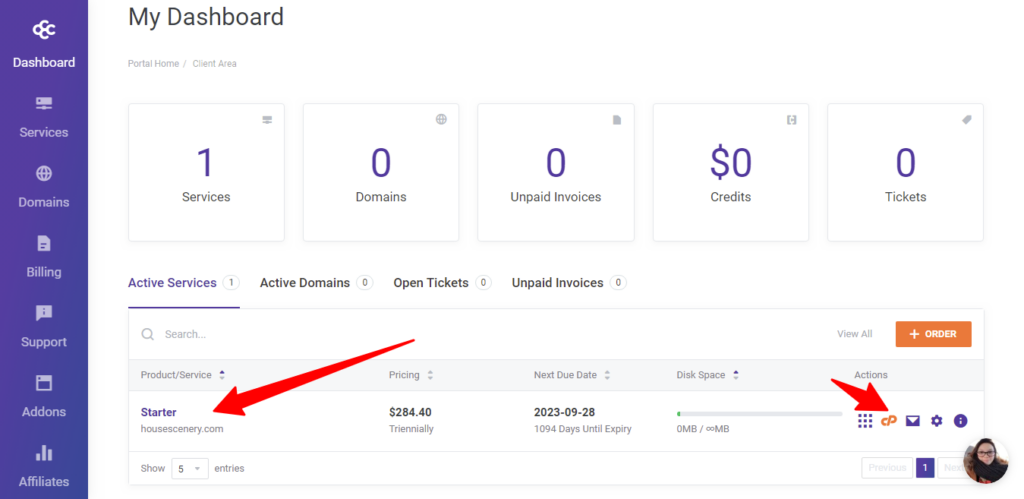
To manage the hosting, you can go to active services – actions – cPanel.
Step 3. Connect Your Domain Name to Web Hosting
➤ Skip this step if you registered the domain name from Chemicloud, The domain should have been connected with the web hosting. Step to next.
The domain name needs to be connected to web hosting manually if you ordered them from different providers, We will show you how to connect your domain name to web hosting in this step.
Actually, there are two methods for connecting domain names to web hosting, but we will only show you one method which is easier and safer for beginners.
Domain management is very similar in different domain registrars, but we mainly use NameSilo, so NameSilo will be an example to show you how to do it.
1. Log in to the NameSilo account, click domain manager ⇢ the domain name ⇢ update DNS Records, you can add or edit the DNS record now, then point the domain name to web hosting by adding an “A” record.
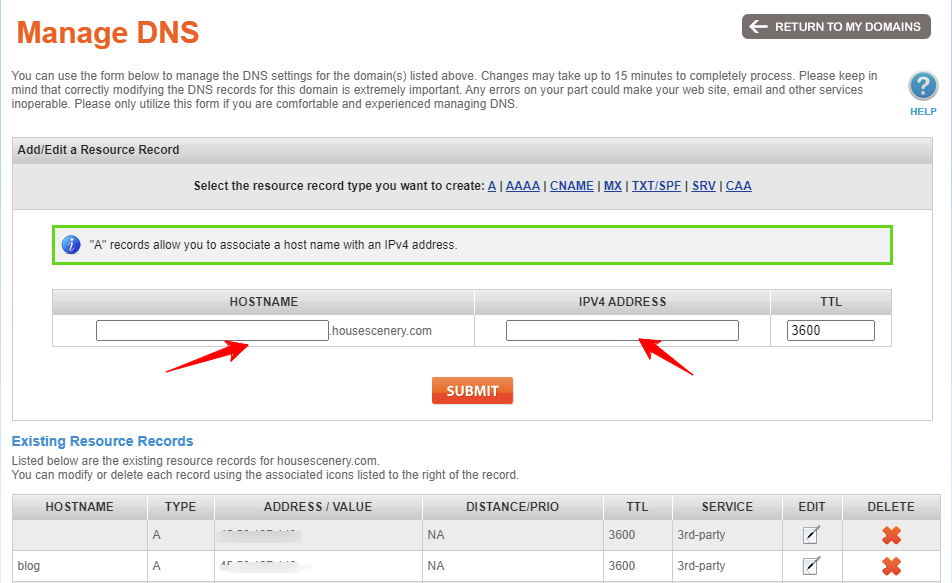
2. Click Blue “A” to create a resource record, it will show you a form like the above picture, you just leave it empty or put a “@” in the column of “HOSTNAME”, for some subdomains, you just write the subdomain name like “blog” or something. Enter the IP address of the web hosting into the column “IPV4 ADDRESS”.
3. Where is the IP address? login cPanel of the web hosting from Chemicloud Account dashboard. The shared IP Address is what you want to enter into the column “IPV4 ADDRESS”.
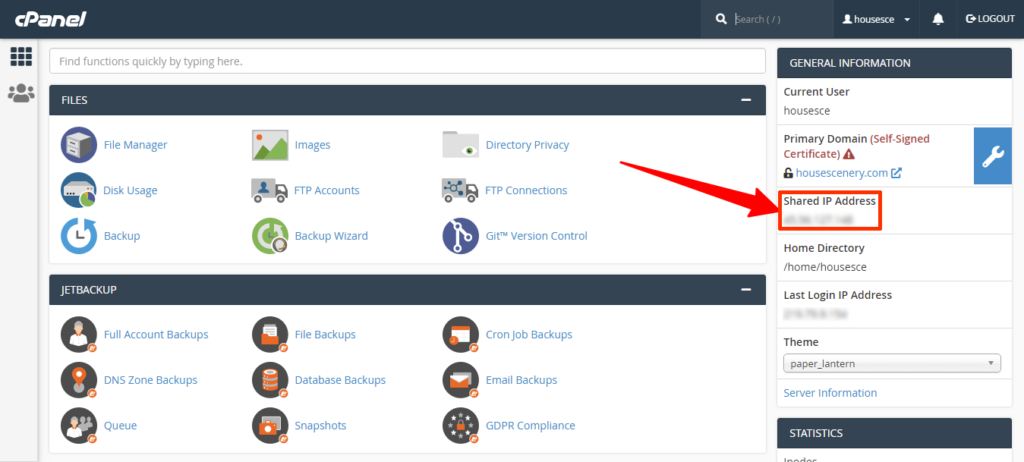
4. Finally, submit, That’s it, generally, you need to wait for a few minutes to a few hours so that the DNS gets propagated worldwide properly.
✻ To know if the domain name is connected with web hosting successfully, the simple way is to go to DNS Propagation Checker enter your domain, and search.
✦ Install SSL for Domain and Web Hosting
SSL short for “Secure Sockets Layer”, are cryptographic protocols designed to provide communications security over a computer network, which helps to protect sensitive information that’s sent between computers and servers. a website with SSL protection or not will affect SEO directly.
Chemicloud offers Free Let’s Encrypt™ SSL, you can login to the cPanel > SECURITY > Let’s Encrypt™ SSL > Issue a new certificate.

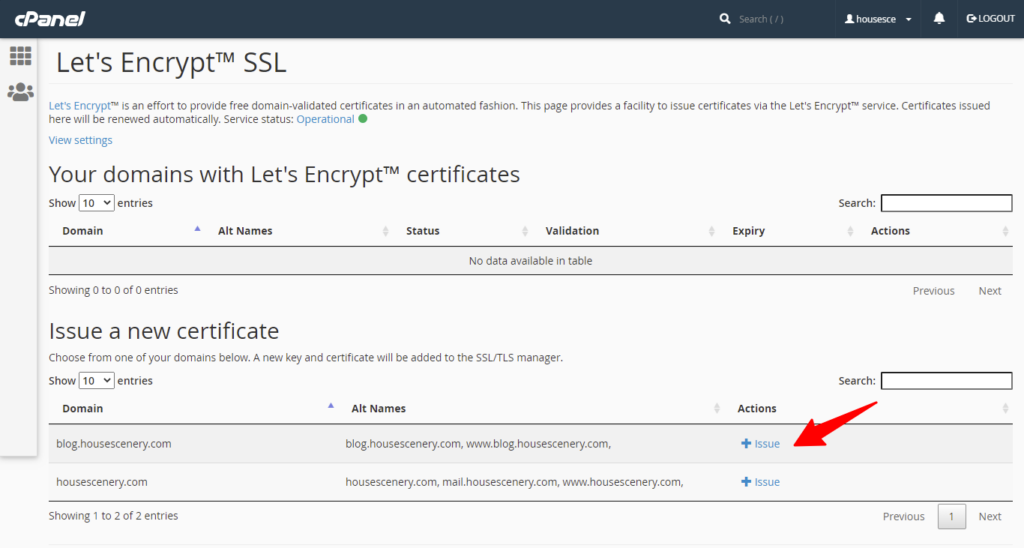
Please see the above picture, in part of “Issue a new certificate”, we added a subdomain “blog.housescenery.com”, which is separate from the domain “housescenery.com”, so if you want to install SSL to both of them, you need to issue separately.
Actually, you see a subdomain mail.housescenery.com in housesenery.com, which is a bundle by Chemicloud when you purchased your plan. so if you add any subdomains, you need to issue a certificate separately.
We issue the certificate for housecenery.com first.
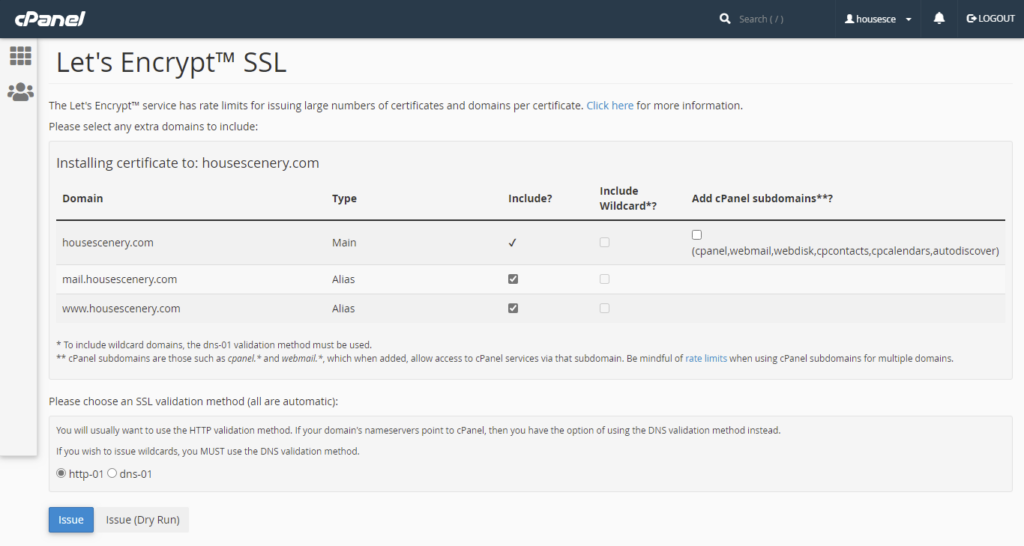
Include all domain names as you want, click issue, the system will get back some information if the certificate was installed successfully or not.

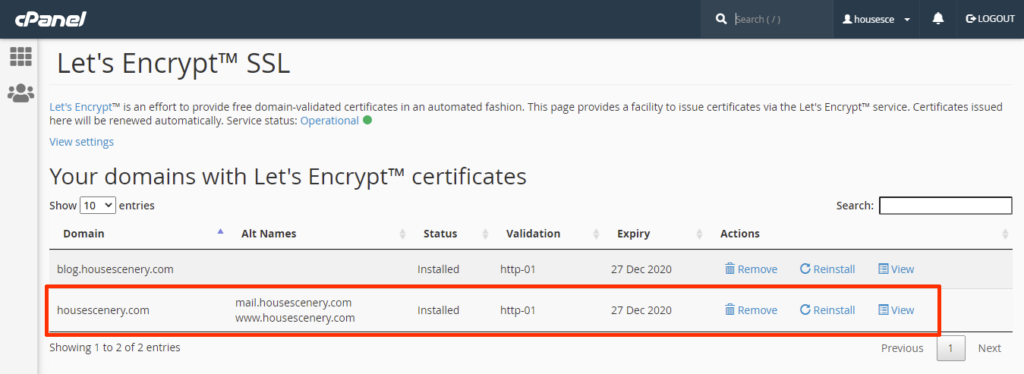
Enter you domain into a browser to check if the website is protected by SSL, there should be a lock before the url of your domain.

Step 4. Install WordPress
Installing WordPress should be the most important step, however, it is also the easiest step for creating a website with WordPress.
1. You can go to the WordPress installation page from two places:
- by clicking App Installer from the Chemicloud dashboard

- Login to cPanel and install WordPress

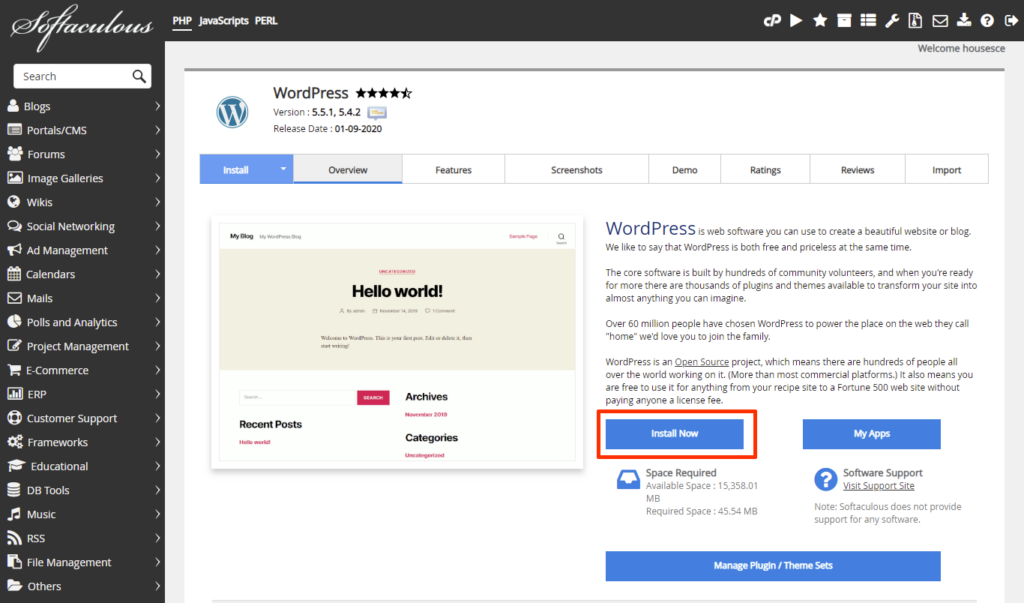
2. Press the button “Install now” on the installation page, the WordPress won’t be installed immediately. it will show you some settings before installing.
3. You need to enter some information, and you can also do some custom settings on the page as below picture.
Note: you need to make sure the domain is correct in the field “Choose Installation URL” if you using Parked domains or Subdomains.
Except for “Software Setup” and “Admin Account” need your own information, you can leave others empty or default, then click “install” at the bottom.
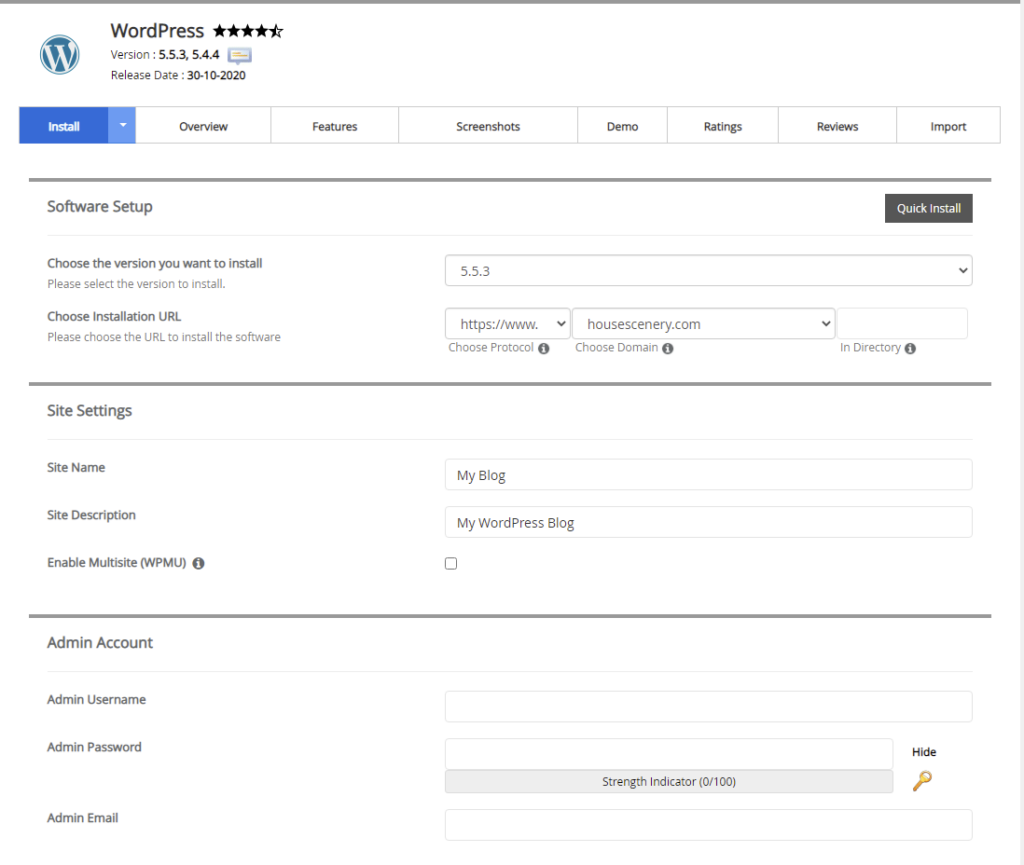
Details of setups and settings as below:
- Software Setup – Choose the version of WordPress and URL for installation, recommend selecting the latest version, it is more secure for the website, if you choose the older version, don’t worry, you can update it in the admin dashboard; please make sure choose the correct domain name if you use parked domains or subdomains.
- Site Settings – including site name, site description, and multiple sites set, you just leave it as empty or default, you can change all this information on the admin dashboard.
- Admin Account – this is the critical setting, that you need to log into your website manage dashboard.
- Choose Language – The default is English, if you are going to create a website with WordPress in other languages, you can change it, or just leave it as English, and it can’t be modified in the dashboard.
- Select Plugin(s) – recommend passing it, all of the plugins you can install on the dashboard when you need any other functions in the future.
- Advanced Options – setting for database, updating, and backup, just leave all empty.
- Select Theme – If you like some theme in the list you can select one or just pass it.
The progress bar is running, and WordPress is being installed, it may take 3-4 minutes, actually, it is much faster and not more than 1 minute on Chemicloud to us.

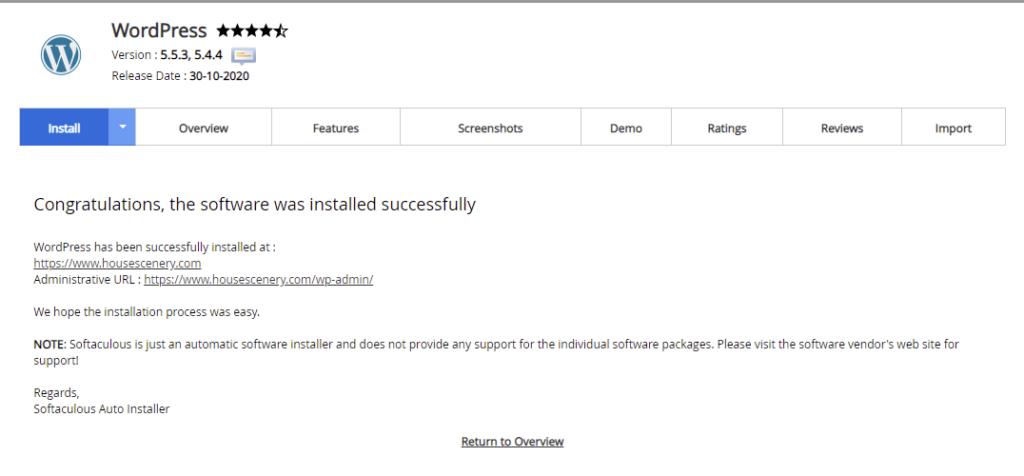
You will see a page showing WordPress was installed successfully, there are 2 URLs in the content, one is for your website address, and the other one is for the admin also the WordPress dashboard address. The website in the screenshot is our other website.
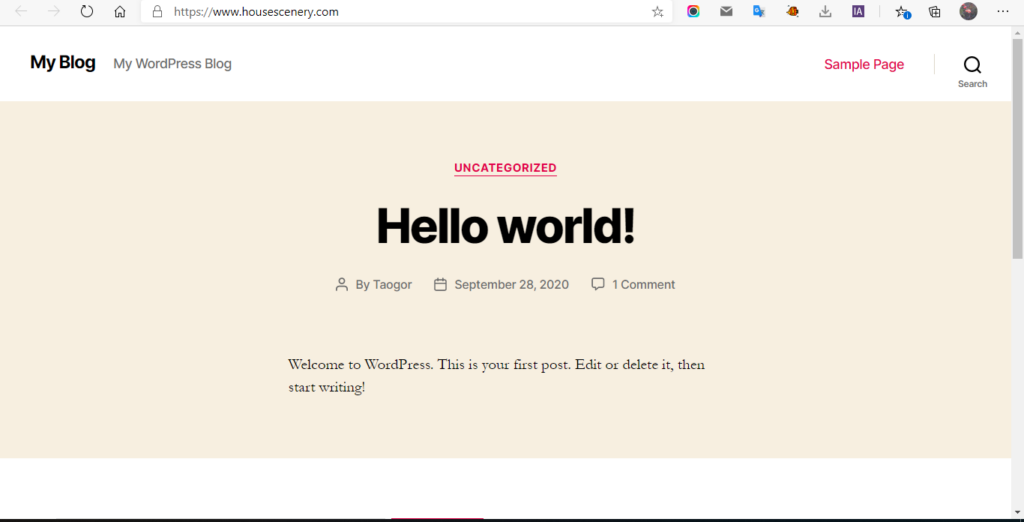
4. Check the homepage of the website with WordPress.
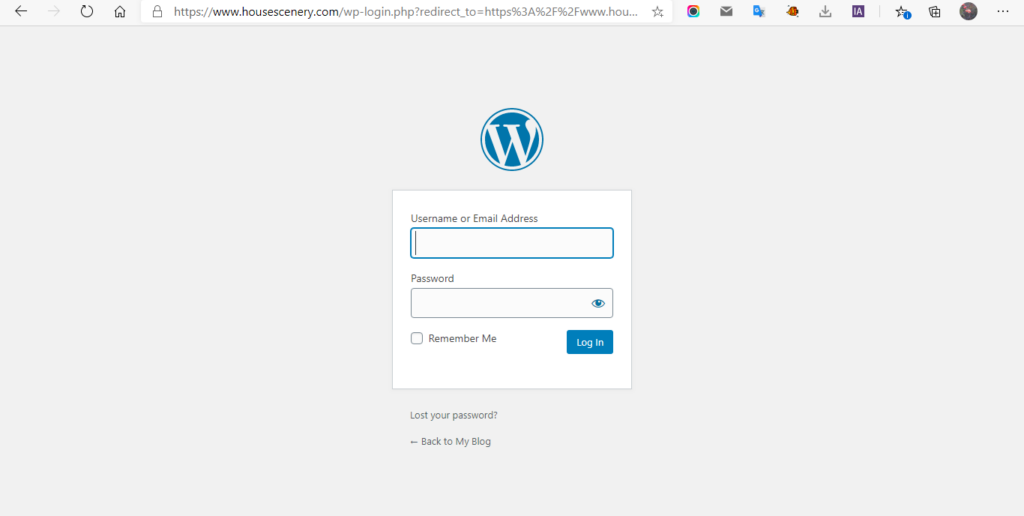
This is the Admin login page, enter the username and password you previously set when you install WordPress.
After you logged in to the admin, you will see the WordPress dashboard for your website.
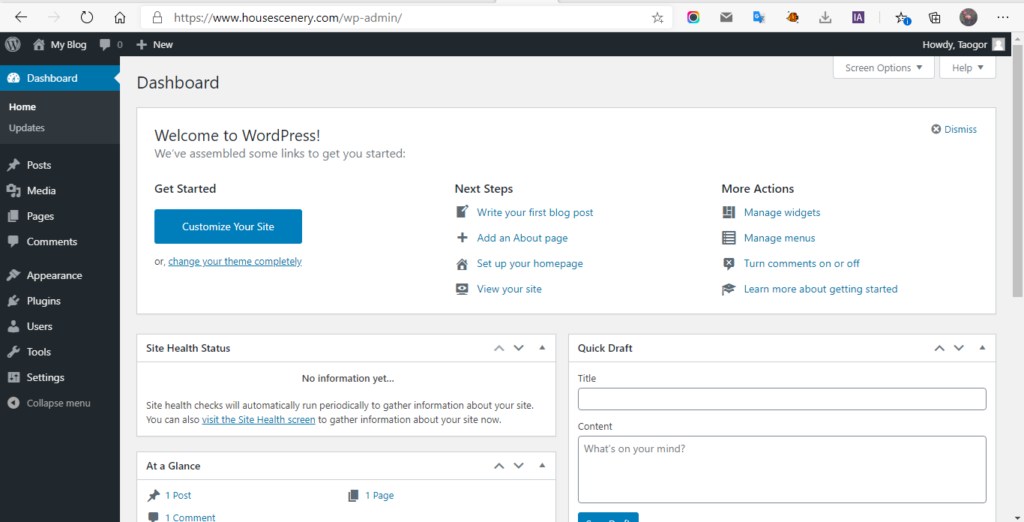
Basically, the website was successfully created, and it is running on the internet, amazing, just a few steps, anyone can open it by entering your website address in the browser worldwide.
Is that all finished, of course not, you need to put your own information and set up the websites to make it remarkable and friendly to visitors.
Step 5. Customizing for Website
To make your websites really running and available for visitors, you need to customize the websites with your or your business information.
✦ Install a Theme
At first, we need to install a new theme to make it SEO-friend with the business. A theme is actually a template that presents the appearance of your website. You can easily use it to design your website and make your website more beautiful and friendly to visitors and search engines.

WordPress will offer three themes for any new installation, most of the time, those three themes do not offer some functions and features for people’s requirements, so the site owner will install customized and 3rd-party themes for their websites. If you just want to create a very simple personal blog, you can use a WordPress theme directly, but you still need to set up the website with your own information.
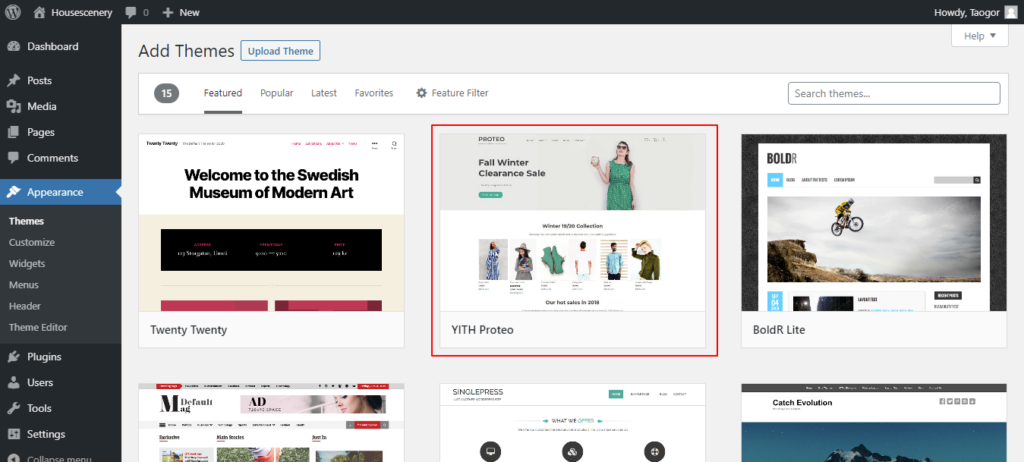
1. put your cursor on the menu “Appearance” on the left sidebar, and choose Theme on the sub menu, you will see a page like the above image.
➤ Theme from WordPress
click the button “Add New”, there are thousands of themes. To save you time again, we recommend the second theme – YITH Proteo as you see, it is totally free and a beautiful theme responsive on different devices. we will name it Proteo in the next contents.
we listed more best free themes here you can find in WordPress.
➤ Upload a Theme
WordPress also allows you to upload a theme, click upload theme, and drag a WordPress theme file to the page. WordPress newbies may not have any other 3rd-party WordPress theme. Actually, many people will buy a paid theme for more features since the free themes have limited features, and it is not good for SEO if you change the theme once your traffic or business is growing. here are the 3 most popular theme markets where you can get a premium theme.
Themeforest belongs to Envato Envato is definitely the biggest theme market not only for WordPress but also for many other website builders, you can check for further requirements.
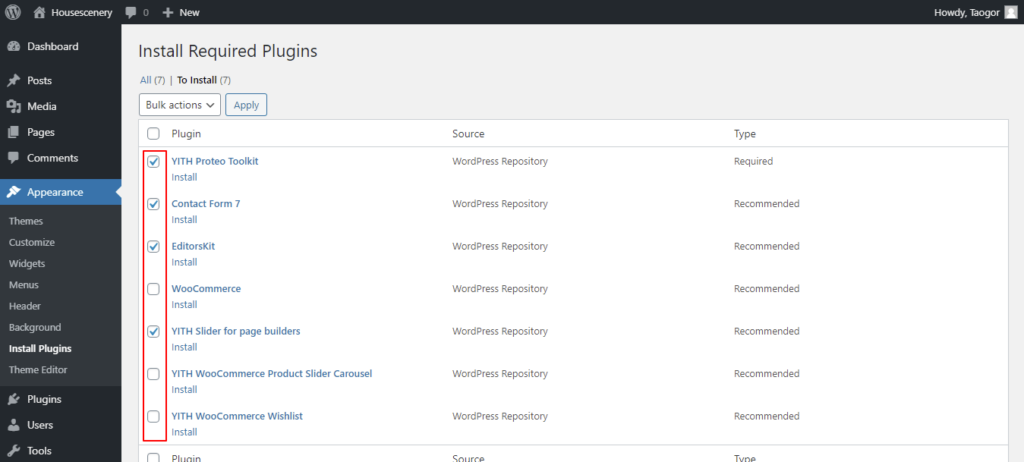
2. Hover your cursor on the Proteo theme, click preview so you can see how it looks, and then install and activate it. Proteo will send you a notice to ask you to install the required and recommended plugins after activating the theme. you just click “Begin installing plugins”, there is a list of 7 plugins as you can see in the below screenshot.
If you are not going to create an online store or e-commerce website, you can install the plugins not related to woocommerce as in the below picture showing.
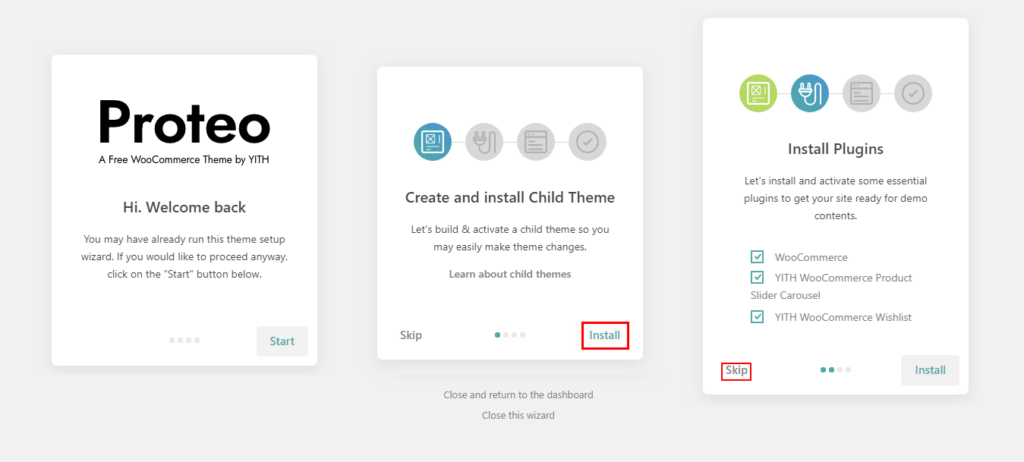
3. After Plugins is installed, there is an option “Theme Setup” in the submenu of Appearance, click and follow the steps,
- Create and install Child Theme – choose install, why do we need a child theme? we may need to change something of the theme when we customize the website, if we don’t have a child theme, the changes will be to the original theme, once the theme is updated, what we changed before will be replaced by the updated theme, we need to do those changes we did before again.
But if we have a child theme, all changes will be to the child one, the updation of the theme won’t affect the child theme, it will only update the original theme. - Install Plugins – skip, we did in the last step
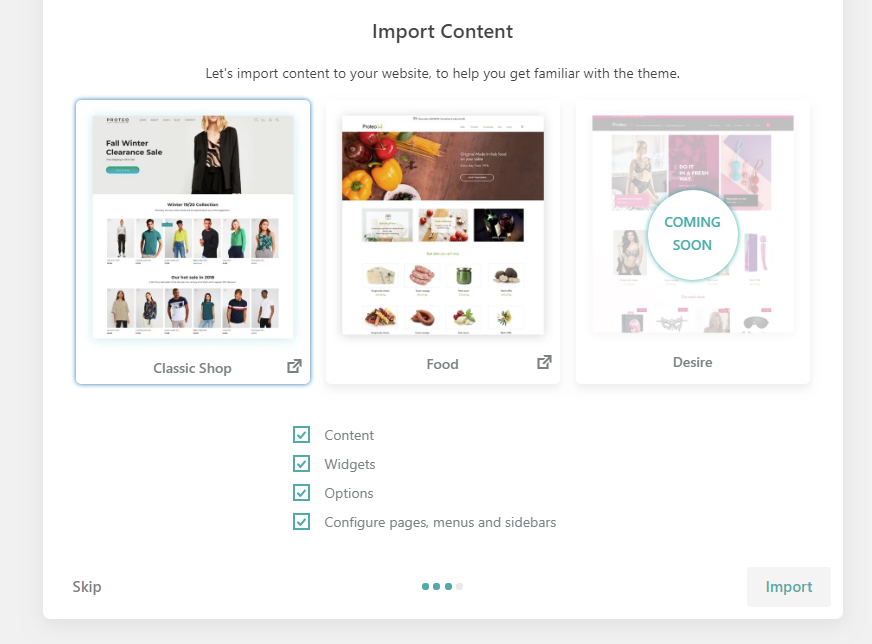
- Import Content – there are 2 choices of the demo for you to import, you can choose any one for importing, we selected the demo of Food. after that, it will take you to your homepage.
✦ Install New Plugins
Actually, we have installed some plugins when installing the theme. It is very easy to install new plugins, which is very similar to installing a theme.
Go to Admin left side menu > Plugins > Add New, we will install the plugin “Classic Editor” as an example, you don’t need to install it, it is an elder editor for you to create posts or pages in the last versions of WordPress, but it is easy to use, many people still prefer the Classic Editor.
Once installed the plugin, you need to activate it, to use the plugins, you need to check the left side bar find the newly installed plugins in the menu, and check their documents, all plugins are different.
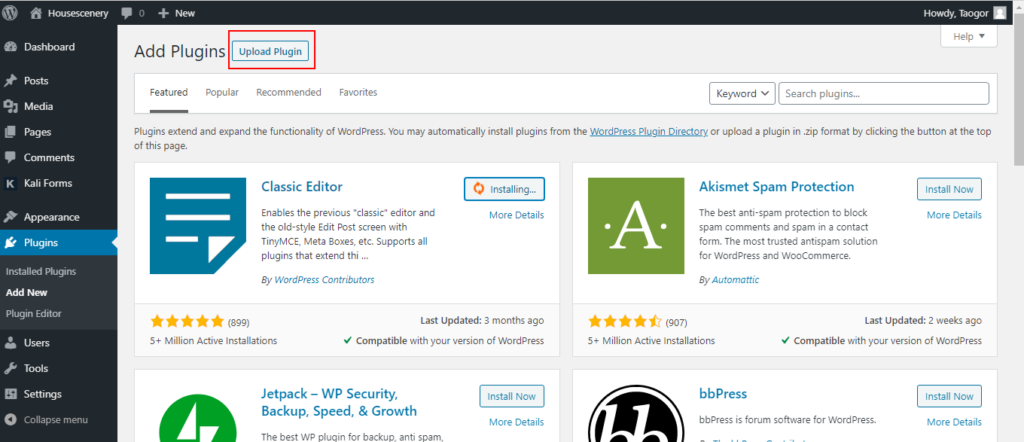
You may see there is a button “upload plugins” after adding plugins, yes, it is like an upload theme, click the button, if you download or buy plugins from other websites, you can drag the plugin file onto the page and install that.
✦ Upload Media Files
Any website will need images or any other media files like video, and documents, adding media is easy with WordPress. You can either upload media from editing Posts and Pages or you can add media directly to the media library, drag files, or select files from your computer to upload.
You can edit the media files by adding the title, alternative Text, a caption, description.
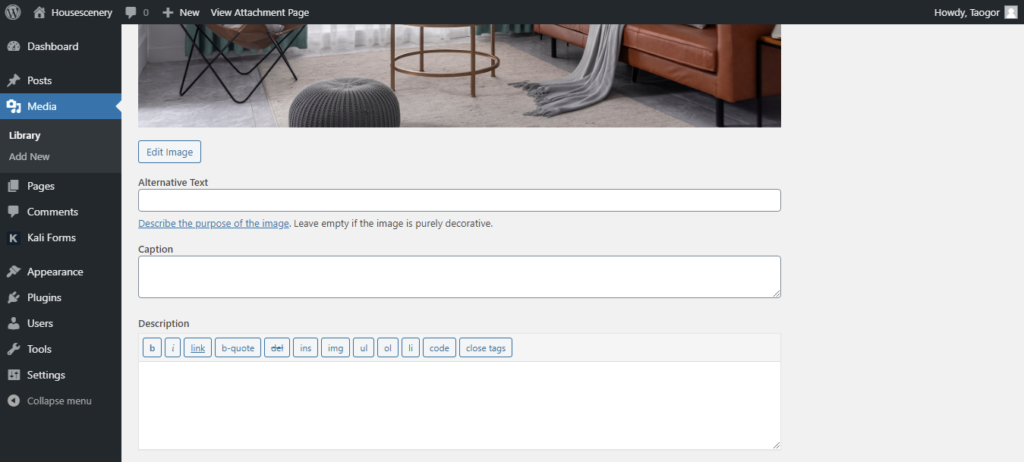
Note: Please remember to only use free or your own images or photos with a license, to avoid any law issues.
✦ Customize Website Step by Step
The next we need to do is to change the settings and customize the website with our own information since the whole website is displayed with the demo contents.
Many beginners may feel a headache when they see the menu, but that’s not difficult, just follow as below full tutorial, and you can make your website online very soon. what we say is creating a website with WordPress helps beginners to run the website online totally with their own information.
Click to check the Full tutorial for how to customize the WordPress website.
Step 6. Add Contents
There were also some pages added to the website when importing the food demo of the Proteo theme, you can check the pages, and if you like the layouts and design, you can keep the pages and modify or replace them pages with your own images and texts for the contents, which may save you some time.
Most of the time, a demo of the theme can help you to create a website with WordPress faster. We recommend that beginners start the website with this method. However, the pages from the demo may not cover all demand, hence, we should know how to create new pages for a website.
✦ Create New Pages (Admin > Pages)
Before creating a new page, we need to discuss the editors of WordPress, the new editor for the latest WordPress is block editor, which is more functional than the Classic editor in the last versions, please read the below tips.
➤ If you installed Classic Editor, you need to change some settings in “Admin left menu > Setting > Writing”. (We recommend you delete the classic editor to avoid unnecessary confusion for any newbies.)
1. Default editor for all users – Choose Classic or Block Editor,
2. Allow users to switch editors – Recommend check on Yes, if you don’t like one of them, you can switch any time.
Pages are basic parts of a website, just like the cells of an organ, displaying different content through different pages, thus making your website richer and more organized. Web pages can be pictures, articles, videos, products, and any content as long as WordPress can do it.
Proteo theme recommends a plugin “EditorsKit”, the plugin adds more features to the WordPress Block Editor, which makes the WordPress Block Editor more functional and powerful.
Go to pages > add new, at first we add a title, such as “About Us”, see the below screenshot.
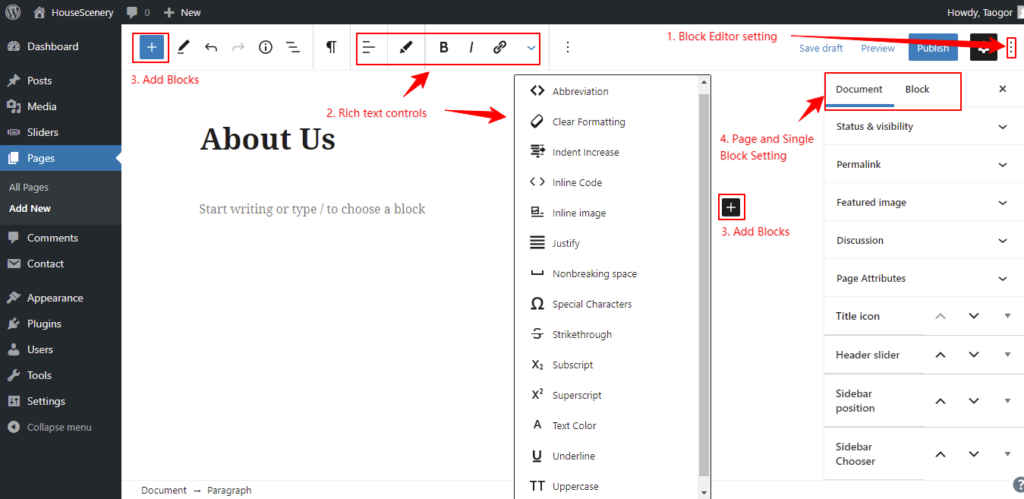
- 1. on the right top, click the editor options button (3 dots), in which you can either switch to full-screen mode without the left admin menu or you can switch visual editor to code editor, but you need to know the HTML code if you use code editor, so we recommend the visual editor for any beginners.
- 2. there is a rich text tool on the top bar, it is like any text editor, you edit the text with a different appearance with the tools.
- 3. you can add blocks to the pages by clicking two plus buttons, one on the top left blue button, and the other in the editor center black button.
- 4. the black nut button on the left of the Publish button is for page settings which includes two tabs, Document and Block.
- “Document” is for page setting, there are many options as below. (there may be new options once you install new plugins).
- Status & Visibility
- Permalink
- Featured image – it mainly is for posts and is used less on the page.
- Discussion – allow comment or not for the post, used less on the page too.
- Page attributes – Parent of the page and order of the page.
- Title Icon
- Header Slider – Choose an existing slider to put on the top of the page but under the header.
- Sidebar Position and Chooser- Choose a position and existing sidebar for the page.
- Header and Footer – show Header and Footer or not.
- “Block” is for a single block setting, you can change the setting of the block that you are editing, that’s a different setting for different block types, when you choose a block you will know that.
- “Document” is for page setting, there are many options as below. (there may be new options once you install new plugins).
Start Editing Pages
We just started a page with the title “About Us” which any website will need to introduce themselves. We will add some blocks and build a simple about page for an example to show you how to create a page.
1. it doesn’t need a sidebar for an About us, so we go to Document > Sidebar Position and choose the option “no-sidebar”.
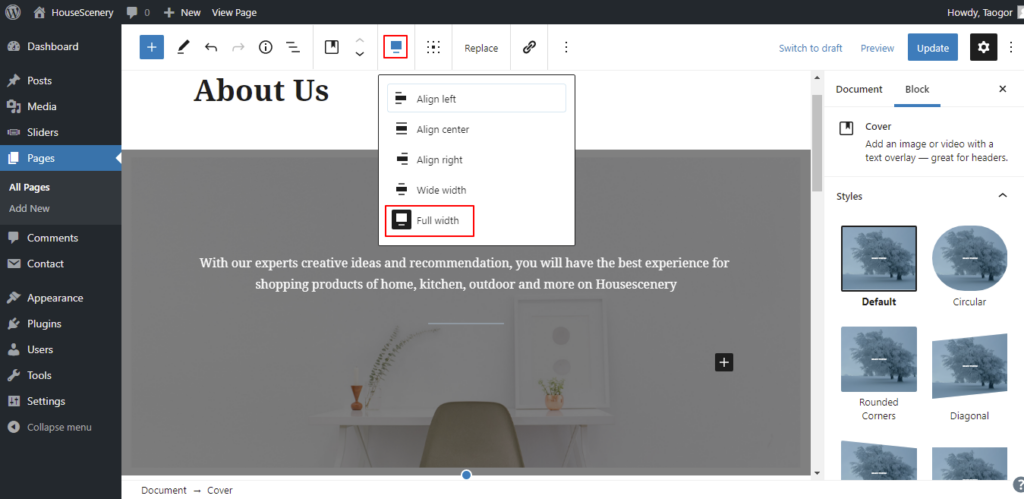
2. Add a block “Cover” as in the below screenshot. As it explains, you can add an image or video with a text overlay, that’s to say, the image and video can be a background on the bottom, and you can add text on the top.
On the top bar, you can change the width and positions of the “Cover block”, we choose full width, that’s the full width of the screen for any device. You can also change and replace the image or video position, and add a link to the block too.
We added 2 blocks on the Cover block, one is a paragraph for text, and the next block is a separator, which is a short line.
3. Go for the next Block, which is Media & Text, it is also very easy to edit, you just upload an image and add some text. in this block, you can change image positions freely and the width of the whole block.
You can add a heading, paragraph, list, and any text blocks, we added a heading and a list, meanwhile, you can edit the colors for text and the block background in the color setting.
Actually, we added 3 blocks of Media & Text, a total of 4 blocks on the page. Displayed information about ‘who we are’, ‘what we do’, and ‘contact us’, this is a very simple page, but the page is very beautiful, you can visit the page to see how it is. You can add ‘your team’, ‘clients saying’, and more details when you create a website with WordPress since we just created this simple page as an example.
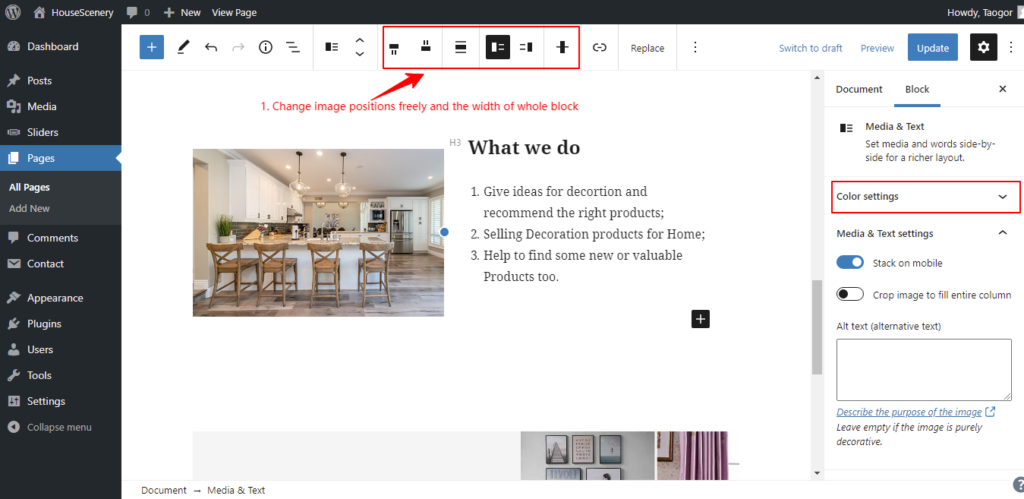
It is also very easy for you to add other blocks and edit or change settings, although they may be different, no need for any coding skills like in our example.
Creating a page is not difficult, the difficulty is showing as rich as the contents. Most websites include the below pages, if possible, you should add these pages to your website:
- About us
- Contact us
- Privacy Policy
- Helps or Supports, if necessary
- Terms (this one can be added in the future)
Besides these pages, you can create any other pages including content of your business, in words, the more content, the more traffic, the more income.
✦ Create New Posts
Technically, a Post is one type of page, more posts can be made up of a blog, and you can do anything on posts as that on pages. But the contents of posts are often journals and articles, so they will contain meta details like date, author, and comments, although pages can contain this information, people won’t do that, Posts can be grouped by Categories and added tags too. that may be the difference between Post and Pages.
How to create a post, just go to Admin > Posts > Add New.
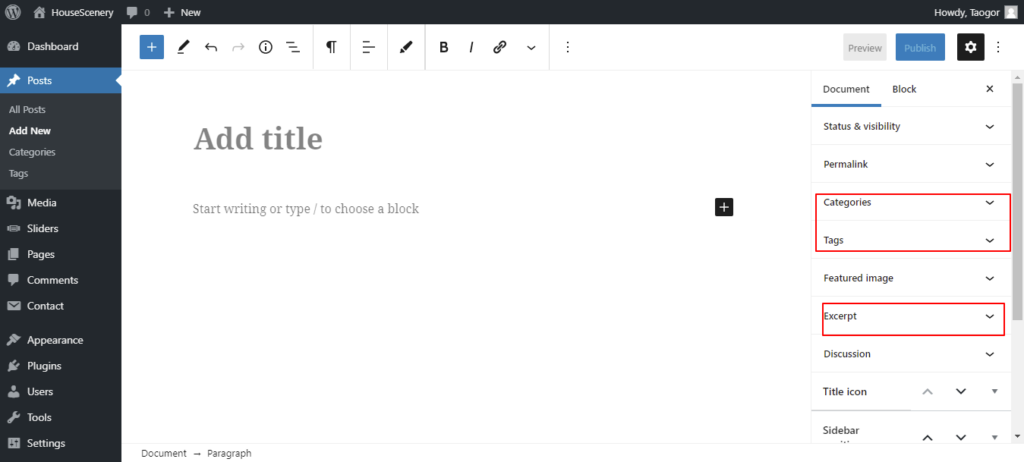
As you can see in the above screenshot, the post editing page is almost the same as the page, but posts can be added Categories, Tags, and Excerpt, editing a post is definitely the same as editing a page, although there are some function from different plugins may not allow in Post, so please read above step.
Categories (Posts > Categories)
In any blog or website that has a blog, more or less, there are groups of posts, a series of related posts, in short, posts with similar content, etc. We will hope to classify them for better management. WordPress posts have This feature, Categories.
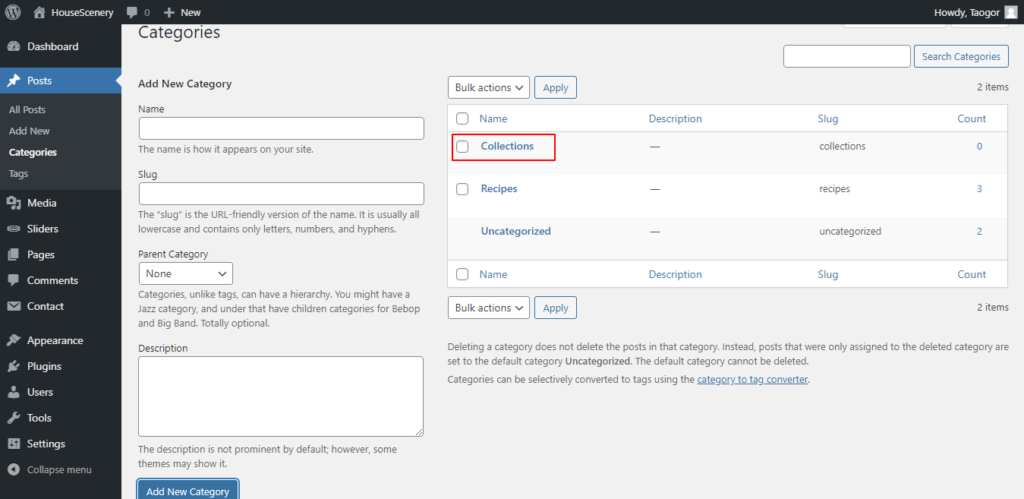
You can use categories to define sections of your site and group related posts. Each post in WordPress can be filed under one or more Categories. The default category is “Uncategorized” until you change it in your writing settings.
Each Category may be assigned to a Category Parent, allowing you to set up a hierarchy within the Category structure. In creating Categories, recognize that each Category Name must be unique.
There are two ways to create a category, you can add a category from Posts > Categories or you can add a new category when you create a new post in Block Editor.
It is a very effective function to classify and manage your content and make the visitor find the related content easily on your website.
Tags (Posts > Tags)
Tags are ad-hoc keywords that identify important information in your post (names, subjects, etc.) that may or may not recur in other posts, Tags have no hierarchy so there is no Parent->Child relationship like that of Categories, but Tags name must be unique too.
Like Categories, you can add tags in two ways, from Posts > Tags or add tags in Block Editor when you create a post.
Both Categories and Tags are for better management and making it is easier for visitors to find the content they want on your website.
Step 7. Build websites for different industries
Different industries and users will need different websites, thus there are many different types of websites. In the final step, we will show you how to create a website with WordPress for 3 most popular types.
1. Start a Blog
As We Mentioned at the beginning of the article, WordPress was a tool born for blogs, So nothing is easier than WordPress on which to create a blog.
What is Blog
The blog is an online diary-type personal website that records life, expresses emotions, or shares information by posting articles, pictures, or videos. Posts are typically displayed in reverse chronological order, so that the most recent or latest post appears first, at the top of the blog.
Set a Homepage
First of all, to set a homepage for the blog, we can go to Admin > Setting > Reading, you can either set the latest posts as the homepage directly or you can create a new page named “Blog” and choose it as the homepage and leave posts page as empty, in this way, the posts page and homepage will be the same page.
If you don’t want the page “Blog” and Homepage to be the same, you can create or choose another page for the homepage and set the Page “Blog” as a Posts page.
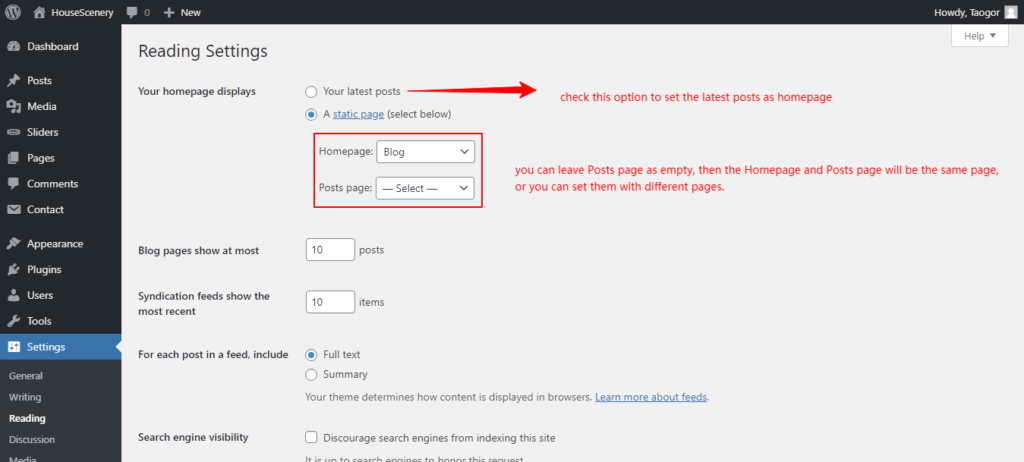
Add New Posts
Once you set the latest posts as the homepage, except to create a new menu for the blog you don’t need to edit or change anything more if you setup all according to our above steps, next what you need to do is add new posts with more contents.
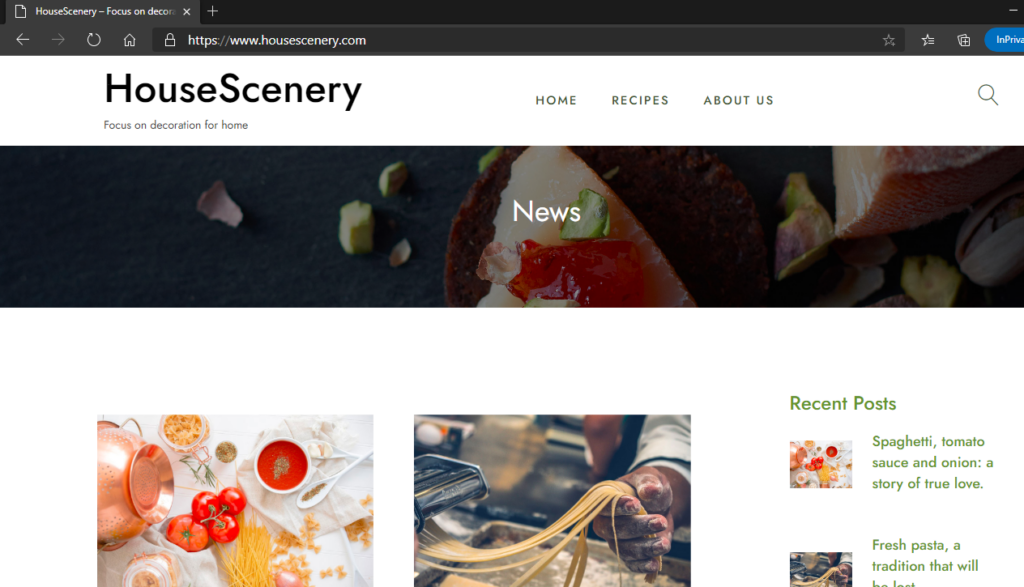
If you create new pages for the homepage and posts page, you just edit those pages and then start to add new posts. We created and set the blog page as a home page, as you can see in the above image it is really simple and beautiful, when we enter our domain in the browser, it shows the blog page directly.
As for how to add new posts, we introduced in above steps.
Make Money
Although a blog was started as an online diary or personal website for sharing information, it is now slowly becoming a content publishing website type. Many people write articles and posts on blogs to promote skill tutorials, share products, and more purposes to increase their income.
- Earn by Affiliate Links – Get commissions once the visitor clicks the affiliate links inserted in your content and buys the products from the links
- Earn ad revenue – Make money each time someone visits your site by displaying advertisements on all your posts and pages.
- Accept donations and tips – Collect donations, tips, and contributions for your creative pursuits, organization, or whatever your website is about.
This is almost all about how to start a blog with WordPress, it is easy for any beginners if you have some niche idea or want to share your skills or whatever just start it.
2. Build an Information Website
There are plenty of websites belonging to an Information website type, for example, Company page websites, Charity websites, News and Magazines, Travelling Websites……and more and more.
Actually, it is a full tutorial from the beginning to the end of step 6, that’s to say, when you read and finished step 6, you should have known how to build an information website. what you need to do is add your own pages or posts with more content.
Of course, you can install some plugins to add more features or functions to your website, like Creating paid subscription options to share premium content like text, images, video, and any other content on your website to earn money
Accept credit card payments via PayPal for physical products, services, donations, or support of your creative work like the next step that we are going to show you.
3. Create an Online Store or eCommerce Website
To create an Online store with WordPress, or an e-commerce website, you need to install some eCommerce plugins, the most popular one is wooCommerce, to save you time and again, you don’t need to consider others, wooCommerce is definitely the best e-commerce plugin for online store on WordPress.
In the article on customizing website, we skipped installing some plugins, that’s for creating an online store, actually, Proteo was created for building online stores.
Install wooCommerce
Now you can go to Appearance > Theme Setup to start the setup again and install the rest plugins, but Do not import anything again in the step “import content”, it will import the demo again and all the content will be duplicated.
After installing wooCommerce, you will find it on the Admin left menu, click it to start a setup wizard step by step like installing the Proteo theme.
Total 5 steps for setup:
- Store Details – your locations and address
- Industry – what is your business for
- Product Types – physical products or download products are free, and other types of products are paid, it depends on you. Most online stores can choose physical products directly, which includes any products that are sold on Amazon.
- Business Details – if you are selling products on any other platform, just enter that, and choose no for not. I’d like to say that you should uncheck the below 3 options below as a beginner, you can add those in the future if your website needs them.
- Theme – of course, the Proteo theme, if you are not using Proteo, you can choose the theme you activated, we don’t recommend using the themes that woocommerce recommends on the theme page.
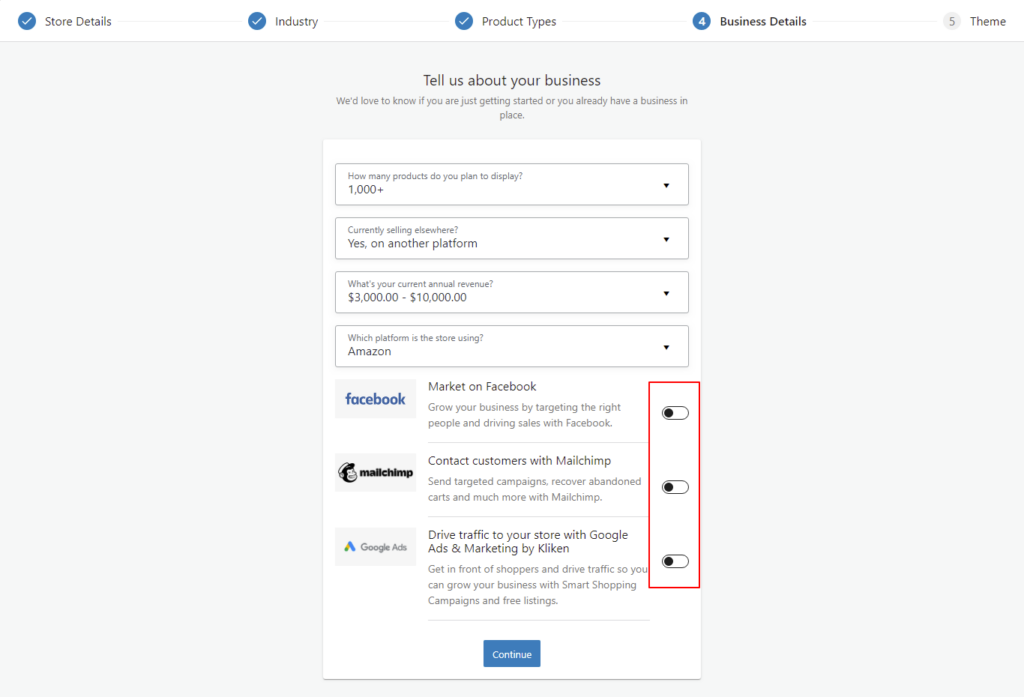
It will show you a welcome page once the setup wizard is finished, you can start to use WooCommerce, but you need to complete some settings before listing your products.
Settings of WooCommerce
Open the submenu of WooCommerce, there are 7 options, but what you need to understand should be the last three. “Settings” is what we need to do in this step; “Status” is displayed with details of the system, database, and web hosting, you don’t need to change anything in this option, but it will remind you what needs to be improved or added. As to “Extensions”, they can be enhanced features of woocommerce like plugins of WordPress.
Let’s go to WooCommerce > Settings to set each item according to your own requirements.
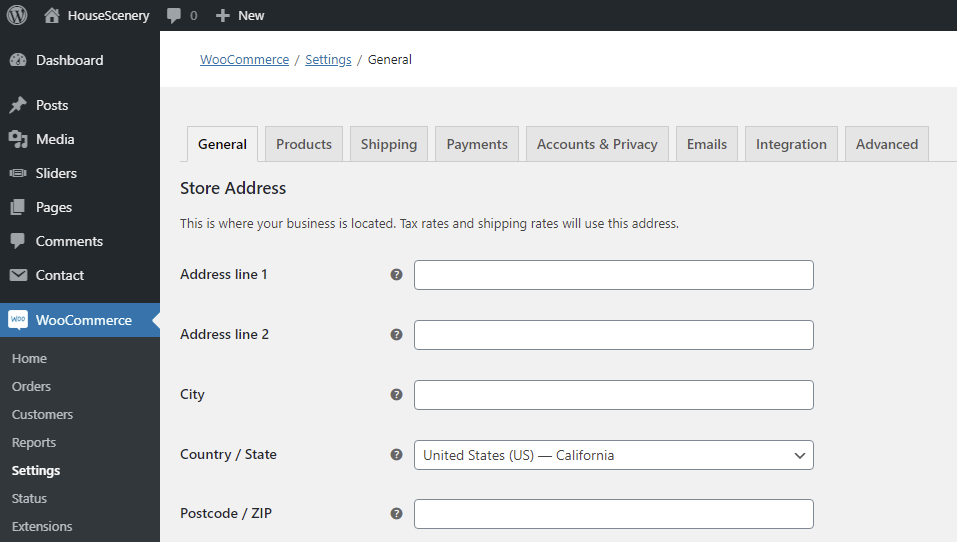
- General – edit the store address where your business is located; you can set currencies and which countries or regions you are willing to sell to, enable taxes and coupons or not in General.
- Products – you can set shop page (all products page), product reviewing and measurement for products, and change some settings of inventory and downloadable products.
- Shipping – you can set different shipping methods for different locations, as well as shipping cost calculation, in addition, it allows you to add shipping classes for similar product types.
- Payments – manage payment methods, including bank transfer, check payment, cash on delivery, and PayPal, for collecting payment by credit card, you need to install some plugins like Stripe.
- Accounts & Privacy – setting for accounts and privacy of customers
- Emails – setting off sending email notifications to you or your customers, you can also edit and manage the email templates.
- Integration – and integration for utilizing MaxMind to do Geolocation lookups
- Advanced – in this setting, you need to do the pages setup: Cart, Checkout, Account, Terms and conditions, these pages need to be set so that WooCommerce knows where to send users to checkout. As for the rest setting in Advanced, you don’t need to know much in the beginning, and you can contact woocommerce support for setting those in the future if you have some questions.
After you enter your information and finish the setting, you can add products to your store now.
Add New Products (Admin > Products > Add New)
Go to Products add new, woocommerce allows you to create product and import products, and start creating products directly since anyone must not have any products for new websites from scratch.
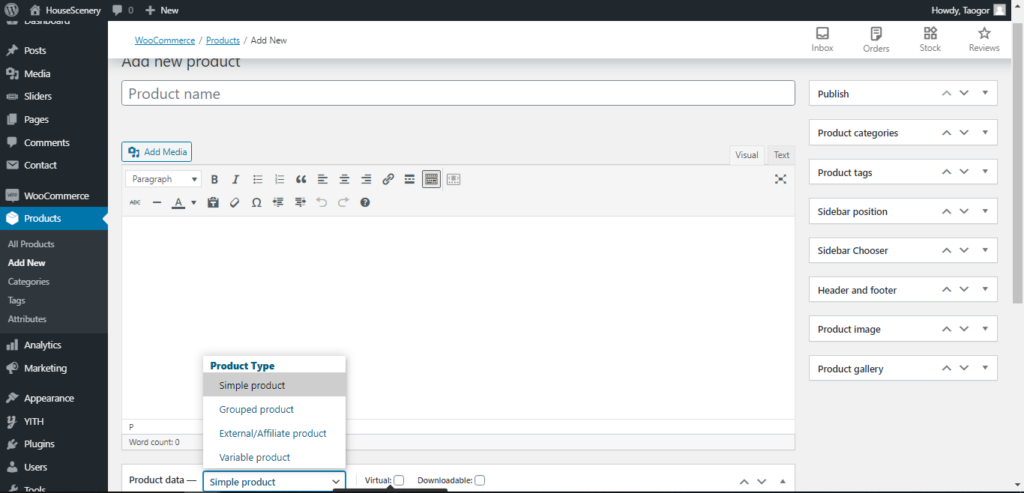
The products editor is actually the classic editor of WordPress we mentioned before. All functions and features are shown clearly.
On the top, you can enter a name for a new product, and then edit the product description in the text editor. Look down, you can see “Product data” in the above screenshot, you can create different types of physical products including simple, grouped, external, and variable products, as well as virtual and downloadable products.
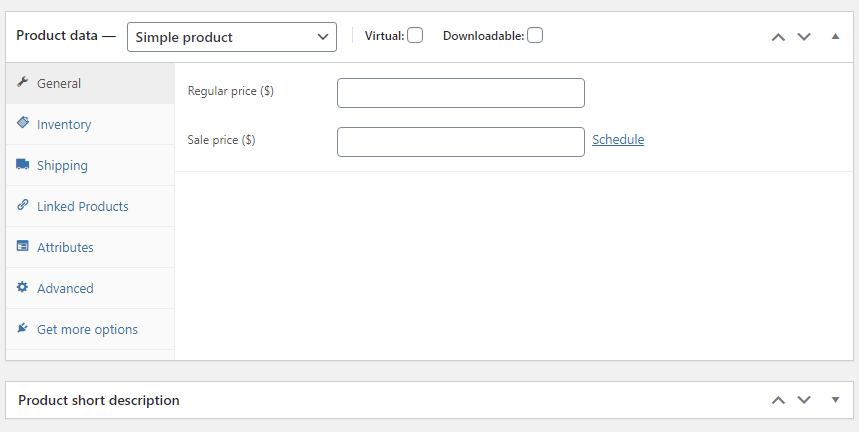
You can edit a lot of options for products, manage inventory, dimensions, and weights for shipping, link-related and upsell products, customized attributes, and advanced options.
In the bottom of the editor, you can add a short description of the product.
There are also a series of options for products, you can add Categories and Tags(it is similar to that for posts,), enable the Sidebar Header and Footer, and most importantly, you can set a primary image for the product and Add product gallery images. Finally, publish your product, and your visitors will see your new products.
Marketing
WooCommerce offers free coupon extensions and some other marketing extensions for you to promote your products, that’s a very useful and powerful tool for any new beginners to get their first order.
4. More Types
For other types of websites like forum, portfolio, photos & video, you can install the corresponding plugins to meet your demands
FAQ
Conclusion
In the beginning, we introduced why WordPress is the best platform for building a website, and then details about how to choose domains and where to buy web hostings, install WordPress, set and customize the website, how to add pages and posts, finally, we show you how to build a different website for different industries.
Although it seems like a long article, it is very simple and easy to understand, we just show more details and hope to help you create a website with WordPress step by step, meanwhile, which should save you much time in the future.
How to use WordPress to build a website from scratch, the tutorials should end here. Just start your websites and enjoy.


