First of all, WordPress should have been installed on the web hosting, if not, please check here to learn how to install WordPress. Once you installed WordPress for your website and have no idea where to start to design and customize the WordPress website, then you are in the right place.
More Related Reading:
- 10 Best Web Hosting For Small Business (in-depth Reviews)
- How To Create A Website With WordPress From Scratch For Beginners – 7 Steps Complete Tutorial
WordPress Admin Menu
To make your websites really running and available for visitors, you need to set up the websites with your own or your business information, the left side menu with sub-menus is available for you to custom your website in WordPress admin, Let us briefly learn about these menus:
- Dashboard – overview of your website situations and control updating of WordPress, themes, and plugins
- Posts – write article and post then publish those online
- Media – the place where the files stored, image, video or other types of files
- Pages – manange and create any new pages
- Comments – comments left by visitors in your pages or posts
- Appearance – manage and control how your websites looks
- Plugins – with plugins, you can add many additional funtions for website, such as adding woocommerce for creating an online store
- Users – users with different authorizations or subscribers
- Tools – site tools like export or import files to your wordpress website or others
- Settings – setting for the dashboard and your websites.
Many beginners may feel headache when they see the menu, that’s not difficult, just follow us, you can make your website online very soon.
Settings (Admin left side area)
We can start from modifying the settings. There are 7 default options in submenu of Setting, what we mainly need to change is General Setting, Reading and Permalinks in the beginning.
✦ General Setting
Every website should have a name or title, it is not domain name, domain name is an address of website, but you can use your domain name as your website tile, where to set your website tile? In “Genenral setting”, see below image.
The “Site Title” is name of the website, enter a name you want for your website tile; You can also write a short description what about your website in field “Tagline”.
We don’t recommend to change the url of wordpress address and site address, leave those as what you previously entered when installed, as well as the Admin Email.
If you don’t want the visitor register to a member of your website, keep the Membership uncheck. For the rest setting, you can leave them as default or change them as you want.
✦ Reading
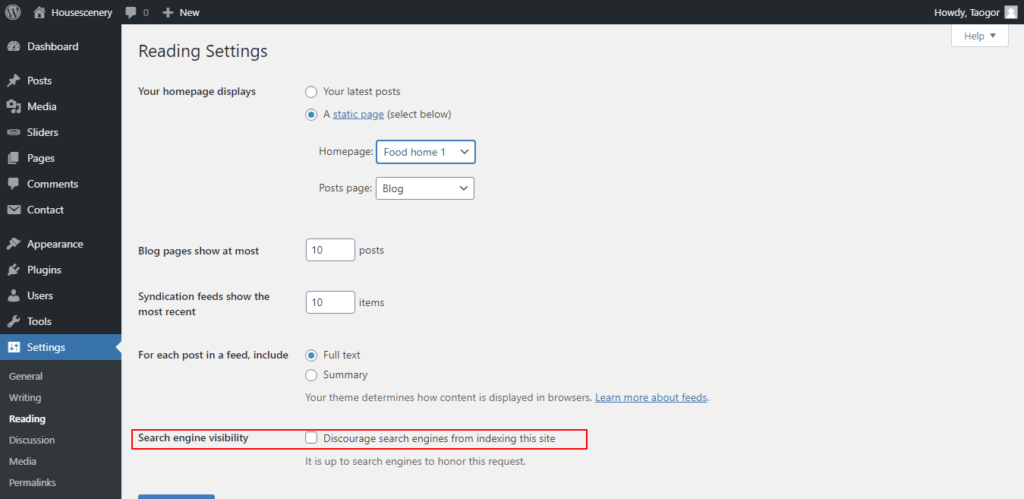
The Reading menu is for setting of the frontend of your website. Here you can choose a page to be your homepage, which is the landing page that the visitor go to your website when they enter your domain in the browser address form, and you can also choose a page for your Posts home page, it is always a blog page.
Look down to the bottom of the Reading setting, you can see a filed “search engine visibility”, it means if you check the field, the search engine won’t find your website temporarily, we recommend you uncheck it if you have a few page for your website, but for online store, you can check it.
✦ Permalinks
Permalinks is an address of a page or a post on your websites, which will affect the SEO(search engine optimization), WordPress give everyone a way to create a custom URL structure for your permalinks and archives, see below image, which show you a recommend setting, you just copy it and save changes.
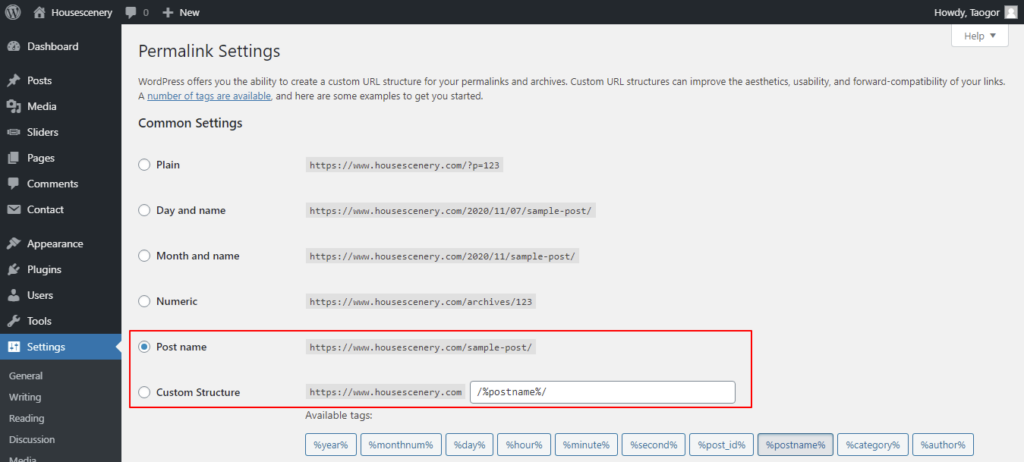
There are some other submenus, you don’t need to change most of those setting, but you can understand them:
- Writing – settings for any users to create a new page or posts, keep that default.
- Discussion – control comments of the posts on your website, keep default.
- Media – Settings for media, like size and upload, keep default.
- Privacy – it allow you to choose a page for the privacy policy, privacy policy is very important for any websites, it including how to protect visitors and users privcy information, you should create one for any website, and after created, change this setting.
- EditorsKit – this is a plugin we just installed after theme with more featuers for wordpress block editor, don’t change anything yet.
Install a Theme
You can Skip this step if you installed theme or you know how to install theme.
Next, we need to install a new theme to make it SEO-friend with the business. A theme is actually a template that presents the appearance of your website. You can easily use it to design your website and make your website more beautiful and friendly to visitors and search engine.
WordPress will offers three themes for any new installation, most of the time, those three themes do not offer some funtions and features for people requirements, the site owner will install cutomzied and 3rd-party themes for their websites. If you just want to create a very simple personal blog, you can use wordpress’ theme direct, but you still need to set up the website with your own information.

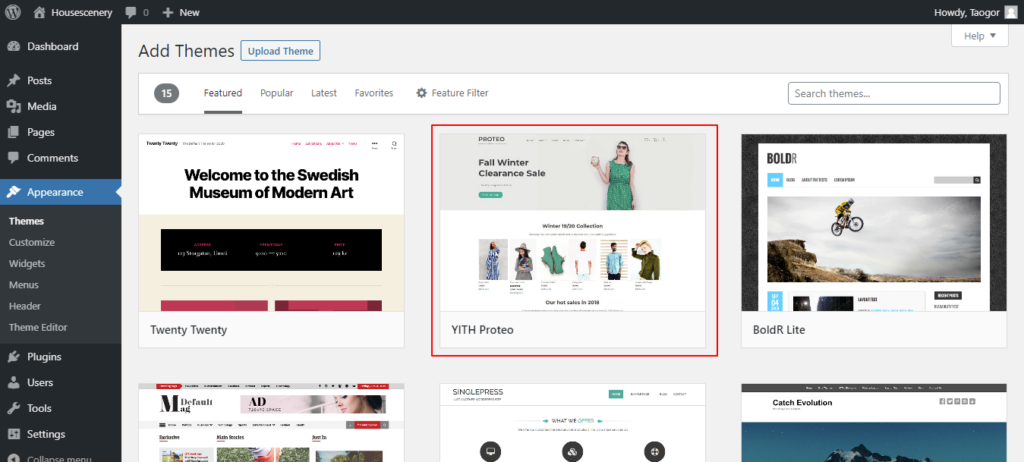
Step 1. put your cursor on meanu “Apperance” on left side bar, choose Theme on the sub menu, you will see page like above image.
➤ Theme from WordPress
click button “Add New”, there are thousands of themes. To save your time again, we recommend the second theme – YITH Proteo as you see, this theme is develped by YITH company, avery famous woocommerce plugin development company. it is totally free and beautiful theme responsive on different devices.
We will call it Proteo in next contents, all settings and customization will be base on Proteo, different theme has different options, but no worries, all of them are similar, even if you change themes, the steps will not be changed a lot.
➤ Upload a Theme
WordPress also allow you to upload a theme, click upload theme, drag a wordpress theme file to the page. WordPress newbies may not have any other 3rd-party wordpress theme. Actually many people will buy a paid theme for more features since the free themes have limited features, and it is not good for SEO if you change theme once you traffic or business is growth. here are 3 most popular theme market you can get a premium theme.
Themeforest belongs to Envato Envato is definitely a biggest theme market not only for wordpress but also for many other website builder, you can check for further requirements.
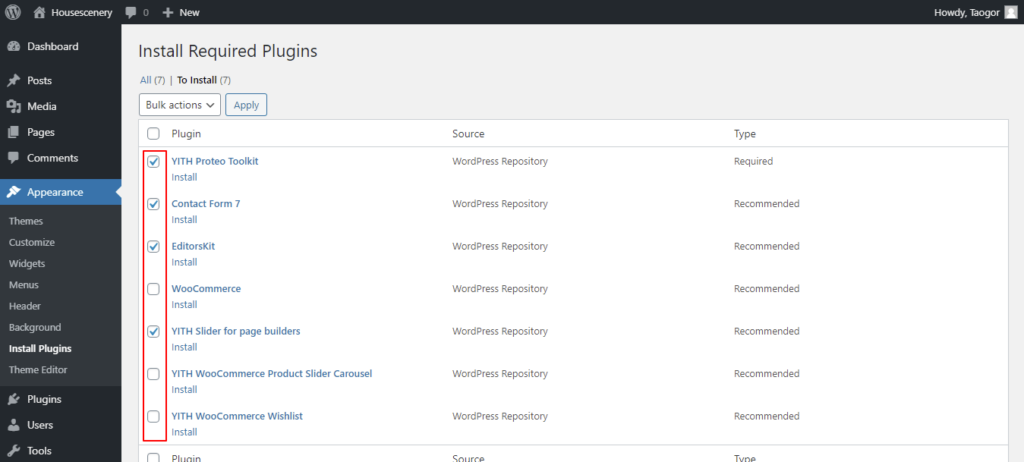
Step 2. Hover your cursor on Proteo theme, click preview you can see how it looks, then install and activate it. Proteo will send you a notice to ask you install required and recommended plugins after activated the theme. you just click “Begin installing plugins”, there are a list of 7 plugins as you can see in the below screenshot.
If you are not going to create a online store or ecommerce website, you can install the plugins not related with woocommerce as in below picture showing.
Step 3. After pulgins installed, there is a option “Theme Setup” in submenu of Appearance, click and follow the steps,
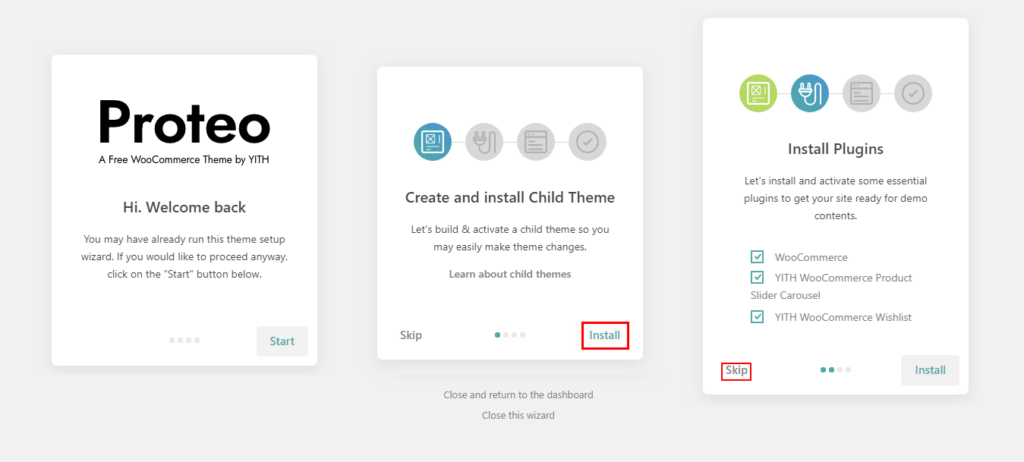
- Create and install Child Theme – choose install, why we need a child theme? we may need to change something of the theme when we customize the website, if we don’t have a child theme, the changes will be to the original theme, once the theme updated, what we changed before will be replaced by updated theme, we need to do those changes we did before again.
But if we have a child theme, all changes will be to the child one, the updation of theme won’t affect the child theme, it will only update the original theme. - Install Plugins – skip, we will install the rest plugins when we need.
- Import Content – there are 2 choice of demo for you to import, you can choose any one for importing, we selected the demo of Food. after that it will take you to your homepage.
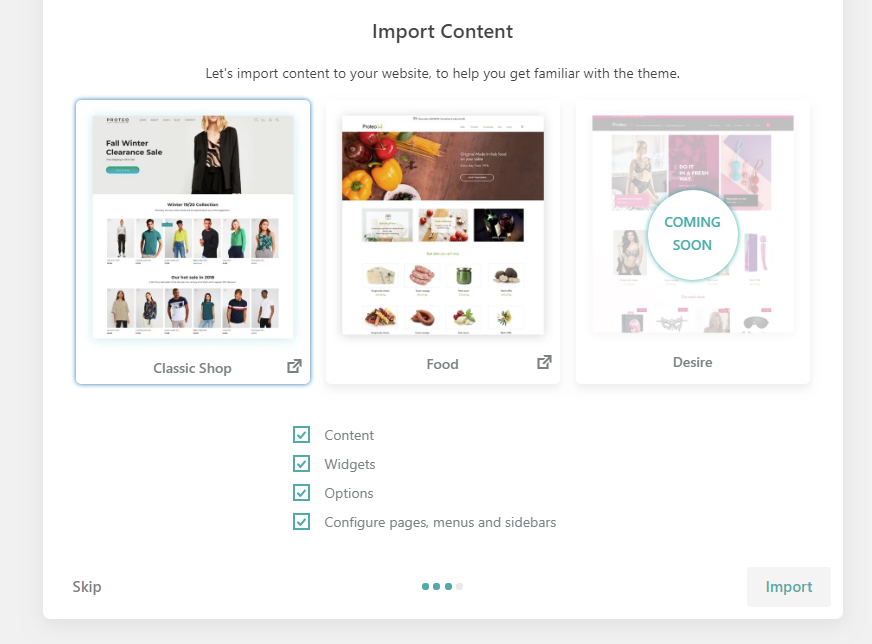
The next we need to do is start customize the website with our own contents since the whole website are displayed with the demo contents, but we hold it on for a moment, let ‘s go to the “Setting” on the bottom of left side menu to set up some information of the website firstly.
Design and Customize WordPress Website
Shift your mouse on left side menu “Appearance > Customize”, it will turn to a page as below:
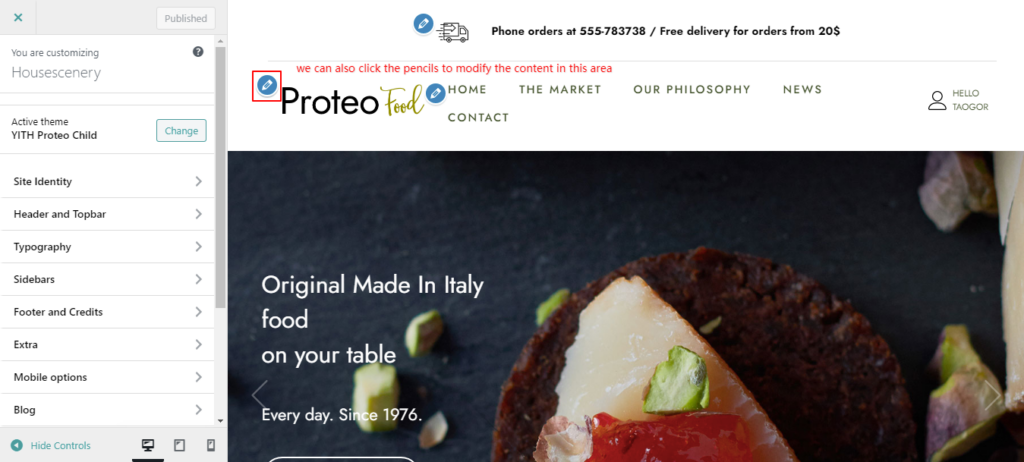
The website is running with activated Proteo theme, so all customization is base on the theme, the options are different for different theme but similar. The left side bar is for your customizing, the right place is displaying your website live. You can also click the pencils in the page to modify contents in the area.
Proteo theme offers theme documentations to guide the users to design wordpress website, you can read it by pulling the scrollbar to the bottom or follow us. Let’s start from “Theme Options.”
✦ Site Identity, Color & Fonts
The first one is Site identity in the customize menu, it allow you set your logo, favicon, site title and site short description, as well as font and color for title and description. you can set your site title and site description in Setting of admin menu, which we mentioned in above steps.
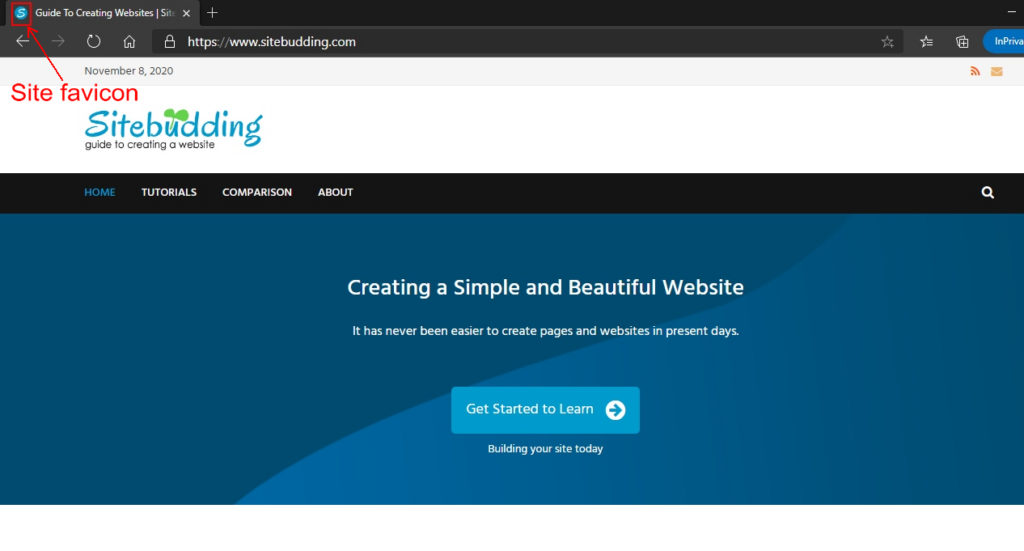
See below image showing where to upload Logo, Site Favicon and customizing colors:
- Logo – A logo is a graphic mark, emblem, or symbol used to aid and promote public identification and recognition (search from google), it will always located on the header of a website, if you don’t upload a logo, it will show the site title as a replacement.
- Favicon (Site Icon) – Favicon is a graphic file or symbol containing one or more small icons, associated with a particular website or web page (from wikipedia), you can see it in your browser tabs or before of the url.
- Color & Fonts – Colors and fonts are the most basic elements of website design, they will directly affect the visitors’ first impression of the website, so choosing a good font with comfortable colors is also very important for the appearance of a website.
Most of the color and font settings are in Typography, you can choose any one from hundreds of google fonts for for your website, you can also change colors for the text, links and heading freely.
and site background and button color setting in option of “Extra”, you can edit colors and fonts for different places like topbar, header and footer too.
✦ Header and Topbar
Header is top most block of a website, most of the time, the visitors will see the header of a website at the most first. Header always includes logo and site name, menu and some other navigations. And Topbar is on the top of Header that you can display notice, deals of website, quickly contact methods, social links or some important information.
You can edit header and topbar in Admin > Customize > Header and Topbar.
- Topbar – enable topbar or not and edit details of topbar
- Header – change layout, font, color of header, enable search, account, cart, sticky header, and so on.
✦ Create Menu (Appearance > Menus)
Menu is quite important to any websites, it is a navgation of the pages and posts or any contents for website, which makes your website readable and friendly to users and visitors, they can find the contents what they want easily with a menu. A good menu can make customers stay on your website longer, you may get more incomes.
You may see most of the menus of websites displayed on header, sidebar or bottom in footer, some themes allow you create and display menu for mobile device. Proteo allows you put the menu on header and menu for mobile device, in addition, you can add menu to siderbars and footer through widgets, please follow us how to change create menu.
There are 2 ways to go for menu creation and structure, but we suggest you go from Appearance > Menus as below image:
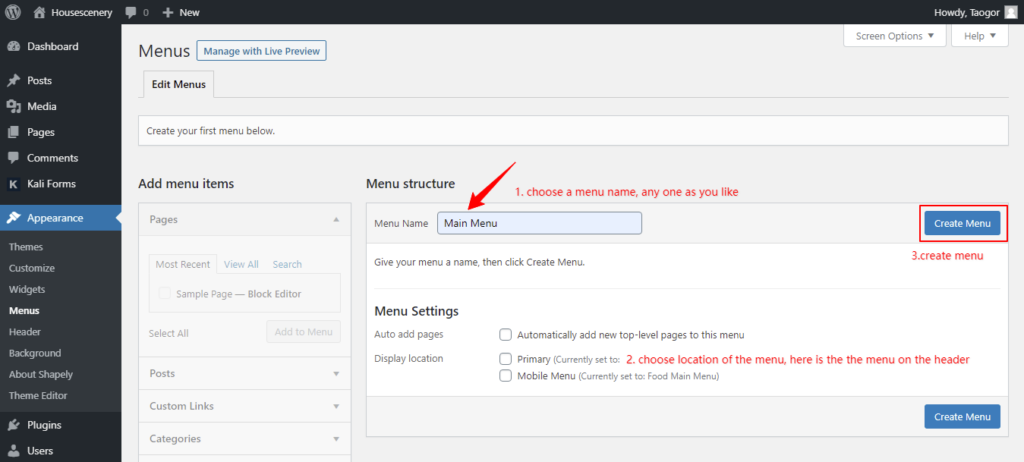
- choose a menu name, any one as you like,
- choose a location where to display menu, Proteo allows 2 locations in menu setting, one is primary on the header left side, the other is mobile menu. And you can add more navigation menu to sidebars and footer through widgets, we will introduce widgets in following steps.
- create menu, then add links including pages, post, categories or custom links to the menu, see below.
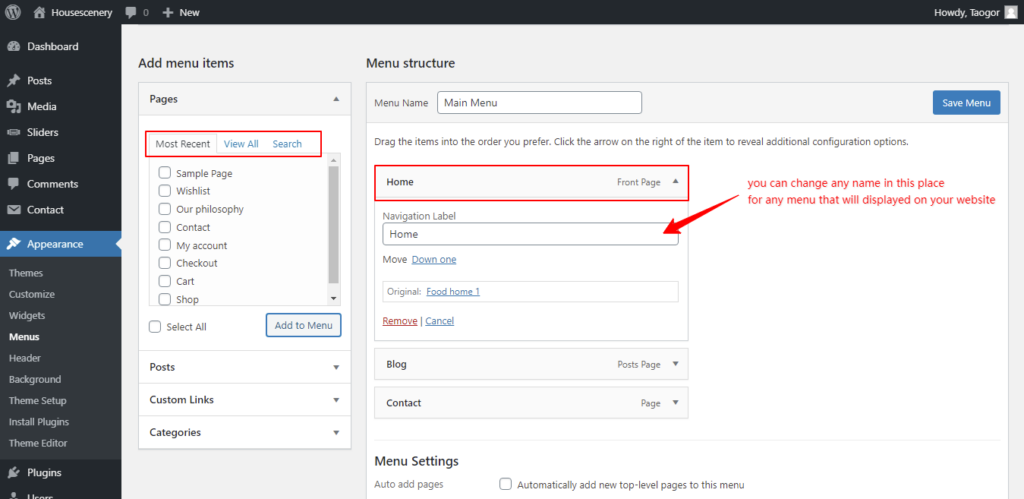
There were already some menus in the menu list when we imported contents, we can select any one to edit or create a new one. As for new webiste, we create a new menu “Main Menu” now.
We don’t create many pages or posts, but we also had some pages when installing theme, so we select and add some pages into the menu. you can change the name for any page which display on header of your website. look at the picture, we changed the front page as “Home”.
Finally, choose locations, both primary and mobile”, then “save menu”, you can visit your website to see if your menu placed correctly.
✦ Widget (Appearance > Widgets)
Wodrpess has many wonderful features, Widgets are one of them, they are a couple of modules or block or pieces of websites that you can add a certain funtion, but that’s not a plugin. Most of time, a widget is always placed at header, sidebar, footer in your website, but some themes allow to load the widgets at different places, which depend on how the design.
There are 2 ways to enter into the setting and management of widgets, one is from Appearance > Customize > Widget, the other is from Appearance > Widgets directly, we sugget the second one.
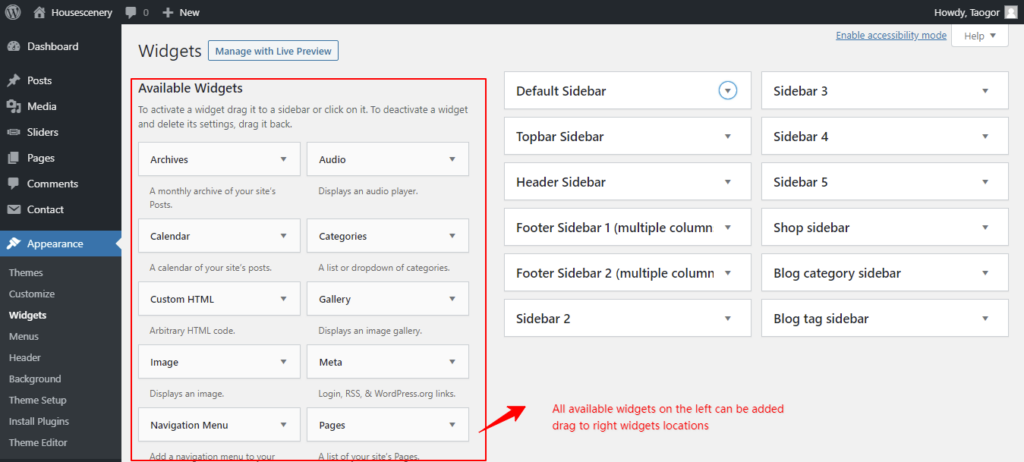
See above screenshot, the availabe widgets on the left can be added or drag to right widget locations including sidebar, Topbar, Header, footer area and customized shop and blog sidebar. there are some widgets has been added to sidebars when installing theme.
The widgets inside the widget locations can be drag and drop to any places in a different order, you can delete any one if you don’t need that, each widget can be managed separately.
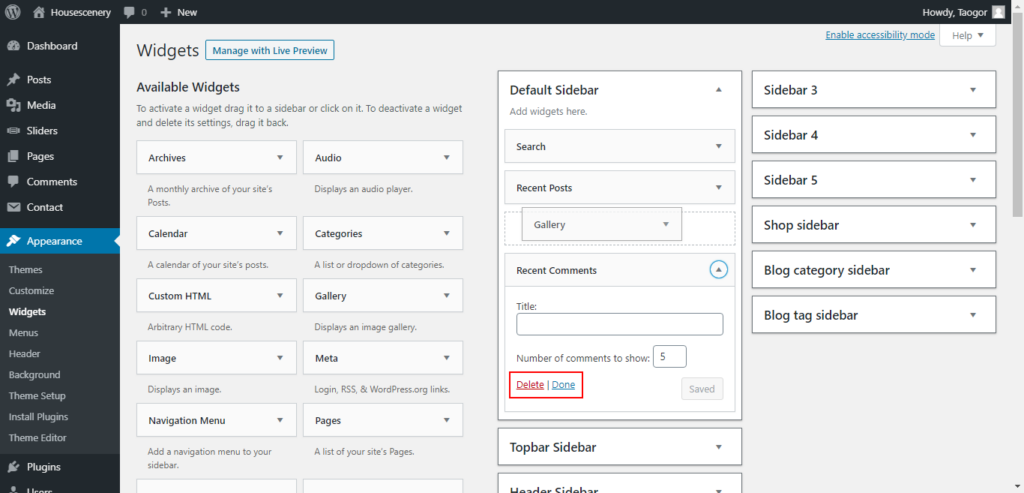
Widgets are a very useful tool for create a website with wordpress and it is not very difficult, you only need to have a trail and you will know, we will try to add a widget in the footer area in next step to show you how it works.
✦ Footer
In contrast to the header on the top, the footer is on the bottom of websites. both of them are Indispensable to any websites. A lot of information can be displayed at the footer, including but not limited additional links, a short about or contacts, gallery, subscribe forms, copyright, social links, credits / payment icons and more.
There are two parts of footer you can customized, main contents of footer and copyrights/credits area on the bottom of footer.
1. Go Appearance > Widgets > Footer Widgets 2 areas for Main contents of footer, let’s add some simple text in Footer Sidebar (I think it will be more understandable if the theme give name “Footer Widgets”),anyway, you just need to know footer sidebar can be added widgets, that’s great.
As you can see there are Footer siderbar 1 and 2 in below screenshot, Proteo theme divided this area as 5 columns, Footer Siderbar 1 is for first column from left, and Footer sidebar 2 is for the rest 4 columns.
- Each widget in Footer siderbar 1 can be one row;
- And each widget in Footer sider 2 can be one column, once you add 5 widgets in Footer sider 2, it will create another row.
✻ Most of time, 5 columns are good for any websites, that’s to say, you can only add 1 widget in Footer siderbar 1 and 4 widgets in Footer siderbar 2.
Let’s delete all the widgets in the Footer sidebar and add an short about “Housescenery” into the Footer sidebar 1. And we create 2 new menus “Company Info” and “Deals and Slaes” from Admin > Munus, then add these menus into the Footer siderbar 2 too, see details in below screenshot too.
➤ You may delete part of widgets not all widgets, in Footer sidebar like us, you can replace some information to yours. We just want to make this article more clearly so delete all of them.
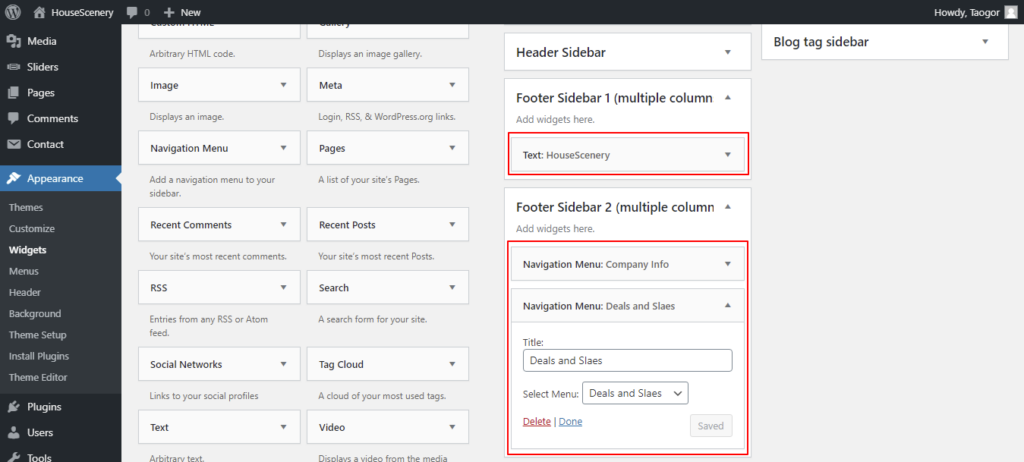
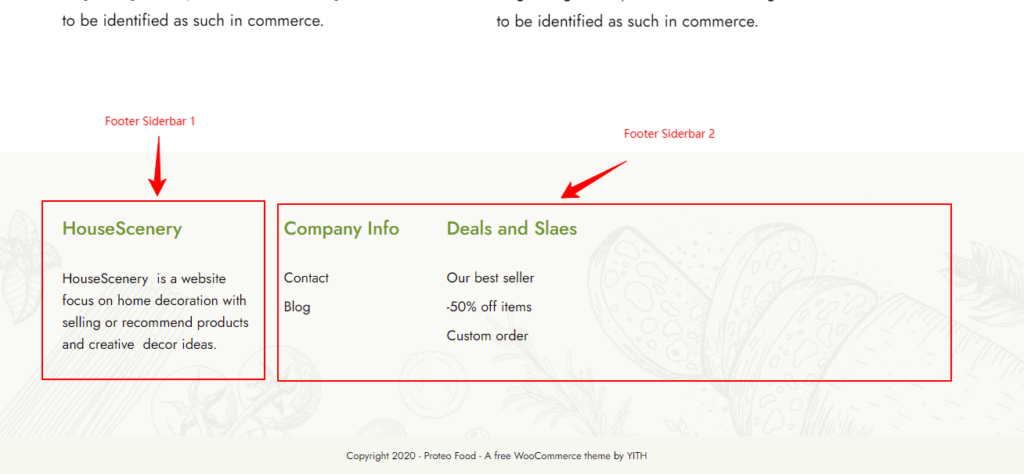
You can see the text we added in the footer displayed correctly in the first column and menus in the second and third columns, just have a trail to add your other information in footer area like this.
2. The bottom of most footer will show copyrights and credits details, you can change and enter your own information in this area, the information can be some html code too, for newibes, you just enter text. Go Apperance > Customize > Footer and Credits, enter the copyrights of “Your Domain or Your Brand” and publish, in addition, you can edit the footer fonts and colors in this customize option too.
Install New Plugins
Actually, we have installed some plugins when installing the theme. It is very easy to install a new plugins, which is very similar like installing theme.
Go Admin left side menu > Plugins > Add New, we will install plugin “Classic Editor” as an example, you don’t need to install it, it is a elder editor for you to create posts or pages in last versions of wordpress, but it is easy to use, many people still prefer the Classic Editor.
Once installed the plugin, you need to activate it, as to use the plugins, you need to check left side bar find the new installed plugins in the menu and check their documents, all plugins are different.
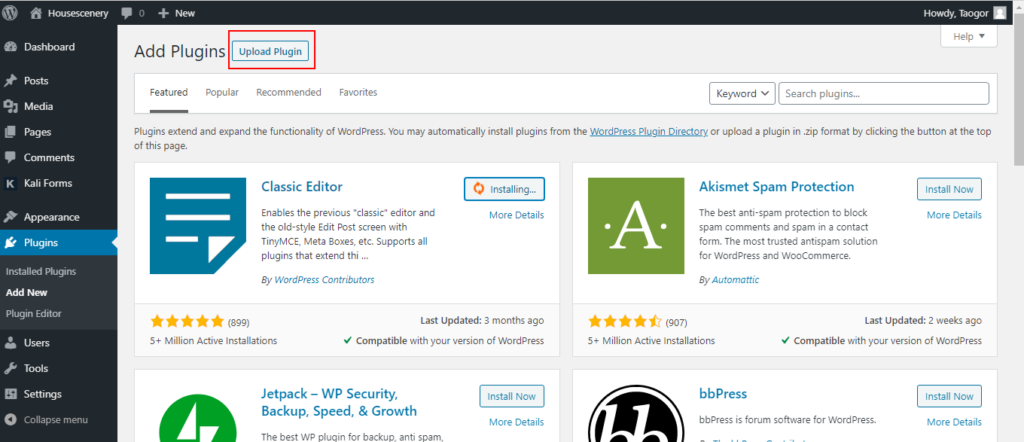
You may see there is a button “upload plugins” after of Add plugins, yes, it is like upload theme, click the button, if you download or buy plugins from other websites, you can drag the plugins file into the page and install that. check some excellent plugins on Envato for wordpress.
Upload Media Files
Any websites will need images or any other media files like vedio, docments, adding media is easy with WordPress. You can either upload media from editing Posts and Pages or you can add media directly to the media library, drag files or select files from your computer to upload.
You can edit the media files by adding the title, alternative Text, a caption, description.
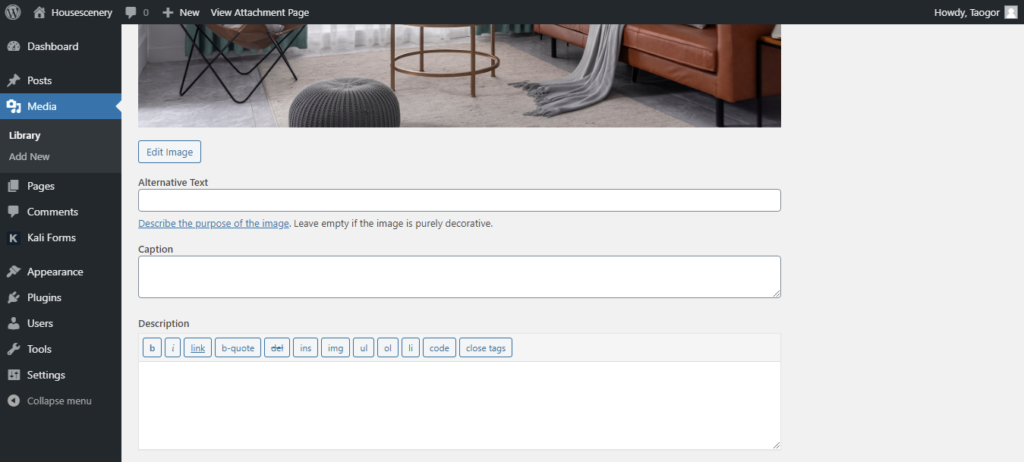
Note: Please remember only use free or your own images or photos with license, to avoid any law issues.
Other Options
✦ Users
In the menu of users, you(the Administrator) can manage all users of your wordpress website, Add new users, edit and delet users. You can add new users in almost 5 roles, Different users have different permissions, Administrator can manage all users.
- Administrator
- Editor
- Autor
- Contributor
- Subscriber
✦ Comments
In this part, you can manage the comments that the visitors leave in your website.
✦ Tools
WordPress offers some extra tools for users to manage the website’s data, all the tools you need to install if you want to use them, most of the time you don’t need to change anything in this part unless you really need to use them.
There are some extra options or menus from themes and plugins, You need to complete the setup according to their instruction documents.
That’s it. After you finished the customization and settings, what you need to do is add contents to you websites or create website type as you want like online store, forum…etc.
Conclusion
You can find almost all the setting and options for customiziation for wordpress In this article, whatever themes you installed, you may follow this tutorial to make your website beautiful and worable online.

